Crossfade Editor
In the Crossfade Editor you can conveniently and efficiently edit all aspects of a crossfade. Select the object you want to crossfade into in the VIP and open the crossfade editor with .
Keyboard shortcut: Shift + F
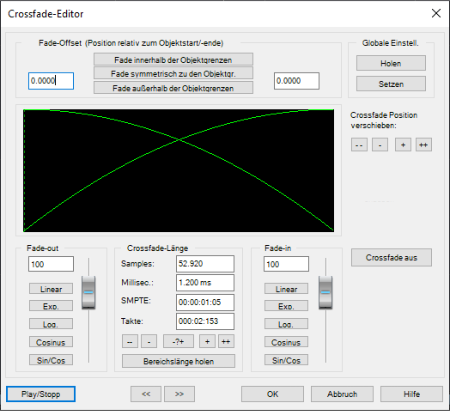
Crossfade Length: The length of the crossfade can be set in varyingly large steps. Clicking the "+" / "-" buttons increases/decreases the length in small steps, the "++" / "--" buttons in larger steps. Use the "-?+" button to customize these step effects as needed. The crossfade length can also be defined by a selected range in the VIP by clicking on the "Get range length" button in the "Range" menu. This range has to be selected before opening the Crossfade Editor.
Fade-in/Fade-out: Different curve types are available for the crossfade:
- Linear
- Exponential
- Logarithmic
- Cosine
- Sine/Cosine
The faders can still be used to change the curves in the corresponding available range. Linear curves require less computer power than non-linear.
Caution: The fade-in/fade-out settings in the Crossfade Editor also affect the selected object if it does not overlap another object.
Global settings: Set
The current settings are defined as preset. This is useful, for example, if you split an object with the "T" key and want to create a crossfade between the two objects. When opening the Crossfade Editor, the specified settings are set as default.
Global settings: Get
Use this button to get the presets of the Crossfade Editor.
Get range length: The range length of the range selected in the VIP is set as the crossfade length.
Fade Offset: Here you can specify how much of the fade should be outside of the object border. Usually, the entire fade can be found within the borders of the object, that is, the fade starting point is at the start of the object (0%) as is normal with fade ins/outs of individual objects. If the fade becomes part of a crossfade, it may be necessary to modify it. If, for example, the second object starts with a drum beat, it would be better to execute the crossfade beforehand in order to keep the "attack" of the drum beat.
The value can be changed from 0% (fade within the object borders) to 50% (fades symmetrical to the object borders) to 100% (fade outside the object borders) – the object is then lengthened by the percentage of the fade length. The "actual" beginning of the object is displayed as a dashed line.
With a fade offset of over 0%, make sure that the corresponding audio material is available in the wave project, otherwise it may be the case that an object with a modified fade offset cannot be faded in or out. If, for example, the object starts at the exact beginning of the wave project, you will no longer be able to crossfade if the fade offset is above 0%.
Crossfade off: The "Crossfade off" button deactivates the crossfade of the selected object. The fade out time of the first object is set to 0.
Play/Stop: This button starts playback in the selected range or at the play cursor position.
Move crossfade position: The end of the first object and the end of the second object are moved together. The ++/--/+/- buttons are used to set the crossfade length.