Vocal Tune
The Vocal Tune effect can be used to edit the pitch progression of an audio object. On the one hand, it is possible to rebalance "distorted” vocal passages. Depending on what you want, this can be as inaudible as possible or even drastically distorted.
It is also possible to completely change the melodic line into a piano roll (see MIDI Editor).
To customize the pitch correspondingly, the original pitch of the audio material must, of course, be known. Fundamental to the functionality is therefore a preliminary pitch analysis of the material. This is basically only for tonal, monophonic audio material like solo vocals, solo instruments, and speech. Polyphonic material, effects such as reverb or chorus and background noises do not provide good analysis results.
The analysis function starts automatically when the vocal tuner is opened. For larger objects, the analysis can take longer. After the analysis the audio object is divided into individual slice objects according to the detected pitches; a slice object corresponds more or less to a sung note. If the pitch deviations within a note are too large or the audio material contains noisy components that interfere with the analysis, this also results in two or three slice objects per note.
|
|
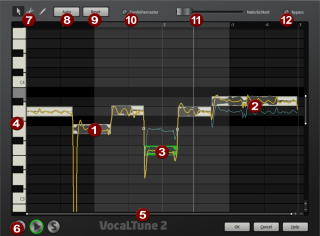
Slice Object: The mid pitch of a slice object determines its position in the graphic independent of the set progression of the pitch inside the slice object. |
|
|
Pitch Curves: The resulting pitch progression is displayed with a yellow pitch curve. The original pitch progression is displayed as a blue curve. |
|
|
Selected Slice Objects can be edited with the Move Tool. (see below) |
|
|
The vertical axis is the pitch, the corresponding notes are displayed as a piano keyboard on the left border. Individual keys can be removed from the pitch grid (see below) by clicking on them (displayed in gray). |
|
|
Similar to the arranger, the displayed time section or the pitch range can be controlled with the +/- buttons and the scroll bar. |
|
|
The play and stop buttons at the bottom left can be used to start and stop the playback of the project. S causes the audio object to play solo in the Vocal Tuner. |
|
|
Tools for editing pitch (see below) |
|
|
„Auto” Automatic pitch correction |
|
|
„Reset” removes all edits and returns all settings to their original status. |
|
|
Activates the pitch grid for automatic pitch correction. |
|
|
The Naturalness slider sets the intensity of the automatic pitch correction |
|
|
„Bypass” temporarily deactivates the effect |


Editing Pitch
There are three tools available for editing pitch:
|
|
Move tool: You can use this tool to select slice objects for the editing by simply clicking on them. |
Ctrl+click enables the multiple selection of individual slices. Clicking on an empty area of the editing window and dragging a selection frame is another method for selecting several slice objects simultaneously. Selected slices can then be moved vertically, i.e. moving the pitch.
|
If "pitch grid” is active, the slice objects always snap precisely to the semitones of the chromatic scale. |
|

To limit the snap function to specific keys (e.g. G minor) individual notes on the piano keyboard can be deactivated by clicking on them. The slice objects will then snap to the next "allowed" semitone.
On the borders of the slice objects two handles are created on the pitch curve. These handles can be moved in order to produce an increasing or decreasing pitch characteristic while retaining the small changes in the basic frequency (vibrato).
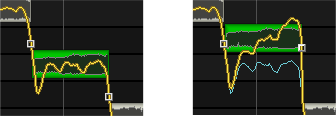
The handle at the end has been moved up to create a rising pitch progression. The small pitch fluctuations remain intact.
Double-clicking on an individual pitch slice makes it possible to enter the pitch more precisely in a +/- cent deviation from the corresponding semitone.
|
|
Cut Tool: You can use this tool to cut slice objects and create two slice objects that can be edited separately. This does not affect the pitch of the slice object. |
It is possible, however, that a slice moves when cutting because the pitch of a slice displayed is only ever an average value across the total pitch progression within the slice.
|
|
Draw Tool: This tool can be used to directly draw the pitch curve. If you hold the Shift key while drawing, a straight line will be drawn between the start position of the drawn curve and the current mouse position. |
If a pitch curve extends beyond the borders of a slice object, the two slice objects will be joined together.
Automatic Pitch Correction
The "Auto" function for automatic pitch correction can be found beside the draw pitch function. The Auto button moves all selected slice objects to the next semitone.
Single notes can be deactivated by clicking on their respective keys on the piano keyboard. The will result in the note being moved to the next available semitone during the correction process. This makes it possible to limit the automatic correction to specific notes in a key.
The "Naturalness" slider determines how much the original pitch progression is retained. With small values, the natural vibrato of the voice is radically "flattened” and the famous "Cher effect” results.