FFT Filter
The FFT filter is used for precise, linear-phase filtering of signals.
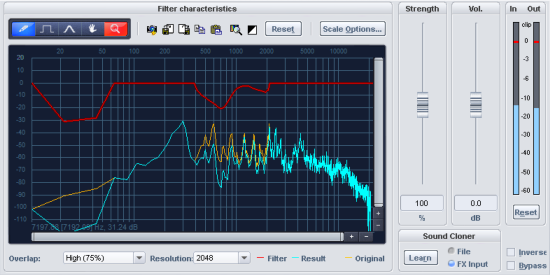
The graphical view shows 3 curves, the vertical axis shows the volume in dB, while the horizontal axis shows the frequency in Hertz or the pitch in notes. The yellow curve represents the frequency response of the input signal, the blue curve the frequency response resulting from applying the red filter curve.
Drawing tools: You can edit the red filter curve in the graphical view with the drawing tools during playback and immediately hear how the sound of the edited audio signal changes. By clicking the left and right mouse buttons on the symbols, you select a drawing tool for each of these keys

|
|
Pen for free-hand drawing: This tool allows you to draw any curve you need. Hold the "Shift" key down to draw straight lines. |
|
|
Pen for quantized drawing: Use this tool to draw stepped filter curves; the quantization steps depend upon the set resolution. If you hold down the Shift key, you will draw straight lines. |
|
|
Bump tool: Click with this tool above or below the curve to bend the curve/frequency area. The further away you place the bump tool from the curve when clicking, the wider the deformed curve area becomes. This effect can be intensified by simultaneously holding down the Ctrl key. |
|
|
Navigation tool: With the navigation tool you can move the visible section vertically and horizontally once you have zoomed into the display. |
|
|
Magnifying glass/zoom tool: Click the mouse to zoom into the display. Click and drag to expand an area, which is then displayed as a zoom area. |


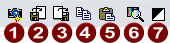
Next to the drawing tools are buttons for actions with the filter curve as a whole:
|
|
Snapshot: The real-time display of the spectrum is paused and a still image is displayed. |
|
|
Save: Save the filter curve in a text file. |
|
|
Load: Load the filter curve from a text file. |
|
|
Copy: Copy the filter curve as text data to the clipboard (keyboard shortcut: Ctrl + C). |
|
|
Paste: Paste the filter curve from the clipboard. Use these commands to transfer a filter curve between different instances of the FFT filter. |
|
|
Analysis tool: Creates a filter curve by spectral analysis. For this purpose, audio material is analyzed from the current track starting from the playback marker position. You can then save this filter curve and use it to filter the frequency response of another object. |
|
|
Invert current filter curve: This inverts the current filter curve. This function allows you to correct the frequency response of rooms or speakers, for example. |


Reset: This button resets the curve of the FFT filter.
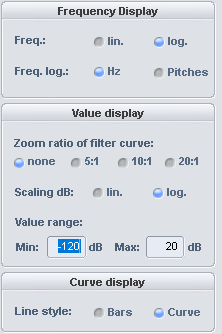
Scale options: Options for displaying the filter curve.
|
|
|
-
Curve display: The curves can be displayed roughly as bars or as interpolated curves.
Overlap: This parameter controls the overlap of the time windows for the calculations of the spectrum. Higher values improve the result, but also increase CPU load.
Resolution: With this parameter you can select the internal resolution of the algorithm. Higher resolutions do not automatically mean better results - the optimal setting depends on the audio signal.
Strength: This controller pinches or stretches the filter curve. This is especially necessary if the filter curve was created by analysis or the Sound Cloner function (see below ). Then use this slider to control the amount of correction to the frequency response.
Vol.: With this control you can adjust the level behind the filter. Use the peak meters for In and Out.
Inverse: Reverses the effect of the filter, only the frequencies removed by the filter are then reproduced.
Bypass: This allows you to temporarily disable the effect in order to compare the unprocessed signal with the processed signal.
Sound Cloner Function
With the Sound Cloner feature you can determine the sound characteristic of a selected object and transfer it to another one. To do this, first determine a spectral image of the object that you want to use as a sound template and save it as a Sound Clone Preset. After that you can apply the Sound Clone to other audio material.
The filter curve of a Sound Clone preset is not taken directly into the FFT filter, but the target audio material is also analyzed and then a combined filter curve is generated that matches the spectrum of the target audio material to the spectrum of the Sound Clone preset.
-
Load audio material whose sound you want to use as a reference. Set the play cursor to a position representative of the desired sound spectrum.
-
Load the FFT filter as an object effect.
-
Now click on the button Learn.
With the options File or FX-Input you can determine whether the unprocessed audio material of the audio file is analyzed or the input signal of the FFT filter is used. Effects that lie in the object before the FFT filter are included in the analysis in this case. This way you can further edit the sound before analyzing it, e.g. with an EQ.
-
After the analysis is complete, a save dialog opens. Save the newly created sound clone under a meaningful name (e.g. Late 50s Jazz).
-
Now select the object whose sound is to be adjusted and load the FFT filter here as well. Also place the play cursor at a position that is representative of the object's sound spectrum.
-
Now select the Sound Clone preset. The sound spectrum of the object is adjusted to the sound of the Sound Clone preset using the filter curve.
Use the Strength slider to control the intensity of the sound characteristic transmission.
The FFT FiIter can also be operated as a track or master effect as a sound cloner. It is always important to remember: the play cursor and the selected track determine the audio material that is the basis for the analysis of the sound spectrum, both when creating the Sound Clone preset and when loading the Sound Clone.
Preset is 20 seconds of analysis, you can also set the length individually by selecting a range over audio material.
The menu Presets contains, in addition to the created Sound Clone presets, a number of universally usable filter settings.