MuSyC Take Assistant
For the analysis to work, it is essential that all takes in the source projects are in separate objects. The Take assistant helps to find takes based on silence in the reference track of the source project and to cut the objects on all tracks at these locations to create new takes that MuSyC can use for analysis.
And this is how you work with the Take assistant:
Place the play marker in front of the object you want to edit, which is typically an object on the reference track of a source project, and then open the assistant.
|
|
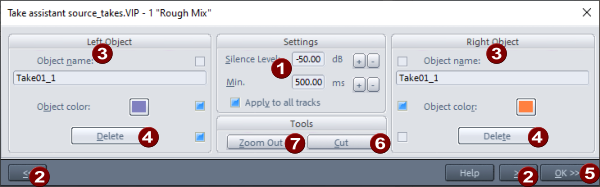
Silence level: This specifies a threshold value in dB below which the signal will be considered silence. Min. duration: This value specifies how long the level in a part of the object must be at least below the specified silence level for its ends to be suggested as potential cutting positions. +/- buttons: Use this to change these values step by step. To change the values directly, click in a field and drag the mouse up or down. Or enter the value numerically and press the Enter key to confirm. |
|
|
Use the buttons >> and << to move between the suggested cutting positions, i.e. to the start and end positions of the detected silence sections. |
|
|
Left/Right Object: New objects are created when the objects are cut. In these areas, you can specify a new Object name (which acts as take name) and a new Object color for the objects to the right and left of the playback marker, which will be applied when the corresponding checkboxes are active and a cut is performed using the OK>> button. |
|
|
Delete: Use this button to delete the objects to the left or right of the playback marker position. The deletion will also be executed when pressing OK>> if the corresponding checkbox next to the Delete button is enabled. |
|
|
Pressing OK>> performs a cut at the play cursor position and applies all settings for Right object and Left object for which the checkbox is set. |
|
|
Set Cut cuts the objects apart at the playback marker location without applying the changes for the right and left object. |
|
|
Overview: With this button you zoom out the project for a better overview, so that it is completely visible. |


The checkboxes in the Left and Right object sections are set automatically, according to a workflow where the OK>> button is used to step through the object and cut out the sections with silence one by one and create new takes:
-
The checkbox for Delete is automatically activated if the new object created by the cut consists of silence, i.e. for the left object if the playback marker is at the end of a section with silence, for the right one correspondingly at the beginning of the silence section.
-
If the new object does not consist of silence, i.e. a new take is created, the checkboxes for Object name/Object color are activated. If the name of the old object ends in a number, the number on the right is increased by 1 and the number on the left is decreased by 1 as the new name. The object color is set to a slightly different hue from the old object.
If the silence is detected correctly and you set the cuts one after the other with the OK>> key, this creates a series of new takes with ascending numbering and color gradient.