Multiband Dynamics
Multiband Dynamics lets you edit dynamics with up to four independent frequency bands. The entire signal is split into individual frequency bands in this case. The dynamics are then edited separately for each band.
The combination of the individual bands is 100% phase-neutral, and thanks to the FIR complement filter technique no discoloration of the frequency response occurs. In other words: If there is no dynamic editing in the individual bands, i.e. the signal is only split into the bands and then reassembled, the audio material will be perfectly compiled to the state it was before. The advantage of dynamics manipulation across multiple frequency bands versus a standard process is that the danger of pumping and other side-effects sinks drastically. For instance, the function is able to prevent bass peaks from reducing the entire signal. Multi-band technology also lets you specifically edit individual frequency ranges.
Frequency separation/Gain enhancement/Reduction
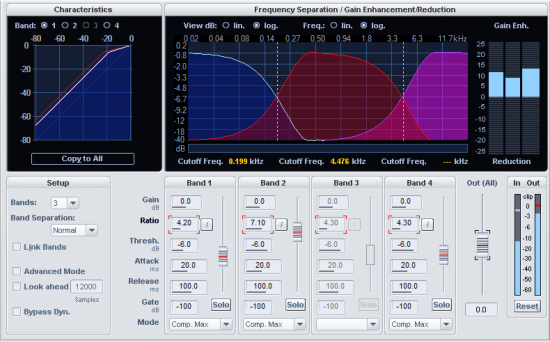
In the Frequency separation / Gain Enhancement/Reductionarea, you'll find the parameters for the filter bank. The graphic display shows the frequency of separate bands. The left axis label shows damping in -dB, the top label shows frequency in kHz. The individual curves are color labeled.
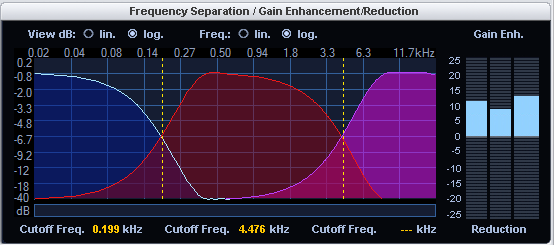
Separation frequencies
Drag the dashed lines in the graphical representation to set the crossover frequencies of the individual filter bands. The number of separation frequencies depends on the number of selected bands (Bands parameter in the Setup area). The border frequencies for the deepest and the highest band (high-cut and low-cut) are shown. The border frequencies are those frequencies where the filter dampening is -3 dB. For mid bands (band pass 1 and band pass 2) the mid frequencies and bandwidths are displayed. The bandwidth in this case is the distance between the two separation frequencies. These also correspond to the cut points of the neighboring frequency curves.
Characteristics
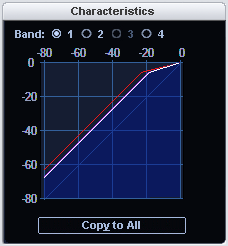
The graphic element to the side shows the dynamics characteristic curve. It illustrates the ratio from the input level (upper axis in dB) to the output level (left axis in dB).
|
Band: You can select a band , the characteristics curve of the selected band is displayed in white, while the other bands appear as lines in their corresponding color. The band selection always follows the currently edited dynamic parameter. |
|
Copy to All: After pressing this button the parameters of the selected band are applied to all bands. If you also have Link bands (in the Setup area) selected, the values for all bands remain coupled to one another. |
Setup
| Control | Description |
| Bands |
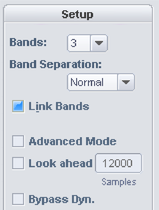
Here you can select the number of bands, between 1 and 4. Set to "1", no separation into different frequencies takes place, and the algorithm works like a standard dynamics effect. The CPU load rises with increasing number of bands. |
| Band separation | With this parameter, different properties of the filters are influenced simultaneously, so that the "selectivity" is increased. With a higher setting for the band separation, the slope of the filter curves increases, i.e. the transition range between two bands becomes smaller and the attenuation in the stop band increases. |
| Link bands |
When this option is active, the changes to the dynamic parameters affect all bands. Often, it isn't necessary to set dynamic parameters for each band separately. For rough adjustment at the beginning, it is often appropriate to adjust the parameters together at first. If you have activated Link bands, it does not mean that all parameters in all bands will have the same values. Initially, only the parameters that were changed after switching on "Link bands" are the same. If you want all bands to have the same settings, click Copy to All below the characteristic curve. |
| Advanced Mode |
If this option is selected, the processing routines of the Advanced Dynamics effect are used internally. |
| Look ahead |
When this option is selected, the dynamics section works with "look-ahead". This setting affects all bands. |
| Bypass dyn. (bypass dynamics): |
The dynamic processing of the individual bands is deactivated. This function serves to compare the editing results with the original. |
|
Bypass all |
This allows you to temporarily disable the effect in order to compare the unprocessed signal with the processed signal. |
Parameters for the dynamic sections
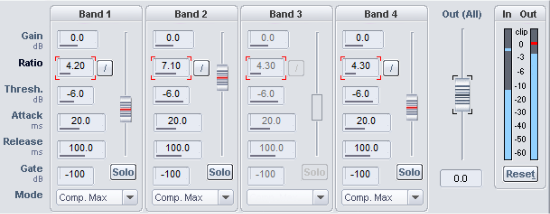
Click in an input field (Gain, Ratio, Threshold, Attack, Release or Gate) to control the parameter with the slider next to the input fields.
| Control | Description |
| Gain (dB) |
Here you can set the level at the output end of the dynamics phase for each band separately. Please note that the graphic display can cannot be fully display the influence of this control. If you set the controller too high, overdriving may occur - in this case the characteristic curve would have to continue upwards beyond the limit of the graphic display. |
| Ratio (factor) | This parameter controls the strength of the respective effect. 1.0 means no effect. Clicking the button beside it resets the ratio to 1.00. |
| Thresh. (dB) | This is the input threshold value above and below which the corresponding effect is applied. |
| Attack (ms) |
Here you can set the time frame between the crossing of the threshold and the maximum extent of the effect. |
| Release (ms) |
Here you can set the time frame between the falling off of the threshold and the complete dissipation of the effect. |
| Gate Level (-dB) |
This parameter specifies below which volume the level should be set to 0. |
| Solo | In "Solo" mode the frequency bands can be monitored one at a time. This function particularly alleviates adjusting the filter parameters. For instance, you can locate a critical frequency range of a mix before editing the dynamics. |
|
Out (All) |
Here you can set the overall output of the entire effect. The graphic display does not reflect this setting. Use the fader to balance the level difference caused by the dynamics processing. |
Dynamics Mode
| Dynamics Mode | Description |
| Comp. Max |
Dynamics of the frequency band is limited in such a way that loud passages above a certain threshold are amplified less, raising the overall volume. This setting is often used to increase the loudness. |
| Compressor |
The effect on dynamics is similar to a classic compressor: The dynamics of a frequency band is limited in that loud passages above a certain threshold are limited in their amplification. Use this settings if you want to achieve sound alteration through compression without raising the overall volume. |
| Expander |
The dynamics of a frequency band are increased, loud sequences remain loud, quiet sequences become even quieter. Dynamics expansion is often used for recording speech with a high noise level. The expansion causes the level of the speech to be raised while the noise is suppressed. |
| Gate |
Here, very quiet passages below the Threshold Level are dampened or set to zero. This way, you can effectively suppress noise during the pauses between takes. Even at high compression (ratio > 5), the gate function is still useful to avoid strong increases in the quietest of passages and background noise. If different threshold values are entered in different bands, with a bit of skill, drum loops may be "chopped up". |
| Limiter | Only the loudest passages are limited (above the threshold). Quiet passages remain unchanged. Limiters are used to reduce the occurrence of big level peaks without reducing the master dynamics. |
| Limiter 100% |
Performs the same editing as the Limiter, but the level is immediately raised to 0 dB - this corresponds to a subsequent normalization. This corresponds to a subsequent normalization. If you want to use the Limiter as protection against overmodulation, you should take into account that the Limiter can only reliably prevent overmodulation in a single band. If the bands are mixed together, the sum can again result in overstepping the threshold level set for the bands. |
Strategies for coping with the flood of parameters
A multiband compressor like Multiband Dynamics naturally has a lot of parameters. Here are a few tips on how to adjust:
-
If you need to alter the dynamics of all bands, rather than one individual band, the following approach may be useful:
-
Common setting for all bands
- Select the mode that corresponds the most with your needs. If you want to increase the volume of the audio material, select Comp. max. If you want to achieve an improvement of the sound characteristics, an increase of the "transparency", an improvement of the speech intelligibility, a refreshing of old recordings, crisper basses, etc., without increasing the loudness, use the Compressor. The selection of this mode only applies to the selected band.
- Click Copy to all bands. Selecting this mode ensures that all bands feature the applied setting.
- Activate Link bands. Any changes you perform in the current band are automatically mirrored on the other bands.
- Change the parameters of all bands until the audio sounds right.
-
Fine adjustment for the individual bands
- Turn off Link bands.
- Activate Solo mode for a band. Individual bands may now be isolated, making the task of optimizing settings for each band easier. The optimal time constants usually have lower values in the high frequency bands because the waveforms are shorter here.
- If you can't find satisfactory settings for a band, try to change the split frequency setting for the selected band. A narrow band setting may help prevent "pumping" artifacts in the sound.
-
-
To edit a specific and critical frequency range only, a different approach may be taken:
- Turn off Link bands.
- Activate Solo mode for the band that contains the critical frequency range.
- Change the separation frequencies for the band so that they can effectively filter out the critical area. Now the dynamic editing can begin. First, select a suitable mode.
- Limiter mode or Compressor mode are suitable for the dynamic limiting of critical frequencies, i.e. for sibilant sounds.
- Use the Bypass dyn. checkbox to compare the processed and unprocessed bands.
- Now switch off the Solo mode and compare the original signal with the processed using Bypass all.
-
Presets: Compare the presets provided and use a suitable preset as a starting point for finding the optimal settings. In most cases, even loading a relevant preset will produce good results. But if you really want the very best sound or volume increase result, you'll often have to apply these settings manually.
-
Compare at same volume: Activate and deactivate the effect with Bypass and adjust the volume with the slider Volume until the audio level with processing equals the level without processing. Use this method to compare the sound differences without allowing the dynamics processing to alter the volume levels.