Tempo Map Dialog
The Tempo Map dialog contains the list of all tempo markers, their properties and a number of options on how to handle the markers. In the dialog, additional markers can also be created and selected or all tempo markers can be deleted.
Open the dialog with Tempo Map Dialog… in the marker menu (right-click on the marker bar) or in the Edit > Tempo menu.
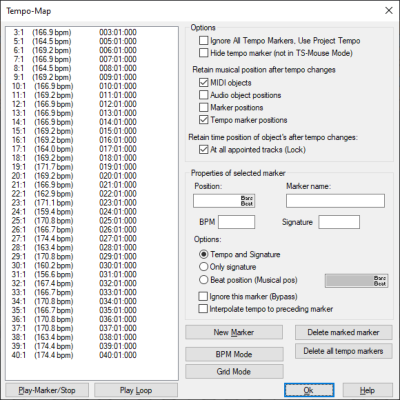
In the list on the left, all tempo markers are listed with their musical position, time signature and BPM value. With Play Marker/Stop the project can be played from the position of a marker, with Play Loop the area around the marker is played in a loop.
You can choose between two modes for displaying and editing all tempo markers: BPM mode and grid mode. In the respective modes all tempo markers are converted into the corresponding format, i.e. in BPM mode all tempo markers are displayed as BPM markers, in Grid mode as grid position markers.
Using the buttons, you can switch between BPM markers and Grid position markers at any time. The tempo markers remain the same, only the type of display changes. For example, first adjust the beat grid in Grid mode to a MIDI recording with many tempo changes. Now switch on the BPM mode and insert musical tempo changes for single sections.
You can also switch between the modes using the commands in the Markers menu > Tempo marker or in the Edit > Tempo menu.
Options in the Tempo Map Dialog
Ignore all tempo markers, use project tempo: This option ignores all tempo markers in the project, so that only the global project tempo is relevant.
This option can also be switched on and off via menu commands and at the track head of the tempo track.
Hide tempo markers: Enable this option to hide the tempo markers in the arranger. However, they are always displayed when you select the Pitchshift/Timestretch mouse mode, because in this mode there are special mouse actions for editing tempo markers.
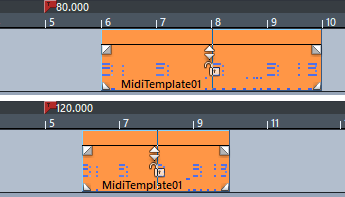
Retain musical position after tempo changes
If a BPM marker is changed or a Grid position marker is moved, this influences the following
The time position is the absolute position, i.e. a certain time position corresponds to different musical bar positions at different tempos.
Example: At 115 BPM, bar 5:1 is at 8347 ms, at 140 BPM this position is at bar 5:04:183.
The musical position is flexible and depends on the time signature. At different tempos, the same musical position corresponds to different time positions.
Example: At 115 BPM, bar 5:1 is at 8347 ms; at 140 BPM, this musical position is already reached at 6847 ms.
If the musical position is to be preserved with changed tempo, the positions of the objects or markers must be adjusted to the changed beat grid, thus changing their time position in the project. If the time position is maintained, their musical position changes accordingly.
The behavior of
Example: A
Notes:
-
Audio objects for which the Musical tempo adjustment is active behave like MIDI objects and are also moved.
-
If you drag a tempo marker in Timestretch mouse mode while holding down the Alt key, the time position of an object is always preserved.
|
For all locked tracks: If you want to preserve the time position of all objects in a track during tempo changes, select this option and activate the button |
|
 for locking all track objects in the respective track head.
Properties of Selected Markers
For the tempo marker selected in the list on the left, the properties are displayed here. If you have created a new marker at the play cursor position directly in the Tempo Map dialog using New Marker, set the properties of this marker here.
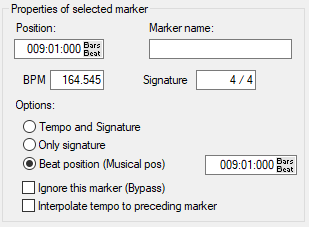
Position: Time position of the selected marker
Marker name: You can also assign names for tempo markers
BPM: Tempo in BPM When entering a grid position marker, the value cannot be edited. It updates to the tempo at that marker from the Beat position currently assigned to the grid position marker when you click into it.
Time signature: A time signature can be assigned to each tempo marker. If you switch to Only signature at Options, the current tempo marker becomes a Time signature marker.
With Beat position (musical pos.) you convert a selected BPM marker into a Grid position marker. You can edit the musical position of the grid position marker in the editing field.
Ignore this marker: Ignored markers have no effect. This allows you to cancel the effect of a marker without deleting it. This happens automatically with grid position markers if nonsensical bar positions are created by moving or entering in the Tempo Map dialog, e.g. if grid position markers are swapped (bar 20 before bar 19) or moved in such a way that this bar position can no longer be reached by tempo interpolation from a previous tempo marker.
Interpolate tempo to previous marker: Activate this option if you want the tempo to change steadily starting from the previous tempo marker over the time span to the new tempo marker and reach the new tempo value at the current tempo marker. This way you realize gradually tempo changes (musically "ritardando" or "accelerando").
Note: These settings apply to the marker currently selected in the marker list. So you can set the marker properties, such as the type or tempo, only after creating a new marker.
Properties of a single marker can also be edited without opening the Tempo Map dialog. Double-click on an existing tempo marker or right-click on a curve point in the tempo track to open the Tempo and Signature dialog for that marker, which displays the properties of a single marker.