Crossfading Events

From the Options menu, choose Event, and then choose Automatic Crossfades from the submenu if you want to automatically create crossfades when you overlap two events on the same channel.

When Automatic Crossfades is turned off, overlapping events punch in and out with no fades.

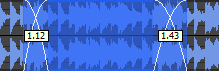
You can show or hide the crossfade length ToolTip by selecting Event and then Show Crossfade Lengths from the Options menu or pressing Ctrl+Shift+T.

Create an automatic crossfadeClosed

You can easily create crossfades between audio or events by simply dragging an event.

  1. From the Options menu, choose Event, and then choose Automatic Crossfades from the submenu to turn on automatic crossfades.

  2. Drag an event so that it overlaps another event on the same channel.

  3. A crossfade is automatically added to transition between the two events.

Create a manual crossfadeClosed

An automatic crossfade is not inserted if a shorter event is placed on top of a longer event (as in a punch-in). You can manually create a crossfade to fade in to or out of the shorter event.

This is a fast and effective method of punching in to replace a bad section of audio.

  1. Drag a shorter event so it overlaps a longer event.

  2. Hover over upper-left or upper-right corner of an audio event until the cursor is displayed as a .

  3. Click the corner of the event and drag to create a fade.

  4. Repeat step 3 for the other end of the event.

Change the fade typeClosed

You can change a crossfade to use one of many combinations of fast, slow, linear, smooth, and sharp fade curves.

  1. Right-click the crossfade region to display a shortcut menu.

  2. Choose Fade Type from the shortcut menu and choose a fade curve from the submenu.