Dynamic Equalizer
NOTE The Dynamic EQ is available in Sound Forge Pro Suite only.
With the Dynamic Equalizer, the frequency spectrum of a signal can be processed depending on the level. This means that the effect of a single filter band can be controlled depending on the strength of the occurrence of certain frequencies in the input signal. In other words, you remove an "interfering" frequency only where it occurs more strongly, but leave it unprocessed in other places.
Unlike the WaveHammer 2 effect, where the signal is split into different bands by filters and then dynamics processing is applied to these bands separately, the Dynamic Equalizer processes the signal as a whole and the dynamics of each band are affected only by the frequency components that occur in that band. As a result, there are fewer phase changes between the frequency components in the signal, which means that fewer unwanted artifacts can occur.
|
1 |
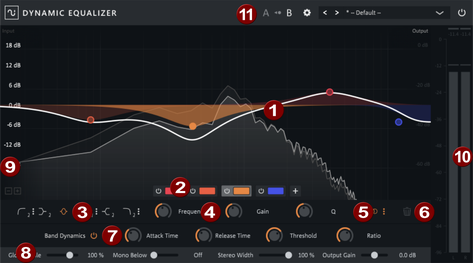
Filter curves and filter symbols: Each filter band is symbolized by a colored circle. The filter curve of the individual band is represented by the transparent colored area below the circle. The thick white line shows the resulting filter curve of all bands. In the background, the light gray line shows the resulting frequency spectrum of the signal in real time, and, somewhat paler, the original spectrum of the signal. |
|
2 |
Band selection: The Plus button can be used to add filter bands. With a single click on the colored area a band can be selected for editing, a double click on the colored area deletes the band.
Shortcuts:
|
|
3 |
Filter Type: Here you set the filter type of the selected band.
The small number next to the symbol indicates the slope (slew rate) of the filter. By clicking on the 3 dots on the icon, you can change the slope for high, low and bandpass in the range between 1 (6dB/octave) and 4 (36dB per octave). The other filters are fixed at 2 (12dB/octave). |
|
4 |
Filter parameters: In this area the characteristic values of the filter band are set: Frequency for the cut-off frequency, Gain for the increase or decrease of the filter, Q for the bandwidth of the filter. You can set these values graphically in the filter graph by moving the circle in the filter graph accordingly: Frequency and gain result from the position of the circle in the filter graph. The Q value of the filter (in the case of the peaking filter) is set with the mouse wheel. Modifiers:
|
|
5 |
Channel processing: In this menu you determine whether the filter band affects both stereo channels, one channel at a time, or the mid or side signal. If one of the options Left/Right/Center/Side) is selected, the filter curve of the band is color-coded accordingly:
NOTE Note: This feature is not available in surround busses/masters. |
|
6 |
Delete filter band |
|
7 |
Band Dynamics: Click the On/Off icon to activate Band Dynamics for the selected band. The gain of a band is then affected by the corresponding frequency component of the input signal. The parameters correspond to those in a compressor or expander:
|
|
8 |
Global settings These settings affect all bands.
|
|
9 |
Scale: With the +/- zoom buttons you can change the value range of the scale. |
|
10 |
Peak Meter |
|
11 |
Presets and Settings At the top of the plug-in window, you can select and save presets, adjust view settings and temporarily disable the effect (see below). |
 The On/Off button can be used to deactivate the bands individually.
 High Pass
  Low Shelving
  Peaking
  Band Pass
 High shelving
  Low Pass
 Tips:
- If you move the mouse over the filter parameters, the value is displayed numerically. By double clicking on this value, it can also be entered numerically. Use the Tab key to move to the next value.
- New bands can also be created directly in the filter graphic by double-clicking. Depending on the location of the click, the correct filter type is selected: Left above 0db -> Low Shelving, Left below 0dB -> Highpass, Right above 0dB -> High Shelving, Right below 0dB -> Lowpass, Center -> Peaking.
- Right-clicking on a circle for a filter band brings up a context menu that allows you to cut, copy and delete filter bands. A copied or cut filter band can replace another one with Replace, with Replace (using current position) the frequency and gain remain unchanged.
Presets and Settings
At the top of the plug-in window, you can select and save presets, adjust view settings and temporarily disable the effect.

User Presets
To save your own presets, select Save as... from the menu. You can set a category and a preset name. Once you have created your own presets, the Preset menu contains a second section USER, where you can find your own presets, organized by category.
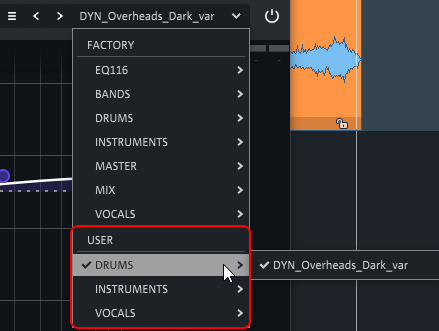
Changed Factory or User presets get an asterisk in front of the name.

With Revert changes you restore the settings of the preset, with Save you save the changes in the preset. Changes to Factory Presets cannot be saved, but you can save them as a User Preset using Save as....
You can rename a user preset with Rename... and delete it with Delete.
You can also organize your user presets by using Open user presets folder to open the folder with the user presets. The categories in the Preset menu correspond to subfolders in this folder, the preset names to the file names of the presets. If you have moved or renamed files there, run Reload user presets so that these changes are applied to the preset menu.
Settings
Show tooltips:Here you can disable the tooltips.
Disable dynamic labels: This allows you to switch the labels of the control elements: By default, a control will display the set value only when you hover the mouse over it, and its function otherwise. If the check mark is active, the set value is always displayed.
Disable FFT analyzer/ Disable peak meters/Enable OpenGL rendering/Frame Rate limiting: With these options you can accelerate the performance of graphical display in case of overload.
Oversampling: For a balance between available processing power and required quality, you can set the oversampling between off and 8x.
Zoom level: This allows you to display the plug-in interface in different sizes.
Last modified on June 09, 2026
Was this page helpful?
What did you particularly like about this page?
What did you dislike about this page?
Thank you for your feedback.