Utility
The coreFX Utility plug-in combines basic tools such as gain, panorama processing with various panning laws, channel conversion for mono/stereo conversions and M/S processing, stereo base width, DC correction and others in one plug-in.
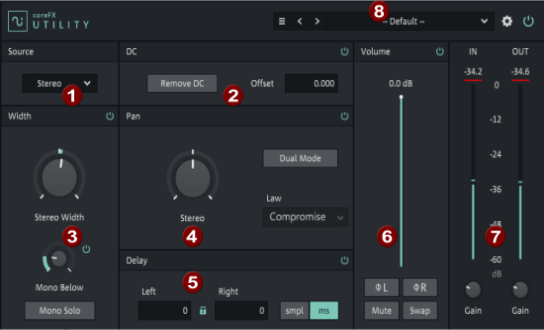
The interface is divided into different sections where the effects can be activated individually  .
.
Source
|
1 |
Source selection: Here you can select which of the two channels of the input signal will be used and how. |
NOTE The plugin can process a maximum of 2 channels, typically stereo signals. Editing multi-channel audio (surround) is not possible.
-
Stereo: The input signal is used unchanged as a stereo signal.
-
Mono: The signal of the input channels is summed and used for both channels.
-
L/R: Only the selected input channel is used and its audio signal is copied to the other channel. Use this option for stereo files that contain audio on only one channel.
-
M/S: The input signal is converted into a mid/side signal, the left channel gets the mono sum of the two input channels, the right channel gets the side signal (the difference of the input channels)
-
The following table shows the effect of the modes on the channels as an overview:
Mode
Output L
Output R
Stereo
L
R
Mono
L+R
L+R
L
L
L
R
R
R
M/S
L+R
L-R
DC
|
2 |
DC voltage removal: Click Remove DC to determine and compensate for the DC voltage component of the input signal. |
If the DC voltage component is known, you can also specify it directly at Offset.
NOTE Note: The automatic DC removal is done by a very steep high pass filter at 5 Hz. As with any digital filter, this can result in sound changes. If the DC value is known, for example because it was caused by defective hardware, and it always has the same value in different recordings, you will get the optimal sound if you determine the value in a different way, enter this value at Offset and deactivate Remove DC.
Width
|
3 |
Here you can change the stereo base width. |
In the center position (100) you get the unchanged stereo signal. Turning the knob to the left (100...0 ), the stereo signal is gradually replaced by the center signal (mono sum L+R), thus reducing the base width. Turning the knob to the right (100...200 ), the base width is increased by gradually replacing the stereo channels with the side signals L-R and -(L-R).
If the slider Mono Below is activated, the audio signal below the frequency set there will be converted to mono (L+R). To get only the mono part, activate the Mono Solo button.
Pan
|
4 |
Panorama control: This is used to set the panorama. |
With Dual Mode you switch to Dual Panning, where the two channels are treated as separate mono channels whose pan can be adjusted separately with two controls.
Law sets the panning law. When arranging an audio signal in the panorama, a signal is distributed to two channels. Different calculation methods can be used to ensure that the signal is perceived as loud in the center position as it is at the edges. The correct setting depends on the audio material used. Available options are:
- Linear: In linear panning, the level of the right channel is linearly decreased when the Pan knob is turned to the left and goes to 0 in maximum right position and vice versa. This means that in the center position the level of the right and left channels is halved (-6 dB reduction). This mode is suitable for mono signals on stereo tracks that are to be placed in the stereo image. With stereo signals, there is a drop in volume in the middle position.
- Constant Power: The level reduction here is not linear, but such that the emitted sound power remains the same. From the curves used, the level of the right and left channels is reduced by -3 dB in the center position. This mode is suitable for stereo signals where the two channels contain partially different audio material.
- Compromise: This mode is a compromise between Linear and Constant Power and lowers the level in the middle by -4.5 dB.
- Compensate: This mode corresponds to the mode Constant Power with an additional increase of the level by 3 dB. Thus, the center position in this mode corresponds to a neutral position that leaves the audio signal unchanged. At the edge positions, the signal becomes up to 3 dB louder in this mode.
Delay
|
5 |
Time offset: For each channel a delay time in samples (smpl) or milliseconds (ms) can be specified. |
With the Link button  activated, the times for the right and left channels are set together in one of the two fields.
A negative delay time means that the audio signal becomes audible earlier. Technically, this is realized by reporting to the plug-in host a correspondingly higher latency that the plug-in would cause. The backward time offset is then caused by the latency compensation in the host.
Volume
|
6 |
With the slider you can set a volume reduction. |
Above the slider the change is displayed in dB, 0 dB corresponds to the original volume. Use Mute to mute the output.
NOTE These parameters are primarily intended for parameter automation.
ɸL / ɸR: With these switches you turn the phase of the respective channel by 180°, in other words: the signal is inverted.
Swap: The contents of the right and left channels are swapped.
In/Out
|
7 |
The peak meters display the input and output signal. |
With the Gain controls below the peak meters you can additionally raise or lower input and output levels.
Presets and Settings
|
8 |
At the top of the plug-in window, you can select and save presets, adjust view settings and temporarily disable the effect. |
Last modified on June 09, 2026
Was this page helpful?
What did you particularly like about this page?
What did you dislike about this page?
Thank you for your feedback.