Add media files to your project
Before you can start editing, you need to add media files to your project. Vegas Pro offers several ways to bring video, audio, and image files into your project — from simple drag-and-drop to organized importing through the Project Media window. You can add individual files or multiple files at once and control how they are arranged on the timeline.
TIP The volume for new audio tracks is determined by your default track properties. »For further information: Setting default track properties
NOTE The first time you add video media to the timeline, Vegas Pro asks whether you want to match your project video settings to the media. If you add a Vegas Pro project (.veg) file, the settings of the project are matched, not the media within the project.
IMPORTANT Vegas Pro is not intended, and should not be used for, illegal or infringing purposes, such as the illegal copying or sharing of copyrighted materials. Using Vegas Pro for such purposes is, among other things, against United States and international copyright laws and contrary to the terms and conditions of the End User License Agreement. Such activity may be punishable by law and may also subject you to the breach remedies set forth in the End User License Agreement.
Add media from the Windows Explorer
-
Drag a media file from the Windows Explorer to the Vegas Pro window.
The file is added to the Project Media window, and an event is created where you drop the file. If you drop the file on an area of the timeline that does not contain a track, a new track is created.
Add media from the Vegas Pro Explorer
The Vegas Pro Explorer lets you preview files before adding them. You can add media in two ways:
-
Double-click a media file or Vegas Pro project to add it to your project. The file is added to the Project Media window, and an event is created at the cursor position.
-
Drag a media or project file from the Vegas Pro Explorer to the timeline. The file is added to the Project Media window, and an event is created where you drop the file.
TIP To add only the audio or video stream from a video file, right-click and drag the file to the timeline. Choose Audio Only or Video Only from the shortcut menu and choose a command from the submenu to arrange the event on the timeline.
Add a nested project
-
Drag a .veg file to the timeline to add it to the current project as a nested project.
»For further information: Nesting projects
TIP Double-click a .veg file in the Explorer window to open the project instead of nesting it.
Add a track from an audio CD
-
Browse to your CD drive and double-click a .cda file (or drag it to the timeline).
Vegas Pro prompts you to type a name for the file and then extracts the track. The extracted track is added as an event on an audio track.
NOTE To stretch Acid loops to match the project tempo when you add them to the timeline, select the Import audio at project tempo checkbox on the Audio tab of the Preferences dialog. The project tempo is specified on the Ruler tab of the Project Properties dialog. »For further information: Audio Tab and Setting project properties
Add multiple files and create events
You can add several media files to your project at once from the Explorer or Project Media window.
-
Select the media files or Vegas Pro projects you want to use.
-
Right-click the selected files and drag them to the timeline.
-
Choose a command from the shortcut menu to arrange the events on the timeline:
Command
Description
Add Across Time
Places the selected media files end-to-end on the track where you drop them.
TIP Select the Automatically overlap multiple selected media when added checkbox on the Editing tab of the Preferences dialog to overlap events when you add them to the same track. Automatic Crossfades must be turned on. »For further information: Editing Tab and Automatic crossfades
To change the amount of overlap between events, adjust the Amount setting in the Cut-to-overlap conversion section of the dialog.
Add Across Tracks
Places the selected media files as events on adjacent tracks.
Add As Takes
Places the selected media files as multiple takes of the same event. »For further information: Using takes as alternate versions of events
Video Only
Adds only the video stream from the selected files. Choose a command from the submenu to arrange the events on the timeline.
Audio Only
Adds only the audio stream from the selected files. Choose a command from the submenu to arrange the events on the timeline.
NOTE To add a missing media stream to a video-only or audio-only event later, right-click the event and choose Add Missing Stream for Selected Event.
-
Events are created where you drop the files. If you use the Explorer, the media files are also added to the Project Media window.
TIP The order of the events is determined by the file you click before dragging and the file order in the Explorer or Project Media window. For example: select A.wav, B.wav, and C.wav. Right-click B.wav and drag the files to the timeline. Choose Add Across Time. The result is B.wav first, followed by A.wav and C.wav.
Audio-specific behavior
-
When you add a multichannel audio file (.wav/.wav64, .avi, .mxf, ATRAC, or BWF) to your project, the audio is distributed across tracks. For example, a four-channel WAV file is added to four adjacent tracks. To control which channels each event uses, right-click a multichannel audio event, choose Channels from the shortcut menu, and choose a command from the submenu. »For further information: Audio channels
-
When you add a multistream audio file, you can choose which stream to use. Right-click the event, choose Stream from the shortcut menu, and select a stream from the submenu.
-
5.1-channel audio from DVD camcorders is downmixed to stereo when you import it into a stereo project. When you import into a 5.1 surround project, the audio is added to separate tracks for the center, front, rear, and LFE channels.
Add media over existing events
When you drop a file on a blank spot on the timeline, an event is created at that location. When you drop a file on an existing event, you can either punch in or insert.
Punch in
A punch-in places a new event on top of an existing event. The original event keeps its position on the timeline but cuts to the new event at the drop point.
-
Drag a media file from the Vegas Pro Explorer or Project Media window to the middle of an existing event (or position the cursor and double-click a file in the Vegas Pro Explorer or Project Media window).
-
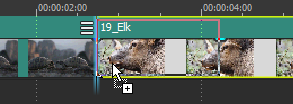
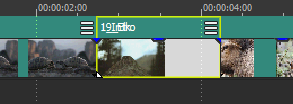
The original event maintains its position, but cuts to the new event where you added the file:
Insert
By using auto ripple, you can drop a media file on the timeline and automatically move downstream events to make space for the new event. »For further information: Post-edit ripple
-
Click the Auto Ripple button
 .
. -
Drag a media file from the Vegas Pro Explorer or Project Media window to a position on the timeline between two events (or position the cursor and double-click a file in the Vegas Pro Explorer or Project Media window).
TIP To insert an event in the middle of an existing event, split the existing event first. »For further information: Splitting events

-
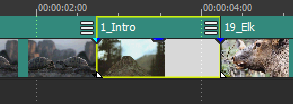
The events to the right move to make space for the new event:
Import media without creating events
Use the Project Media window to collect and organize your media files before placing them on the timeline.
-
From the File menu, choose Import | Media (or click the Import Media button
 in the Project Media window).
The media file is added to your project without creating an event on the timeline.
-
When you are ready to start editing, drag media files from the Project Media window to the timeline.
»For further information: Using the Project Media window
-
If Vegas Pro cannot read frames in a video event, the unreadable frames are displayed in red on the timeline. These frames appear black in the Video Preview window and in the rendered output.
-
To use RAW camera files in your project, install the Microsoft Camera Codec Pack. This allows you to view RAW files and add them to the timeline.
-
Select the Allow pulldown removal when opening 24p DV checkbox on the General tab of the Preferences dialog to remove pulldown when you open 24 fps progressive-scan DV video files. When the checkbox is cleared, 24p video is read and edited as 29.97 fps interlaced video (60i). »For further information: General Tab
Last modified on April 29, 2026
Was this page helpful?
What did you particularly like about this page?
What did you dislike about this page?
Thank you for your feedback.