Video tutorial
AI Quick Mask
AI Quick Mask separates a person or object from the rest of the image.
You mark the object on a single frame, and the effect follows it through the rest of the event. The result is a matte, a grayscale image that isolates the object or limits other effects to it.
-
Replace or blur the background behind a person without shooting in front of a green screen.
-
Grade or stylize one subject while the rest of the shot stays untouched.
-
Keep several selected people together in one matte while excluding bystanders from the same shot.
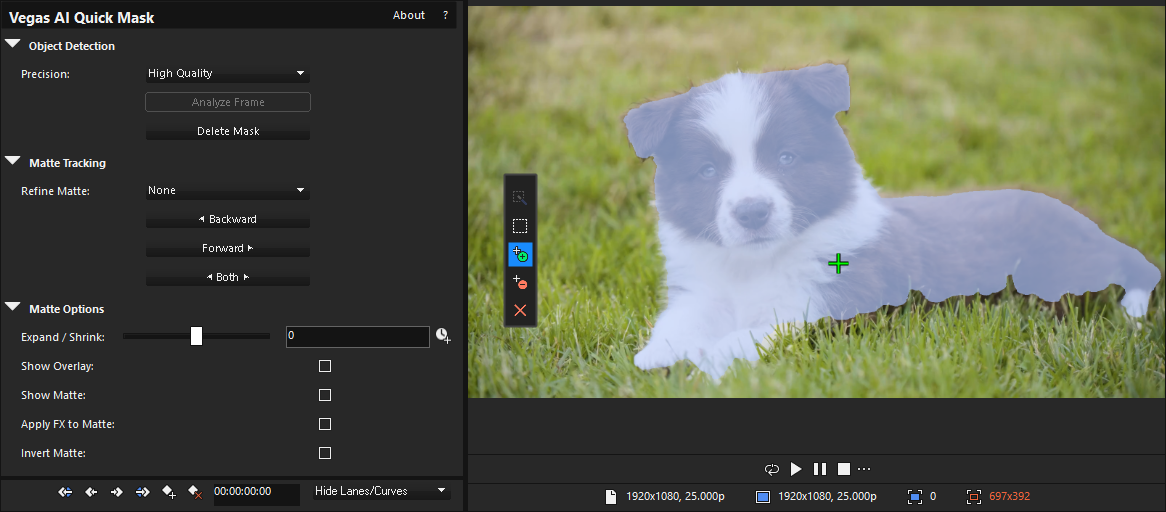
FIGURE AI Quick Mask with a finished mask. The controls sit in three sections, the colored overlay shows the selected area.
Create a mask
-
Add a video event containing the object you want to mask to the timeline.
-
Click the Video FX tab and select AI Quick Mask.
-
Drag the (Default) preset onto the video event to apply the effect.
-
Place the cursor on the frame where you want to define the mask.
For a first mask, use the first frame of the event and track forward from there.
-
Click Analyze Frame and wait for the analysis to finish.
The analysis uses Boris FX Mask ML to prepare the current frame for object selection.
-
Until a mask exists, the Video Event FX window shows only the Object Detection section. Matte Tracking, Matte Options, and the Delete Mask button appear as soon as you have selected an object.
-
Each analysis clears Show Overlay and sets Refine Matte back to None, so the hover preview is visible right away.
NOTE Tracking processes every frame in its range, so the time it takes depends on the number of frames and on your graphics card.
Choose a selection tool
A toolbar appears in the Video Preview window after the analysis. It holds five tools.
|
|
Selected by default. Move the pointer over the image to preview what the effect can select, then click to create the mask. |
|
|
Draws a rectangle around the object you want to select. |
|
|
Sets a positive point on an area the mask should include. Positive points appear as green crosses. |
|
|
Sets a negative point on an area the mask should exclude. Negative points appear as red crosses. |
|
|
Removes an individual point or the rectangle. |


Select the object
Clicking the object is the fastest way and works whenever the preview identifies the object clearly.
-
Move the pointer over the object in the Video Preview window.
-
Click when the preview identifies the object you want to mask.
-
Check the colored shading to see which image areas the mask includes.
If clicking the object does not produce the mask you need, draw a rectangle around it instead.
-
Select the rectangle tool in the preview toolbar.
-
Drag a selection rectangle around the object.
-
Check the colored shading to see which parts the mask includes.
The rectangle guides the selection. The resulting mask follows the object outline instead of filling the rectangle.
Correct the selection
The first selection can omit parts of the object or include unwanted image areas. Correct it with the rectangle, with points, or with both.
To correct a rectangle, use one of these methods:
-
Drag the rectangle to move it over the intended object.
-
Drag one of the four corner points to enlarge or reduce the rectangle.
Changing the rectangle recalculates the mask. Check the colored shading after each adjustment.
Points tell the effect what belongs to the object and what does not. To include a missing part of the object or another area in the same mask:
-
Select the positive point tool in the preview toolbar.
-
Click the part of the object that the mask should include.
-
Drag the point or add more positive points only if the selection needs further correction.
To exclude an unwanted area:
-
Select the negative point tool in the preview toolbar.
-
Click the area that the mask should exclude.
-
Drag the negative point or add more negative points only if the selection needs further correction.
Every new or moved point recalculates the mask.
TIP With the positive point tool active, hold Ctrl while clicking to set a negative point. That saves switching tools for every correction.
Remove points or the rectangle
An unwanted point distorts the mask. Remove it instead of adding more points against it.
-
Select the removal tool in the preview toolbar.
-
Click the point or rectangle to remove.
The mask recalculates from the remaining points and rectangle.
TIP Hold Alt while clicking an existing point or rectangle to remove it without switching tools.
Check the selection
The colored overlay over the original image is the best reference for checking mask coverage. AI Quick Mask shows it while you work in the plug-in.
-
Clear Show Matte and Show Overlay under Matte Options if either is selected.
-
Check that the overlay covers the intended object and excludes unwanted areas.
-
Add, move, or remove points if the selection needs correction.
TIP Select and clear Show Overlay while you correct the selection. Switching between the masking result and the colored overlay makes it easier to judge whether an edge is right.
Track the mask
Tracking propagates the mask on the current frame through the video and keeps it on the object while the object moves. It requires a checked mask on the starting frame.
You make the settings below in the AI Quick Mask controls in the Video Event FX window.
-
Place the cursor on the frame containing the mask you want to track.
-
Optionally, select a Refine Matte mode under Matte Tracking to smooth or sharpen the matte edges.
With None selected, tracking uses the mask without refinement. With any other mode, tracking refines each propagated mask before storing it.
 Refine Matte modes
Mode Result None Uses the original binary mask without refinement.
Soft Edges Creates an alpha matte with gradual edge coverage.
Hard Edges Sharpens the mask boundary.
Video Matting V2 Uses the Video Matting V2 model for matte refinement.
A refinement mode creates a refined version from the original analyzed mask. It does not overwrite that mask: select None at any time to return to the unrefined result and compare.
Editing the points or the rectangle recalculates the mask and resets the refinement.
Refine Matte needs analysis data for the current frame. Tracking alone does not produce that data, so the control stays unavailable on a frame you only tracked through. To refine such a frame, analyze it again as described under Correct a tracked mask.
-
Make a time selection on the timeline if you want to limit processing. The selection must include the current frame.
For time-selection instructions, see Creating selections and positioning the cursor.
A timeline selection limits tracking to its overlap with the event. If no selection overlaps the event, tracking continues to the event boundary in the chosen direction.
-
Choose a direction under Matte Tracking:
-
Click ◀ Backward to track toward earlier frames.
-
Click Forward ▶ to track toward later frames.
-
Click ◀ Both ▶ to track in both directions.
-
-
Wait for tracking to finish.
-
Select Show Matte under Matte Options to check coverage, or clear both display checkboxes to inspect the colored overlay.
-
Play the processed section and check that the mask follows the object.
Tracking stores a mask for every processed frame.
If tracking does not start, one of these messages explains why:
-
"Create a mask on the current frame before running mask propagation." Select an object on the current frame, then start tracking again.
-
"There are no frames in the requested propagation direction." Check the cursor position and the timeline selection.
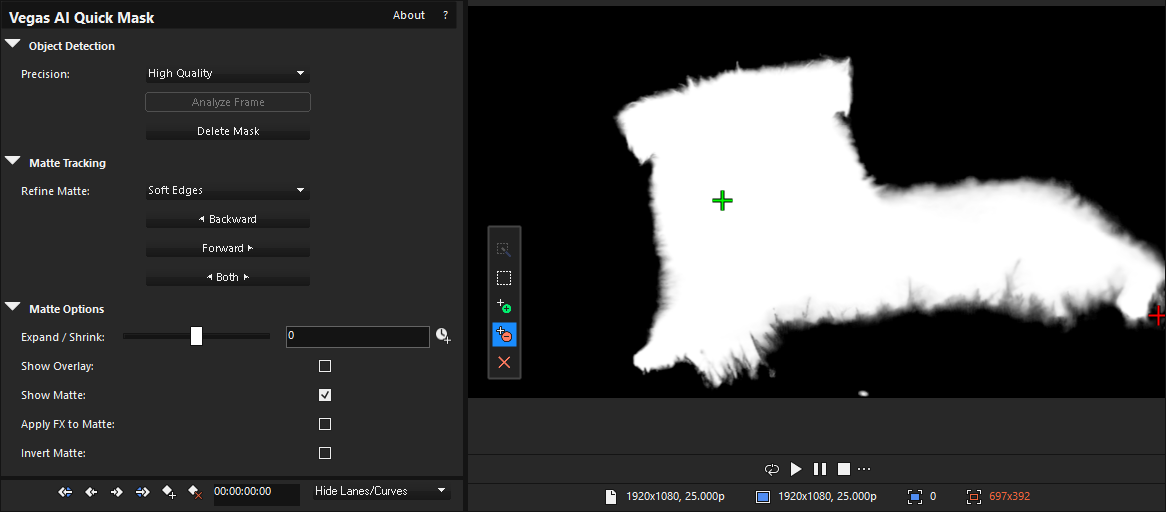
FIGURE The matte with Show Matte selected. White marks the included areas, black the excluded ones, and gray values along the fur mark partial coverage.
Correct a tracked mask
If tracking drifts away from the object, a new selection on the problem frame provides a corrected starting mask.
IMPORTANT Analyzing a frame again clears its existing mask, points, and rectangle. Tracking again replaces the stored masks in the processed range.
-
Move the cursor to a frame where the mask needs correction.
-
Click Analyze Frame and wait for the analysis to finish.
-
Select the object again and adjust its points or rectangle if needed.
-
Select a timeline range if you want to limit the correction. The range must include the newly analyzed frame.
-
Select a Refine Matte mode again if needed.
-
Run tracking in the required direction and review the processed frames.
The processed range now uses masks generated from the corrected selection.
Use the masking result
The masking result is either an isolated object on a transparent background or an image with effects restricted to the matte.
Isolate the selected object
-
Clear Apply FX to Matte under Matte Options.
-
Clear Show Matte.
-
Select Show Overlay to display the masking result instead of the colored overlay.
The selected image area remains visible, the area outside the matte becomes transparent. Place the event on a track above your new background to composite the two.
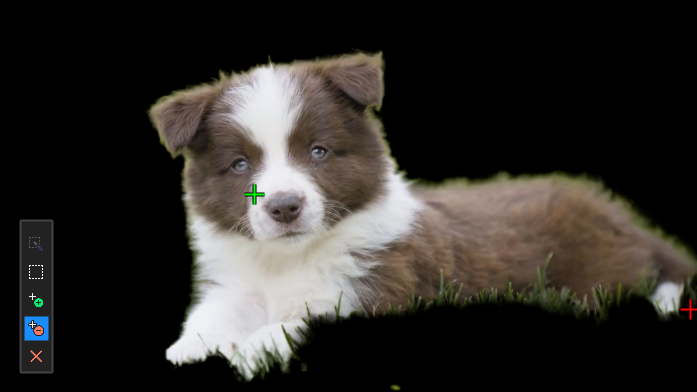
FIGURE The isolated object. The Video Preview window displays the transparent area as black.
Limit effects to the matte
This output keeps the surrounding image and restricts the effects to the selected area. The effects you want to restrict must sit before AI Quick Mask in the event's effects chain.
For more information, see Adding video event effects.
-
Drag the required effect buttons before AI Quick Mask if they are not already there.
-
Select Apply FX to Matte under Matte Options.
-
Clear Show Matte and select Show Overlay to view the result.
-
Select Invert Matte if you want to affect the area outside the selected object instead.
Effects that sit after AI Quick Mask process its output without this restriction.
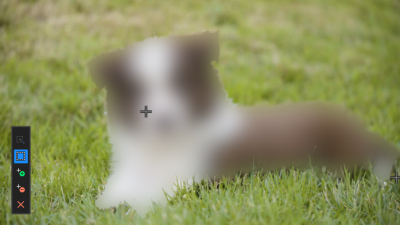
FIGURE A Gaussian Blur with Apply FX to Matte selected. The blur affects the selected object only.

FIGURE The same blur with Invert Matte added. The blur now affects everything outside the object.
Blur the background behind a subject
This walkthrough starts from a tracked mask on your subject and produces the second figure above.
-
Click the Plug-In Chain button
 above the effect buttons in the Video Event FX window.
The Plug-In Chooser window opens and shows the current chain at the top.
-
Select Gaussian Blur from the plug-in list and click Add.
The plug-in joins the chain at the end, behind AI Quick Mask.
-
Click Move Plug-In Left
 in the Plug-In Chooser window so that Gaussian Blur sits before AI Quick Mask.
Reorder the chain while the window is still open. The blur has to run first, otherwise AI Quick Mask cannot restrict it.
-
Click OK.
-
Click the AI Quick Mask button to return to its controls.
-
Select Apply FX to Matte under Matte Options.
The blur now covers the subject and leaves the background sharp, as in the first figure.
-
Select Invert Matte.
The blur swaps to the area outside the subject.
-
Clear Show Matte and select Show Overlay to see the result without the colored overlay.
-
Click the Gaussian Blur button and adjust the blur amount to taste.
The subject stays sharp, the blur covers the background, and it follows the subject through the tracked range.
TIP Reordering inside the Plug-In Chooser saves a step. The alternative is to click OK right after Add. Then drag the Gaussian Blur button to the left of AI Quick Mask in the row of effect buttons.
Matte Options reference
The controls under Matte Options adjust the matte and select what the Video Preview window displays.
| Option | Description |
|---|---|
| Expand / Shrink |
Negative values shrink the matte, positive values expand it. A value of 0 leaves its size unchanged. The slider covers -10 to 10, the value box accepts -100 to 100. This parameter is animatable: click its animate button and adjust the value at different frames in the keyframe controller area. |
| Show Overlay |
When selected, displays the masking result. When cleared, displays the colored overlay over the original image. This choice takes effect only when Show Matte is cleared. |
| Show Matte |
Displays the matte as a grayscale image for inspecting coverage and edges. This display takes precedence over the colored overlay and the masking result. |
| Apply FX to Matte |
When selected, restricts the preceding effects to the matte and keeps the surrounding image. When cleared, makes the area outside the matte transparent. |
| Invert Matte |
Swaps the masked and unmasked areas, so the matte covers everything outside the selected object. |
Mask and point keyframes
The keyframe controller area stores the mask results separately from the points and rectangles that define a selection. It shows three rows.
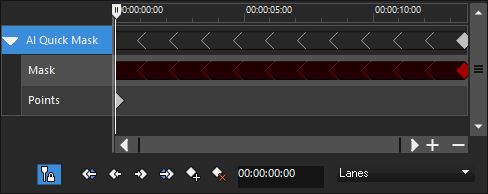
FIGURE The keyframe controller area after tracking. The Mask row carries an entry on every frame of the processed range.
| Row | Contents |
|---|---|
| AI Quick Mask |
Collects the keyframes of the rows below. |
| Mask |
Holds one entry for every frame that carries a mask. Tracking adds an entry on every frame of the processed range. |
| Points |
Holds the positive points, negative points, and the rectangle that define a selection at a frame. Tracking generates mask results without adding a point selection to every tracked frame. |
Delete the mask and start again
IMPORTANT Deleting removes all stored mask and point keyframes of this effect instance, including the masks on all other frames.
-
Click Delete Mask under Object Detection.
-
Place the cursor on the frame where you want to create the new mask.
-
Click Analyze Frame and select the object again.
AI Quick Mask now contains only the new mask and its selection data.
NOTE Each instance of the effect carries one mask. To isolate a second object separately, apply AI Quick Mask to the event a second time.
Last modified on October 19, 2026
Was this page helpful?
What did you particularly like about this page?
What did you dislike about this page?
Thank you for your feedback.