AudioWarp
With the help of Audio Warping it is possible to selectively shift audio material within an object in time. This allows temporal inaccuracies in recordings to be corrected.
For this purpose, Warp Markers can be set in objects. These Warp Markers can then be moved, whereby the audio material in front of the Warp Marker is temporally compressed and the audio material behind it is stretched or vice versa. This time-stretching is effective until the next Warp Markers in the object.

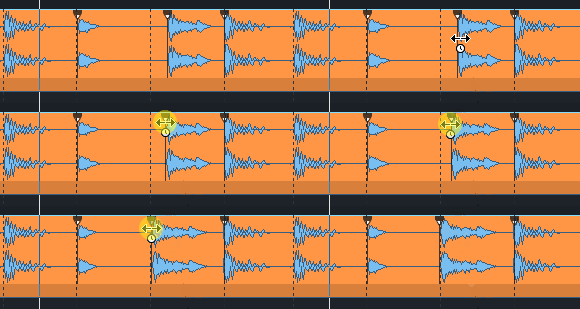
In the picture you can see the typical procedure: To fit the beat in the middle to the beat grid, a Warp Marker was also set on the beats before and after it. By moving the middle Warp Marker, audio material in front of and behind it was compressed and stretched so that the beat at the now exactly desired position in the project.
|
|
To set and edit Warp Markers, switch to Pitchshift/timestretch mouse mode. Warp Markers that have already been set are also only visible in this mouse mode. |
Tip: To quickly change the mouse mode, right-click anywhere in the project, hold the mouse button, and also left-click.
|
|
To set a Warp Marker, click in the upper half of the object at the desired position. An auxiliary line at the mouse cursor over the entire height of the object makes setting easier.
|
|
|
Click and drag the Warp Marker in the upper half of the object to move the point in time in the audio material below the Warp Marker to the desired position. All audio material before and after the Warp Marker until the next Warp Marker (or the object start or object end) will be compressed (played faster) or stretched (played slower) accordingly. |
|
|
To move the anchor position, i.e. the original position of the Warp Marker in the object to be moved, click and drag the Warp Marker in the lower half of the object. You will notice that even in this case it is not the marker that moves, but the audio material, because the target position of the Warp Marker remains the same, only the time-stretching of the audio material is adjusted to the new anchor position. |
For audio warping, the Musical tempo adjustment must be active in the objects. This is automatically activated when you set the first Warp Marker. This also means that the restrictions that apply to Musical Tempo Adjustment (no objects with loop, reverse effect, Melodyne, Elastic Audio or object resampling) also apply to Audio Warping.
Right-clicking on a Warp Marker brings up a context menu where you can use Warp marker active to temporarily disable this marker, as well as delete this Warp Marker or all Warp Markers in the object .


