Clean up & Backup
In the submenu Clean up & Backup in the menu File you will find the functions to collect complete projects with all the required files in the project folder, delete any data in it that is no longer needed and save the complete project to a folder or burn it to disc.
Collecting Project Files
In the course of working on a project, besides the files directly recorded in the project folder, media files from various other folders may have been used in the project. To archive projects or share them with others, you can use the function Collect project files to ensure that all media files required by the project are located in the project folder.
With Menu File > Clean up & Backup > Collect Project Files… you open a dialog that lists all files that are outside the project folder.
Use Copy files or Move files to select whether to keep the files in their original location or move them to the project folder. By default, all files are selected to be copied to the project folder. You can exclude individual files from processing by deselecting them at Process.
So if there are files that you want to use later for other projects (e.g. files from sample libraries) and files that are only used within the project, execute the function twice, for each of the files with the appropriate setting.
If you enable the Create subfolders option, subfolders will be created in the project folder for the files copied to the project folder.
Deleting Unneeded Files
To save hard disk space, the following functions can be used to delete data that is no longer needed in the project:
Delete virtual project (VIP)
This function allows you to delete projects completely, including the media files they use. Select File > Clean up & Backup >Delete Virtual Project (VIP)....
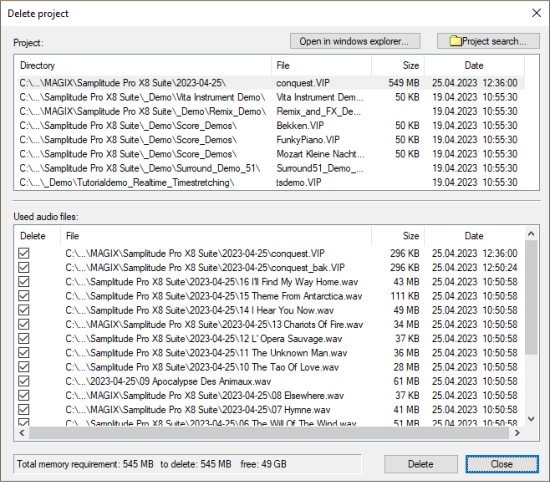
The upper section of the dialog lists all projects (*.vip) located in the default folder for projects (including subfolders). Select the project to delete from the list. With Open in Windows Explorer you open the project folder of the selected project in Windows Explorer. Projects that are located outside the default folder can be located via Find Project....
In the lower section of the dialog all used files of the project are listed and can be excluded from deletion by unchecking the checkbox in the column Delete. If you now click on Delete at the bottom, all files that will be deleted will be listed once again. Confirm the final deletion with Delete files.
Attention: There is no additional security prompt, the files are now deleted immediately.
The Delete Virtual Projects dialog remains open so that you can delete more projects.
Delete wave project
This function allows you to delete individual wave projects from the hard disk. All files belonging to a wave project (*.wav, *.hdp, *.h2...) will be deleted together.
Note: A wave project cannot be deleted until it is closed. As long as parts of the wave project are still used by objects, deletion is not possible. There will be a query, after confirming with Delete the data will be deleted immediately.
Remove unused samples
This function deletes all unused sections from the audio files of the active virtual project, i.e. the sections in the audio files that are not used by objects in the project and therefore are never played. The objects in the virtual project are adjusted accordingly.
This function permanently deletes data from the hard disk and has no "Undo" option. Therefore, use it wisely.
If other virtual projects use the same audio files, to be on the safe side, open those projects as well before performing this function to prevent possible data loss.
This function can be used to save hard disk space, but afterwards length corrections of the objects are only possible to a limited extent, because the audio data outside the object boundaries have been removed. For this reason, you can specify a safety reserve for each object at Save additional samples for each object. This reserve is additionally left in the audio material before and after the object boundaries. The default value is 22050 samples , which corresponds to 500ms at 44.1 kHz sample rate.
Select File > Clean up & Backup >Remove Unused Samples....
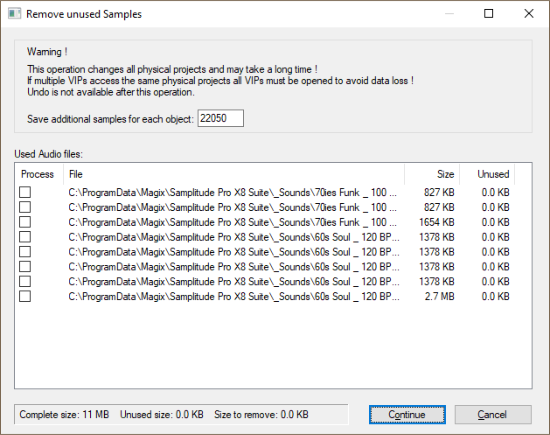
The dialog lists all audio files used by the virtual project. The Size column shows the total amount of disk space used by the audio files, and next to it, in the Unused column, how much of it is not used in the virtual project. Use the checkbox in the column Process to select the files to be processed. Files that contain unused audio data are already selected. Uncheck the ones you want to keep completely.
Attention: The list can also contain files that are currently no longer used in the VIP, but still appear as entries in the Undo history. These files contain 100% unused samples and would therefore be deleted completely. This can be intentional: For example, if you have completely discarded a recording session, you can thus also delete these unused files. However, if you had opened audio material from other sessions or your own sample library and did not use them later, such files are now also selected for deletion. Therefore, before using the function, clear the Undo history and close all unused audio files.
The same function is also executed when archiving a complete project with menu File > Clean up & Backup > Save complete VIP in…, if you activate the option Copy only samples used in VIP there. Then only the audio data that the archived project actually needs will be copied to the new folder.
Delete Freeze Data
Use the function Freeze data to delete unused data that was created when freezing tracks or objects but is no longer needed after "unfreezing".
Archiving Projects
You can save a project with all used files to a separate folder or burn it to disc.
Save complete VIP in
The complete project with all used media files will be saved to the specified folder. Use this function for backing up projects or if you want to continue editing a project on another computer with Samplitude.
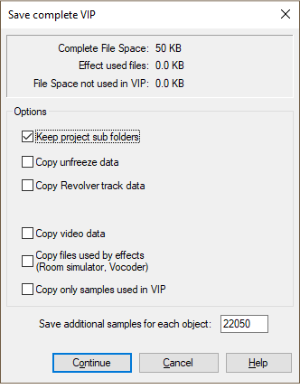
Setting the following options will copy more files to the new folder:
-
Keep project subfolders: If there are subfolders in the project folder, they will also be created in the new folder.
-
Copy unfreeze data: All data will be copied to the new folder that is needed to continue editing and undoing object or track freezes.
-
Copy revolver track data: All Revolver tracks (track variants) are copied as well.
-
Copy video data: Copies associated video files.
-
Copy files used by effects: Files used by effects like room simulator or vocoder are copied as well.
If you activate the option Copy only samples used in VIP, only the parts of the audio files that are also used by objects in the project will be copied. With this function you can save memory space. However, by doing so, you accept that the object boundaries in the new project can no longer be moved outward, since all audio data outside the object boundaries is no longer available. Therefore you can use Save additional samples for each object to specify a safety range in samples that should additionally remain before and after the object boundaries in the audio data, in order to have a reserve if object fade-ins/fade-outs should be changed afterwards. The default value is 22050 samples , which corresponds to 500ms at 44.1 kHz sample rate.
Burning Project Backups to CD/DVD
This function allows you to burn complete projects onto multiple CDs or DVDs. The separate burning program Boris FX Speed BurnR is used for this purpose.
Of course, you can also burn the project folder to disc using the Windows burn function. However, you must then use the function Collect project files to ensure that all the files used are also in the project folder. In addition, using Boris FX Speed BurnR has the advantage of being able to burn project backups to multiple discs.