Controller Editor
The Controller Editor is a graphical editor that allows you to edit the velocity of the notes in the piano roll and other MIDI events such as Pitch Bend, After Touch, Program Change and Continuous Controller events. Continuous Controllers, abbreviated as CC or simply Controller, are used to transfer control values such as filter, volume or pan position.
|
|
The Controller Editor is located below the Matrix Editor/Drum Editor and can be shown and hidden with this button or the keyboard shortcut Alt + V. |

The controller editor is used to display and edit up to four different MIDI controller curves simultaneously.

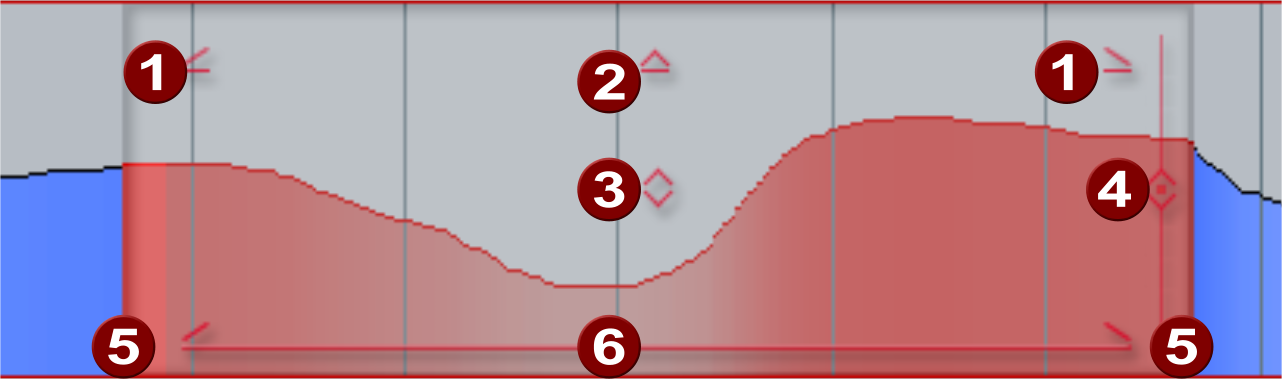
By default, only one controller lane is shown, in which the velocity is displayed. Pull the dividing line beneath the horizontal scroll bar (1) up to enlarge the display of the controller editor. If you now click on one of the controller buttons (2), another controller lane is displayed. In the menu next to it  you can select the controller to be edited. Pitch bend, aftertouch or program change can also be displayed.
An asterisk behind the controller name indicates that the MIDI object already contains data for that controller.
The velocity values of the note events (3) are displayed as a colored bar in the controller editor. The color scheme corresponds to that of the notes: In velocity colors mode, a darker and higher bar symbolizes larger values; for the other color modes, see Event display. The bars are located directly below the respective notes.
Also the values of the other controllers are displayed as a bar (4), the width of the bar extends to the next event with a different value. Because the controllers typically change more or less continuously in smaller time intervals independently of note events, they appear as ascending or descending ramps. The height of the ramps and their color intensity also represent the last defined value of an event. Selected controller events also appear in red.
The controllers can be edited with the tools (5).
To make it easier to edit Pitch Bend curves, which typically have very small differences in values, you can use Ctrl+Mouse wheel to zoom vertically into the controller curve.
Combi tool 
(Keyboard shortcut: Ctrl + 2)
The Combi tool lets you select events, edit the values of the selected events, and draw straight or freehand lines.
To select individual events, click the corresponding bar. To modify the controller value, click and drag on the bar end. To select multiple events, click in the controller editor and drag a selection frame. The reference for the selection is the top edge of a bar. Since the selection is two-dimensional, it is thus also possible to select only events in a certain value range.
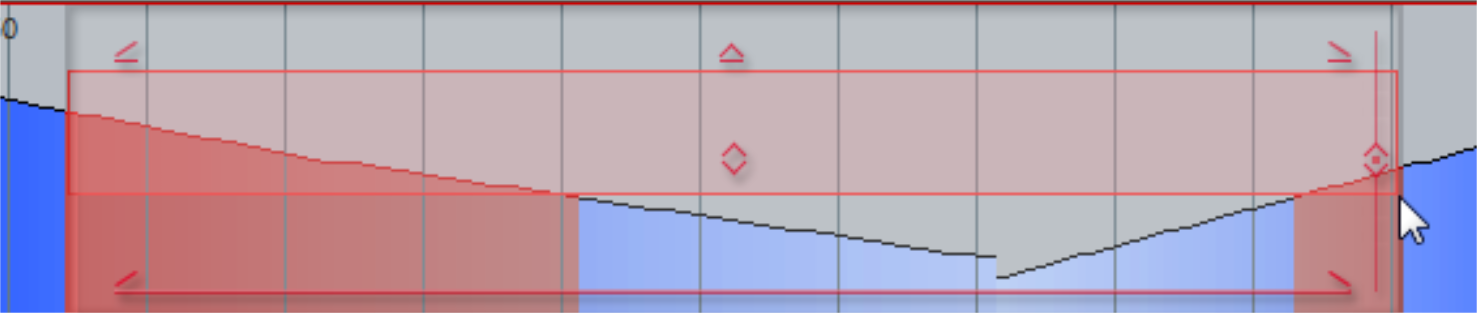
The selected events can now be edited together with the handles on the selection frame:
|
|
Fade in and out: Drag the handles to fade controller values in and out. |
|
|
Scale values: Drag the handle to increase or decrease the values relative to each other. |
|
|
Increase/decrease values: Drag the handle to increase and decrease all values by the same amount. |
|
|
Increase/equalize value differences: Starting from the clicked point on the vertical line, the value differences around this point are increased or decreased. Dragging the handle all the way down will result in a straight line at the height of the clicked value, in the other direction it will increase the "amplitude" of an existing curve. |
|
|
Stretch/compress duration: Drag at the edges of the selection for temporal stretching or compression of the curve. |
|
|
Move selected: Drag the line at the bottom to move the selected curve. |


The display of the selection frame with the editing handles can be deactivated by deselecting the Use CC selection controller option in the Options menu.
The Combi tool is called like this because with the help of additional modifier keys you can quickly switch to the other two tools Because the Alt key is used for the drawing tools in controllers for another special function, the modifiers differ depending on whether the velocity or controllers are being edited:
-
Velocity:
-
Alt + Click and drag: Switch to freehand drawing.
-
Shift + click and drag : Switch to straight line drawing.
-
-
Controllers:
-
Shift + click and drag: Switch to freehand drawing.
-
Ctrl + Shift + Click and drag : Switch to straight line drawing.
-
-
To delete selected events in the controller editor, press the Del key.
Freehand drawing 
(Keyboard shortcut: Ctrl + 2)
With this tool you can draw detailed gradients by clicking and dragging in a controller range. If you drag backwards while drawing, the curve you just drew will be deleted again. Single-click to create a single controller event.
If you edit velocity, no new notes are generated; only existing velocity values are modified. For example, you can easily create crescendi or decrescendi using velocity curves.
Shift + click and drag: This activates the drawing of lines.
Alt + click and drag: Activates snapping to the grid points according to the current quantization settings. Thus, when drawing controllers, only one value per raster unit is generated.

Draw lines 
(Keyboard shortcut: Ctrl + 3)
This tool allows you to draw straight lines by clicking and dragging. Click in the controller lane to set the start point, and then drag the end point to the desired location.
If you edit velocity, no new notes are generated; only existing velocity values are modified. For example, you can easily create crescendi or decrescendi using velocity curves.
Alt + click and drag: Activates snapping to the grid points according to the current quantization settings. Thus, when drawing controllers, only one value per raster unit is generated.