Creating New Projects
|
To create a new project, go to menu File > New virtual project… (keyboard shortcut E) or click this button in the upper toolbar. |
|

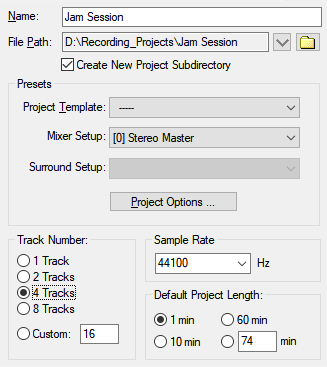
The New virtual project dialog opens, where you define the most important properties of the new project. Most of these properties can be changed later.
All settings made here (except for the name of the project) will apply to future new projects, even after the program is closed.
-
Name: Enter a name for the new project here. By default, the current date is set as the name.
-
File path: Here you can define in which folder you want to store your project. By default, the new project is created in the default folder for projects, see Program Preferences > Program > General. The folder icon can be used to browse to another location, the arrow button can be used to select from the last used paths.
-
Create new project subfolder: By default, a subfolder is created with the project name in the file path.
-
Project template: In this list box you can choose from supplied and your own project templates. These templates are actually ordinary projects. Therefore, you can create your own project templates by saving a project with the command Menu File > More > Save project as template. A new project using a project template gets all its properties, including busses, track states like mute or record, routings, instrument and effect plug-ins, but no objects.
When a project template is selected, the track number, mixer
-
Mixer setup: In this list box, you can choose from supplied and own custom mixer presets. These presets include the number and type of tracks and busses, as well as input/output and effect routing. For more information, see Mixer setup.
If you have selected a mixer preset with surround master, you can select a surround format in the Surround Setup list box below it.
-
Project Options: The dialog corresponds to the General Project Options dialog, where you can make settings such as snap and grid settings, BPM, auto crossfade... for each loaded project. However, the project options here apply to any newly created project.
To set project properties as default for all new projects at a later time, activate the option Save as default in the dialog Project options.
-
Number of tracks: The start track count of the virtual project is defined here. You can add more tracks with Menu Track > Insert New Tracks.
-
Sample Rate: Here you can set the sample rate of the virtual project.
-
Default project length: Here you can set the original project length. The length is automatically adjusted when loading audio files or recording and can also change when zooming out.