Recording
In this dialog, various further settings for the recording are made. It can also be accessed via the button Advanced Options… directly from the dialog Recording Options. Some options from this dialog can also be found here (Format, Record offset in samples, Read CD/DAT marker...). Only the additional options are described below:
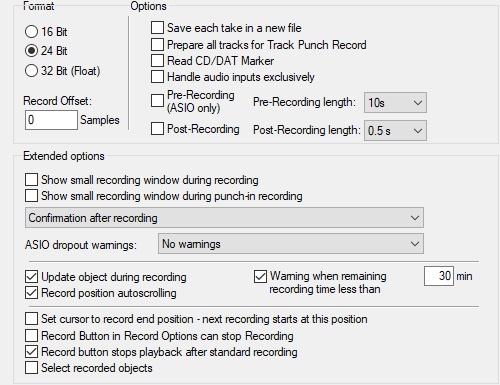
Options:
-
Save each take in a new file: If active, a new file is created for each take of a recording. New takes created manually (+ key at Take in the recording window) and multiple passes of a loop recording are always saved as takes in the same file.
-
Prepare all tracks for track punch record: If you enable this option, all assigned input devices will also be opened during playback, so you can start recording on all tracks when you enable recording for a track.
-
Treat audio inputs exclusively: This option (active by default) ensures that recording can only be activated in one track at a time if the same input is assigned to multiple tracks. This avoids recording identical audio data on multiple tracks.
-
Pre-Recording (ASIO and Wave Format only): If active, this function adds audio material that was present at the input before recording was started to the beginning of the current recording when you activate recording from the stop state or from playback. Preset is 5 seconds, but up to 120 seconds are possible. Move the object start of the recorded objects to the left to make this material visible.
-
Post-Recording: If active, up to 2 seconds of additional audio material is recorded in the background even after recording has stopped (default: 0.5 seconds) If you move the end of the object to the right after recording, you can make the additional audio material visible.
Extended options:
-
Show small recording window during recording/punch-in recording: Use these options to display a small, non-modal recording window with the most important recording controls during direct recording or punch-in recording.
-
Confirmation after recording: With the options in the menu you can define the behavior when stopping the recording.
-
No confirmation dialog: The recording is finished and the recorded material is taken over into the project.
-
Confirmation after recording: (default) The recording is stopped and you are asked whether you want to accept the recording or not. If you select Delete, you will also be asked whether the recorded audio should also be deleted or not.
-
Confirmation at record stop, recording continues: The recording continues at first, and a dialog appears in which you can choose whether you want to accept the recording or delete it; in both cases, the recording is then stopped. Press Continue recording to close the dialog and continue recording.
-
Confirmation at record stop, recording continues (protected): The recording continues at first, and the same dialog appears, but the buttons Delete recording and Apply recording are not available yet. The dialog can be closed immediately by Continue recording and closes automatically after 30 seconds. To stop the recording, you must first uncheck the Prevent record stop checkbox to be able to click on the two buttons and thus stop the recording. You can use this option as a safety measure against accidental recording stop.
-
-
ASIO drop-out warnings: Specify whether a warning should be issued when ASIO drop-outs occur. Drop-outs are short gaps in recorded audio that occur when a buffer could not be written in time. If Show warnings is selected, a red warning is displayed in the status display when drop-outs occur. At Show warnings and set markers markers are also set at the locations in the project where the drop-outs occurred.
-
Update object during recording: If active, the objects created by recording in the project are updated during recording, so they grow as the recording progresses, allowing immediate visual control of the recorded audio.
-
Record position autoscroll: If you have activated this option, the visible section is scrolled along with the record position during the recording.
-
Warning if remaining recording time is less than ... minutes: If a timed recording was started, a warning is issued if the remaining recording time until the end of the recording falls below the specified time.
-
Set cursor to record end position - next recording starts at this position: If you have activated this option, the play cursor will be set to the end of the recording after the recording, the next playback or recording will then start from this position.
-
Recording button in the recording options can stop recording: If active, the Record button in the Record Options dialog (keyboard shortcut: Shift + R) can both start and stop the recording. By default, the option is off and the recording can only be stopped with the stop button.
-
Recording button stops playback after standard recording: If active, you can stop both recording and playback while recording is in progress using the Recording button on the transport console.
-
Select recorded objects: After finished recording, all recorded objects are selected, if several takes were recorded, the objects with the last take.