Tempo Changes
You can define changes of tempo in the course of the project by inserting tempo markers on the marker bar.
The menu commands for inserting tempo markers can be found in the marker menu (right-click on the marker bar or via the marker button  ) in the submenu Tempo marker and in the menu Edit > Tempo.
With variable tempo, the current values for tempo (BPM) and time signature at the current play cursor position are displayed in the transport console.
There are two different ways to define tempo changes:
BPM Markers
If your arrangement requires an explicit tempo change at a specific time position in the project, set the new tempo in BPM by entering a BPM marker (red). The beat grid adjusts to the new tempo accordingly.

Place the play cursor where you want to insert the tempo change and right-click in the marker bar to open the marker menu and select tempo marker > Set tempo change.
The dialog Tempo and time signature opens with the properties of the tempo marker, enter the desired tempo there in BPM (beats per minute) and confirm with OK.
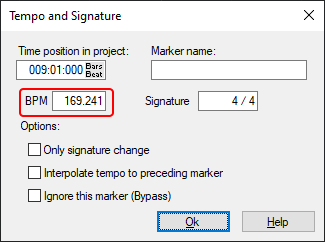
If you enable the Interpolate tempo to preceding marker option, the old tempo will be changed steadily starting from the previous tempo marker over the time span to the new tempo marker and the new tempo value will be reached at the current tempo marker. This way you realize tempo changes (musically "ritardando" or "accelerando").
The tempo markers are set to the next snap point near the playback position when the snap is active. Drag the tempo marker while holding down the Alt key to temporarily bypass the snap function.
Note: For audio objects in the project to adapt to tempo changes by tempo markers, Musical Tempo Adjustment must be active in the Object Editor.
Grid Position Markers
If you use audio material in the project in which the tempo varies, you can adjust the beat grid to match the audio material by reflecting these variations with appropriate small tempo changes in the project. But it would not be practical to directly control this changing tempo with all its fluctuations and enter corresponding BPM markers. Instead, you take an indirect route by entering Grid position markers (green).
Grid position markers assign a specific musical position to a specific time position. In this way, you define the tempo indirectly , because the tempo before this marker is adjusted in such a way that the desired musical position is reached exactly at the marker position.
In practice, you use grid position markers in such a way that you insert markers according to the perceived tempo at regular intervals (for example, by "tapping in") and then move them in the project exactly to the corresponding transients in the audio material, thus adjusting the beat grid to the fluctuating tempo.
To insert grid position markers, right-click in the Marker bar to open the Marker menu and choose Tempo Markers > Set Grid Position marker.
The grid position marker is set without opening the Tempo and Time signature dialog. The option Interpolate tempo to previous marker in the dialog is enabled by default, since it is assumed that continuous tempo variations will be captured with the input of grid position markers.