The ADM Editor window
The ADM Editor window enables the creation and management of ADM (Audio Definition Model) files for immersive audio formats such as Dolby Atmos. It provides precise control over audio objects, metadata and export options.
Selection of the target format
The ADM specification is flexible and serves as a basis for future audio applications. Distribution formats such as MPEG-H Audio or Dolby Atmos are based on ADM, but require additional specifications (e.g. speaker arrangements, number of channels, sample rates). To ensure that the ADM file is compatible with these formats, the corresponding render profile must be defined when creating the ADM layout.
Sequoia supports the following render formats:
-
ADM (EBU ADM renderer)
-
Dolby Atmos
After selecting the target format, the button changes to Change Format. You can also use it to change the target format later.
Attention: Changing the target format can lead to an invalid project structure. If the new target format does not support certain properties, data may be lost!
ADM
This option can be used to generate generic ADM audio. There are no restrictions regarding the number of programs, channels or objects. However, an ADM audio file created in this way may not be compatible with Dolby Atmos . That means this option is primarily suitable for your own customized immersive software solutions, for archiving or for further processing in other software.
Dolby Atmos
Dolby Atmos is a widely used format for film sound and found in home theater systems, professional cinemas, and streaming services. It is supported by a wide range of hardware and software solutions.
The following restrictions exist compared to the general ADM specification:
-
Sample rate: The sample rate is limited to 48 kHz or 96 kHz for Dolby Atmos projects only.
-
Mono objects: Objects only ever have one audio channel. However, two audio channels of a stereo track can be assigned to two connected objects.
-
Maximum number of objects: 128 objects at 48 kHz (64 at 96 kHz). The first 10 objects function as direct speaker objects for a "bed" surround mix in 7.1.2 format.
-
Program restriction: Only one program is permitted in the hierarchy Program → Content → Object.
Terminology variants
Although the Dolby Atmos format is based on ADM, it uses its own terms for some of the concepts from the ADM specification in its actual implementation. In the ADM Editor, we use the more general ADM terminology for both format variants. The following table therefore compares the terms of the different terminologies:
| ADM | Atmos |
|---|---|
| Program | N/A |
| Content | Content |
| Object | Object |
| Complementary objects | N/A |
| Direct speaker objects | Bed |
Set up ADM structure
AutoFill
With the AutoFill function, you can make all the necessary track-object assignments with a single click. ADM content is created for each folder with tracks. Tracks that are not in a folder are assigned to the "Default" content as ADM objects.
The following operations are carried out with AutoFill:
-
A program is created that contains one item of content.
-
One object is created for every track.
With Dolby Atmos, in which only mono objects are permitted, two objects are created internally for stereo tracks. The two objects are displayed as one unit and can only be edited together.
-
A direct channel object is created for
The surround setup of the busses or folders is transferred to the channel/speaker assignments.
Note: For a Dolby Atmos project where no more complex structures are permitted, you can use AutoFill to create the complete structure by creating tracks for all objects and surround folders for all beds and subsequently performing AutoFill.
Manual creation of contents, objects and direct speaker objects
For more complex projects
Click on the "+" button to create new ADM elements Programs, Content, Object and Direct Speaker. The menu that opens offers various options for manual creation.
Select the desired element type and then one of the following actions:
-
Programs > From project name: Creates a new, empty program that is named after the project.
-
Content > Empty: Creates new, empty content - corresponds to clicking the button directly. This option is also available for Object and Direct Speaker buttons.
-
Content > Reference existing content: Existing content can be referenced from the submenu. The referenced content contains all objects of this content, but may also contain other objects or attributes. This function is also available for Object and Direct Speaker buttons.
-
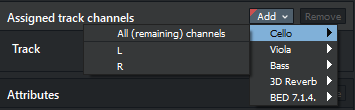
Object / Direct Speaker > From track selection (single object): Creates an ADM object or Direct Speaker object and assigns all track channels to this object.
-
Object/Direct speaker > From track selection (per track): An object is created for each selected track, bus or folder.
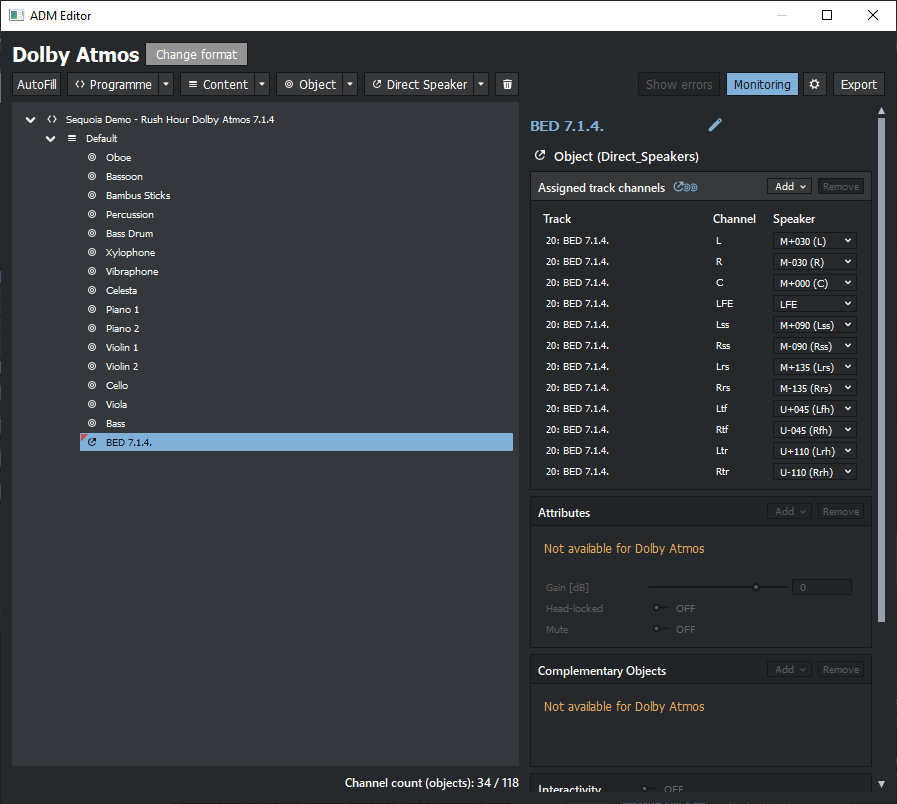
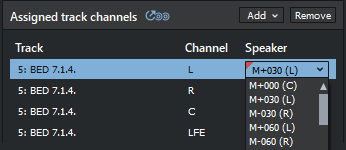
After creating an empty object, you must manually define the channels of the associated tracks. In the "Assigned track channels" area, click on Add and select the track and track channels from the menu.
Assigned track channels
With Direct speaker objects, you must also specify the associated speakers.
|
|
Bed formats that are not natively supported by Dolby Atmos are composed of a standard bed and additional object channels as follows:
|
Attributes
In addition to the mandatory track channel assignments and, in the case of direct speaker objects, speaker channel assignment, the elements can also be assigned additional attributes.
| Attribute | Item | Target format | Description | Value range |
| Name |
Programs, contents, objects |
ADM, Dolby Atmos | Designation of the element | |
| Language | Programs, contents | ADM |
Language of the element. |
Selection of a 3 letter code from the menu or any own entry |
| MaxDuckingDepth | Program | ADM | Maximum strength of automatic ducking for each object within the program | -62… 0 dB |
| Content kind | Contents | ADM, Dolby Atmos | Type of content | Selection from a range of predefined values in the menu |
|
Gain |
Objects |
ADM |
Additional gain for all audio data belonging to the object |
-100…12 dB |
|
Head-locked |
Objects |
ADM |
The perceived location of an audio element is linked to the head position. | on/off |
|
Mute |
Objects |
ADM |
Additional switch to switch an object on or off |
on/off |
|
DisableDucking |
Objects |
ADM |
Allow/prohibit ducking for individual objects | on/off |
|
Importance |
Objects |
ADM |
Allows the renderer to discard an object below a certain level of importance | 0...10 (0 is least important, 10 is most important) |
|
Position Offset (X,Y,Z) |
Objects |
ADM |
Apply an offset to all positions |
No limitation in all directions |
Complementary objects
Complementary objects (only available for ADM) are mutually exclusive. They can exist in different contents. Only one object can be active at a time. Select an object within a content, click on Add and select another object in the content. You can use the checkbox to decide which ADM object is set as the default ADM object and is therefore played if no selection has been made.
Interactivity
Objects that are marked as interactive can be changed live during playback within certain limits if the target format supports this.
Note: Interactivity is only available for the ADM target format.
| Name | Description | Parameter |
|
On/off |
Switch object on or off |
on/off |
|
Gain |
Change in the object level | Min/max -100…+12 dB |
| Position | The position of the object can be changed. |
Azimuth: -180°…180° Elevation: -90°...90° Distance: 0…1 |
Surround Panning of Objects

|
As soon as a track is assigned to an object, the mixer panorama control replaces the surround control. Right-click on this element (or on the panorama slider in the track header or track editor) to open the surround editor. This differs from the standard Surround editor and is therefore labeled "Obj". |
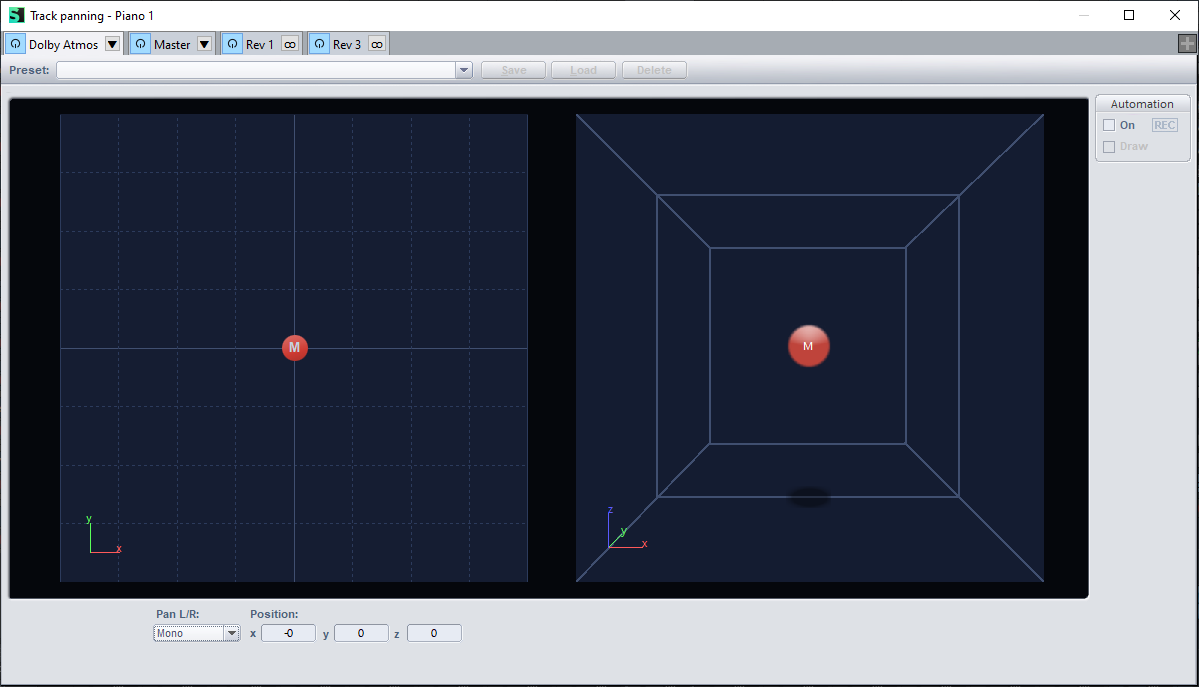
Object surround editor for a mono signal
Note: The Object surround panner does not allow the LFE channel to be used. Objects are placed in the room, while LFE signals should ideally not be localized. The LFE channel can only be controlled via a direct speaker object (bed).
Dolby Atmos projects only supports mono signals in an object. When an object is created from a stereo track, the system automatically creates two objects in the background, which are assigned the right and left channels respectively. These objects are moved as a single unit in the Surround editor. Additionally, press the Alt button to move a channel individually. There are additional key combinations to restrict the movement of sound sources. You can find more information on this at Surround editor controls.
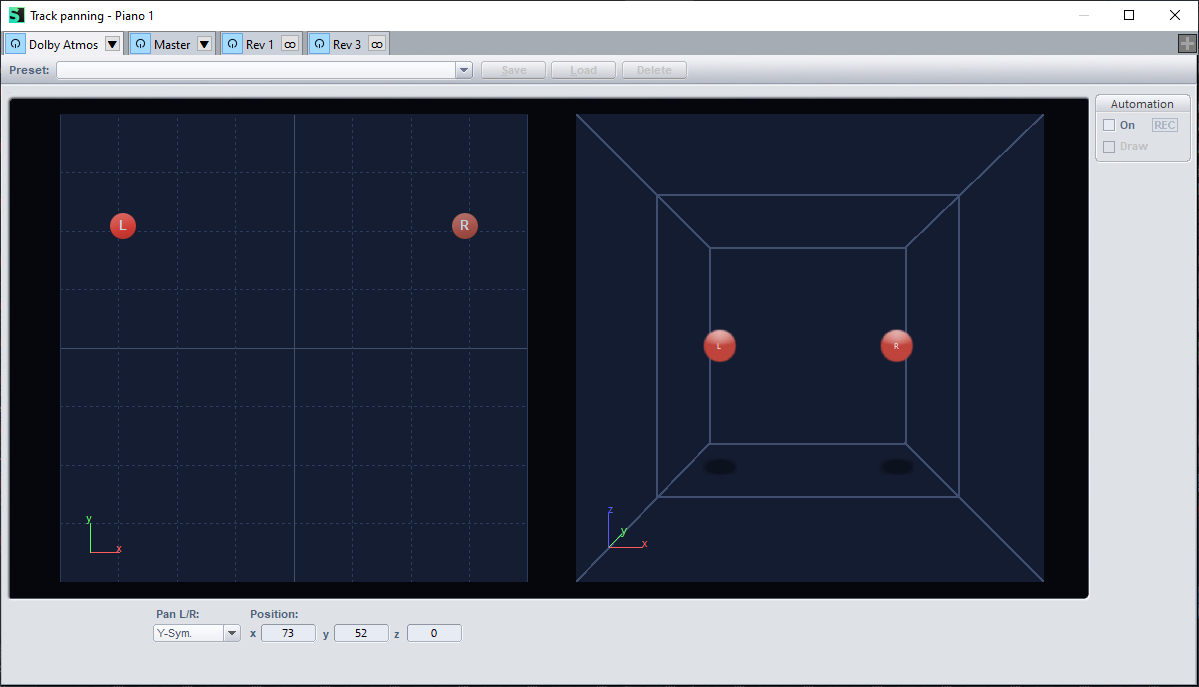
Object surround editor for a stereo signal
Dynamic metadata - Automation
In addition to static attributes, objects can also be positioned in space using dynamic metadata. This metadata changes during project playback and enables the movement of objects. The movement is controlled using Automation curves. In addition to the position parameters (X, Y, Z), Dolby Atmos has other parameters that can be automated:
| Name | Description | Parameter |
|---|---|---|
|
Size |
Controls the size of the object. A value of 0 means that the object is localized exactly at the specified X, Y and Z coordinates as a point-shaped sound source without spatial expansion, which means that the sound is positioned precisely and reproduced directly. A value of 1 means that the object reaches its maximum spatial extent and acoustically covers the entire listening room, whereby it is evenly distributed in the room and reproduced by all relevant loudspeakers so that its exact position is no longer perceptible. |
0…1 |
|
Speaker zones |
This allows the objects to be assigned to specific speaker groups in order to restrict playback to certain levels of the speaker system. |
The following zones can be assigned: 0 - all 1 - no back 2 - no sides 3 - center back 4 - screen only 5 - surround only |
| Object snap |
When active, the object position is moved to the nearest speaker and then "snaps" to this speaker. |
on/off |
| Elevation |
With Elevation off, the output of the object is limited to the listener level; the top speakers are no longer used. |
on/off |
Monitoring with the Render plug-in

|
To create a surround mix, the surround output must be rendered for the selected output format must be rendered so that it can be played back via the speakers. |
By clicking the Monitoring button, a surround bus is created and the renderer for the output format is loaded into the bus.
The render plug-in is an internal effect plug-in that is loaded in the first plug-in slot of the bus. However, the bus with the renderer does not behave like a normal bus. The audio signal goes directly from the objects into the render plug-in. From there, it is routed directly to the hardware outputs (speakers). The monitoring section can optionally be used for headphone monitoring. Other bus functions (gain, volume, EQ, other plug-ins...) are not available.
Click on the cogwheel  to open the render plug-in settings. Click on the cogwheel to open the render plug-in settings.
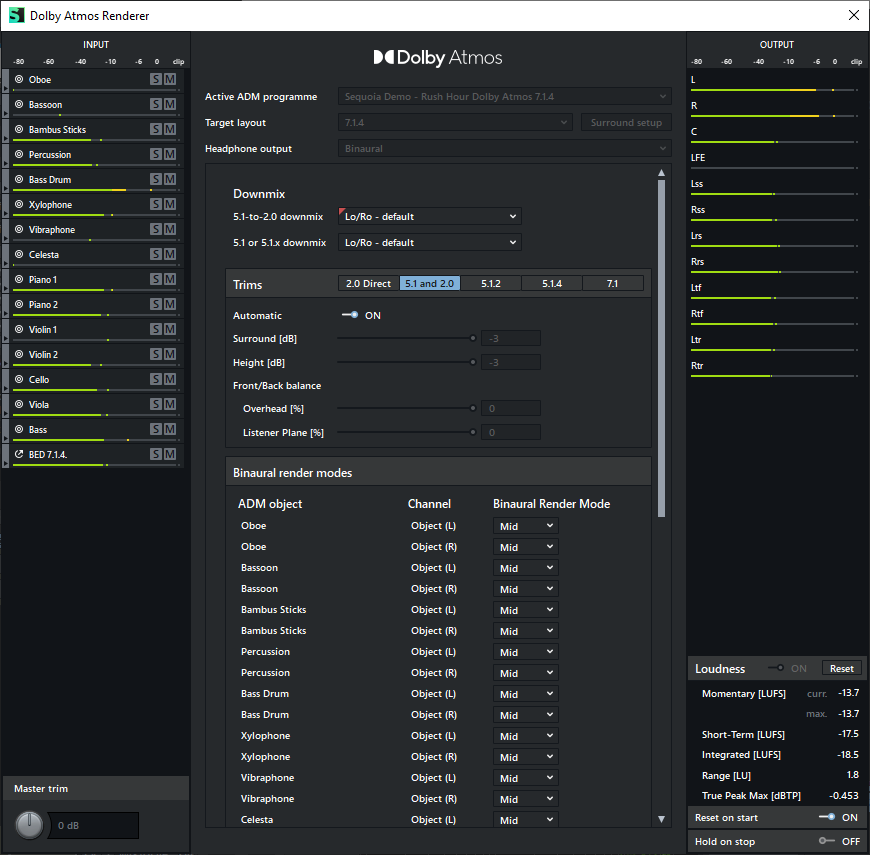
Settings of the render plug-in
The settings dialog of the render plug-in offers various monitoring options:
-
Peak meter:
On the right and left side of the dialog are peak meters for the input signals (track channels, sorted by ADM objects) and for the output signals (loudspeakers).
-
Mute & solo mode:
The "M" and "S" buttons can be used to mute or solo the objects individually.
The Solo (S) and Mute (M) buttons are only used to control the monitoring situation during monitoring. They do not affect the export of the ADM file.
-
Master Trim: Controls the overall volume of the input levels for all signals in the renderer. Enables amplification by up to +24 dB or attenuation by -24 dB.
The volume control allows you to globally adjust the volume of all objects displayed on the left-hand side of the renderer. It works independently of the mixer and only influences the input signals of the renderer. The volume can be adjusted by up to ±24 dB.
This makes it possible to adjust the ADM mix specifically to a desired loudness - for monitoring or test purposes, for example.
Comparison: While the mixer faders have a range of -100 dB to +12 dB, the volume control is used exclusively for global adjustment within the renderer.
-
Loudness measurement (loudness metering):
The measuring instruments for loudness measurement are located at the bottom right of the dialog.
Settings:
-
On → Activates the loudness measurement.
-
Reset → Resets the loudness measurement.
-
Reset on Start → Resets the measurement each time playback is started.
-
Hold on Stop → Pauses the measurement when playback is stopped.
-
You can find more information on loudness measurement in the section Loudness meter.
Further settings for the renderer can be made in the middle:
-
Active program: Only one program can be played at a time. This setting has no function for Dolby Atmos, as there is only one program in this case.
-
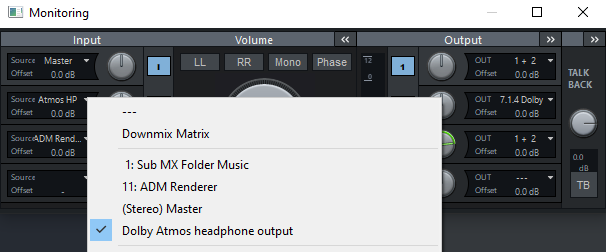
Target speaker layout: Select the speaker configuration of your playback system on which the surround mix will be played. Open the surround settings of the render bus via Surround Setup. Select a preset there that connects the channel assignments of your audio hardware with the corresponding speakers.
The Stereo, Stereo Direct and Binaural modes in the renderer are also only intended for listening. These settings do not affect the content of the exported ADM file.
-
Headphone output
The Dolby Atmos renderer offers a number of other settings that not only affect the renderer, but are also transferred to the exported Dolby Atmos BWF wave file:
-
5.1 to 2.0 downmix/5.1 or 5.1.x downmix: If the target speaker format is set to stereo, a downmix method according to Dolby standards can be selected. It is also possible to downmix more complex channel formats to 5.1 or 5.1.x (with raised speakers). When downmixing complex channel formats to stereo (not with "Stereo direct"), conversion to 5.1 takes place before the final downmix to stereo is performed. More information on the individual settings is available at Dolby Support.
-
Trims: The Trims function allows you to adjust the volume for the middle and upper levels. The balance between these two levels can also be adjusted. If automatic is activated, the system automatically adopts the preset values.
-
Binaural headphone modes: For binaural playback on stereo headphones, a special render mode can be defined for each object and each bed channel special render mode can be defined for each object and each bed channel. Binaural processing improves spatial sound perception by converting the entire 3D sound information into a stereo signal. The positioning of the objects and bed channels can be influenced using the following modes:
-
Off → No binaural processing
-
Near → Close to the listener
-
Mid → Average distance
-
Far → Far away
These settings enable optimized spatial perception, depending on the playback environment Playback environment and the desired sound image
-
Loudness calculation in the Dolby Atmos renderer
The Dolby Atmos renderer contains an integrated loudness measurement based on the settings on the "Loudness" page.
The calculation takes into account the basic settings and the program loudness and ensures that these parameters are used for the measurement. The exact maximum peak value (true peak) and storage options are not taken into account, as these are not included in the automatic calculation.
Parallel to the render signal, the system internally generates a stereo or 5.1 mix, which is used for the loudness calculation. The "Loudness" switch activates the measurement and display of the rendered audio data.
The measurement is controlled via the following options:
-
Reset resets the measured values.
-
Reset at start performs a complete reset of the loudness analysis at the start of playback.
-
Hold at stop ensures that the measured values are retained after the stop and are not automatically reset.