DeNoiser
With the DeNoiser function, you can effectively remove annoying background noise from audio material without its sound suffering to any significant extent. To do this, the algorithm requires a noise sample. The function is especially useful for eliminating consistent, long-lasting noise such as mains hum, fan noise, noise from inferior sound cards, tape noise or feedback.
Noise sample
For noise removal, the DeNoiser needs a sample of the noise signal, the noise sample.
Before opening the Denoiser dialog for this, select an area in the object or wave project where only the noise can be heard and choose Menu Effects > Restoration > Get Noise Sample. Especially for hissing, as a rule, you will usually get better effects with longer noise samples.
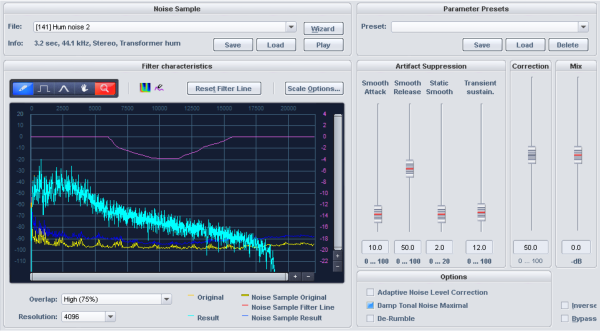
At File the noise print just captured is displayed. In the selection list you will find more noise prints of typical noise such as camera noise, mains hum or tape hiss, which you can use if you cannot find a place in the audio material that contains only the noise. At Info you will find information about the length, type and format of the set noise sample. The Save button allows you to save the noise sample for later use. With Load you can import any wave file as a noise sample. With Play you can play the selected noise print.
Wizard opens the Noise Print Wizard, which can help you capture the noise sample.
The Noise Print Assistant offers two additional ways to create a noise sample in addition to the menu item Get Noise Sample.
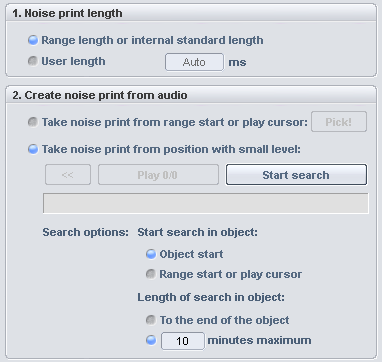
Use Set noise print length to set the length of the noise print. With the option Range length or internal default length, if a range is selected, the range length is used. If no range is selected, a default length is used. With User Length you can explicitly set the length for the noise sample.
For Create noise print from audio there are two methods to create the noise print:
-
Take noise print from range start or play cursor: With the button Pick! the noise sample is picked from the beginning of an existing range selection, otherwise from the position of the play cursor.
-
Take noise print from position with low level: This scans the audio material for low level positions and extracts the noise sample at such a position. After setting the search options (see below), press the button Start search. You can cancel the search by pressing "Esc".
After the search, you can switch between the found passages with the buttons << and >> and listen to them with Play. With OK you accept the current position as Noise Print and close the wizard.
Search options
-
Start search in Object – Object start: The search area starts at object start.
-
Start of the search in the object - Range start or play cursor: The search starts at the start of the range if a range was previously defined. Otherwise the search starts at the play cursor.
-
Length of search in the object – To the end of the object: The search for soft passages stretches until object end.
-
Search length in object – x minutes maximum: Enter the search length in minutes here.
Filter graphic
The filter on the left can be used to additionally filter the noise sample to improve the results.
The graph shows the original spectrum of the noise as yellow curve and the corrected spectrum used by the algorithm to remove the noise as blue curve. If the effect is active (e.g. during playback or monitoring) you can also observe the input spectrum as light blue curve and the output spectrum (orange curve).
The violet curve can be drawn freely and is used for filtering of the noise spectrum. For filter parameters and drawing tools, please refer to FFT Filter.
Artifact suppression
The applied algorithm can leave a metallic chirping or twittering sound, the so-called artifact noise. The level of artifacts is lower than that of the original noise - usually in the order of -20 dB - but due to its synthetic character the ear reacts quite sensitively to it. The settings at Artifact suppression are used to suppress these artifacts. Please note that choosing high values can also worsen the quality of the playback result.
Smooth attack: This parameter controls the attack during noise reduction. At high delay, the artifacts are effectively suppressed. However, this can degrade the timing and impulsiveness of the audio material. In case of speech or singing, high values will not always produce the best results. This method of artifact suppression is recommended for orchestral instrument.
Smooth release: Use this parameter reduce an overly strong reduction of the release phase. However, artifacts can again be amplified at high values. So find the most acceptable compromise between artifact suppression and impulse performance.
Static smooth: This smoothes the corrected spectrum of the noise that the noise removal algorithm uses. You can also see this in the graphical display: the blue curve is smoothed as the values increase. The artifacts are thus reduced. For speech, singing or pop music, high values usually lead to good results. With orchestral instruments, on the other hand, high values for this parameter can lead to an unpleasant roughening of the sound.
Transient sustain: With this parameter you can influence the algorithm in such a way that the noise removal works more reservedly with transients. This leads to a significant improvement in noisy jazz or pop recordings, for example.
Correction
This parameter causes the noise sample spectrum to be raised or lowered (dark blue curve). Low settings may result in incomplete removal of the noise or increased occurrence of artifacts. High settings may cause the results to deteriorate. These phenomena depend mainly on the type of noise, and the nature of the original material also plays a role. Note that a higher level of noise does not automatically require a higher correction value.
Mix
Here you can set noise damping in decibels, between 0 dB and -40 dB.
In many cases it is most definitely advantageous to not completely remove noises: for example when working with gramophone recordings, it can be desirable to leave some of that "gramophone feeling" in. In reportage, a complete cancellation of background noise is also usually not desirable. In addition, the imperfect suppression of the noise also reduces artifacts that occur.
Options
Adaptive correction: This enables continuous automatic adjustment of the value for the parameter Correction. Using "Adaptive correction" makes most sense with distortions with variable noise levels.
Dampen tonal noise to maximum: If the material to be removed is tonal noise such as humming or camera noise, activate this switch. This means that the "Correction" parameter only affects the non-tonal signal components (noise). This can lead to better results, since attenuating tonal signal components produces fewer artifacts than attenuating non-tonal noise. The value for the resolution should be at least 4096.
De-Rumble: Frequencies below 40 Hz will be considerably dampened. This way impact noise like footsteps or rumbling on records can be removed.
Inverse: If this switch is activated, you will hear only the part of the signal that is removed by the algorithm. If the parameters are optimally tuned you will only hear all the noise and only a small portion of the used signal If the parameters are set insufficiently, larger components of the music or speech signal become audible.
Bypass: This allows you to temporarily disable the effect in order to compare the unprocessed signal with the processed signal.
Procedure for the adjustment
To find optimal settings for noise removal from your material, proceed as follows:
- Search for a good Correction setting. The noise should just not be heard anymore. If artifacts occur, they should not be suppressed by a very high value for "Correction". The result could otherwise sound dull.
- To suppress artifacts, increase the values for Smooth Attack and/or Static Smooth. Which parameter is the more appropriate depends on the audio material.
- To improve the result, you can now slightly reduce Correction. In the process, the artifacts will reinforce themselves again. Now raise the Smooth attack and/or Static smoothparameters .
- A high value for Overlap will further increase quality.
- Increase the parameter Transient sustain until an increase in the disturbance is perceptible at the transients (with noise, this effect manifests itself as a kind of noise modulation). Now turn the fader back a little.
- For difficult cases, we recommend the freehand draw filter curve for the noise sample. Here, problematic areas can be influenced by frequency-selective boosting or cutting of the noise spectrum.
- If a convincing result cannot be achieved in very difficult cases, you can at least attenuate the noise by reducing the Mix value.