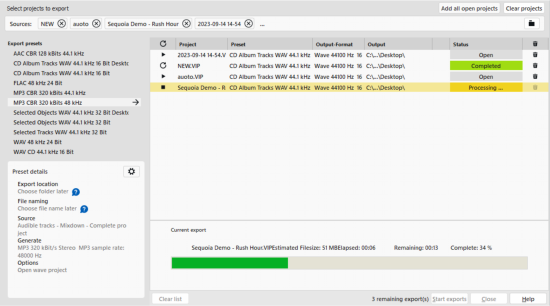
Export List
With the export list, several projects can be exported one after the other using different export presets. For example, you can
Note: For exporting a project to several different file formats (e.g. Wave and MP3) you can already define several file formats within an export preset in the section Create, for this you do not necessarily need the export list. However, the export list is useful when you need several files of the same file format with different settings (e.g. MP3s with different bitrates).
You can access the dialog Export list via the menu File > Export list... or via the button Open export list... in the export dialog.

-
At Sources, click at Select projects to export. You can now define the projects for the export in the menu:
-
Use Add current project/Add all open projects to add the current or all open projects as a source.
-
With Select project from hard disk… you can add further projects via a file selection dialog.
-
There is also a list of recently used projects in the menu, from which you can select projects for export by clicking on them. This list can be filtered by entering name components.
You can remove a project from the selection using the close field at the name (x). Use the recycle bin icon
 on the right to remove all selected sources.
 -
-
The list on the left shows all export presets. Move the mouse over the preset name to display a summary of the preset's settings at the bottom left of the dialog. To view the complete settings for this preset in an export settings dialog, click on the preset and then click on the gear icon at the bottom of the summary.
You can also make changes to the settings in this dialog and save these changes with Save preset. You have the choice of overwriting the existing preset or saving the changed preset under a new name.
Use Export dialog… to switch to simple export.
-
Double-click on the name of the export preset or click on the arrow symbol to the right of it to insert an export job with this preset in the export list for each source project.
-
You can now add more jobs with other presets.
Individual jobs can be removed from the list by clicking on the trash can icon behind the job, and all jobs can be removed by clicking on the trash can icon
 above the list.
 -
When you have finished creating the export list, start the exports with Start exports.
Attention: The export list is only processed without interruption if no presets are used that require user input. This occurs if you have specified the options Choose file name later or Choose folder later in the preset for the output folder or the file name. Such presets are marked with a warning symbol
 in the preset summary and in the list. Click on the icon next to an export job in the list to specify the storage location for this export. You can then click on the path specification to change it again before executing the job.
Individual export jobs can be started with the play icon at the list entry
 .
. -
The export jobs remain in the list even after the export until the end of the program session. So you can close the list and continue working on the projects involved. You can open the list again later and carry out individual or all exports again. To keep track, you can reset the status of a job using the repeat icon
 in front of the individual job or at the top in the column header.