Exporting Audio
With menu File > Export… (keyboard shortcut: Ctrl + E) you save your project to one or more audio files. (This is also referred to as "rendering" or "trackbouncing").
In the ExportIn this dialog all aspects of an export like used tracks, time selection, file formats... can be set very flexibly. dialog, all aspects of an export such as tracks used, time sections, file formats... can be set very flexibly That's a lot of parameters, so all the settings made in the dialog can be saved together as a preset for later use, so you don't have to start from scratch every time.
The dialog is divided into several sections that can be opened and closed individually. In the collapsed state, a summary of the selected settings is displayed in the heading.
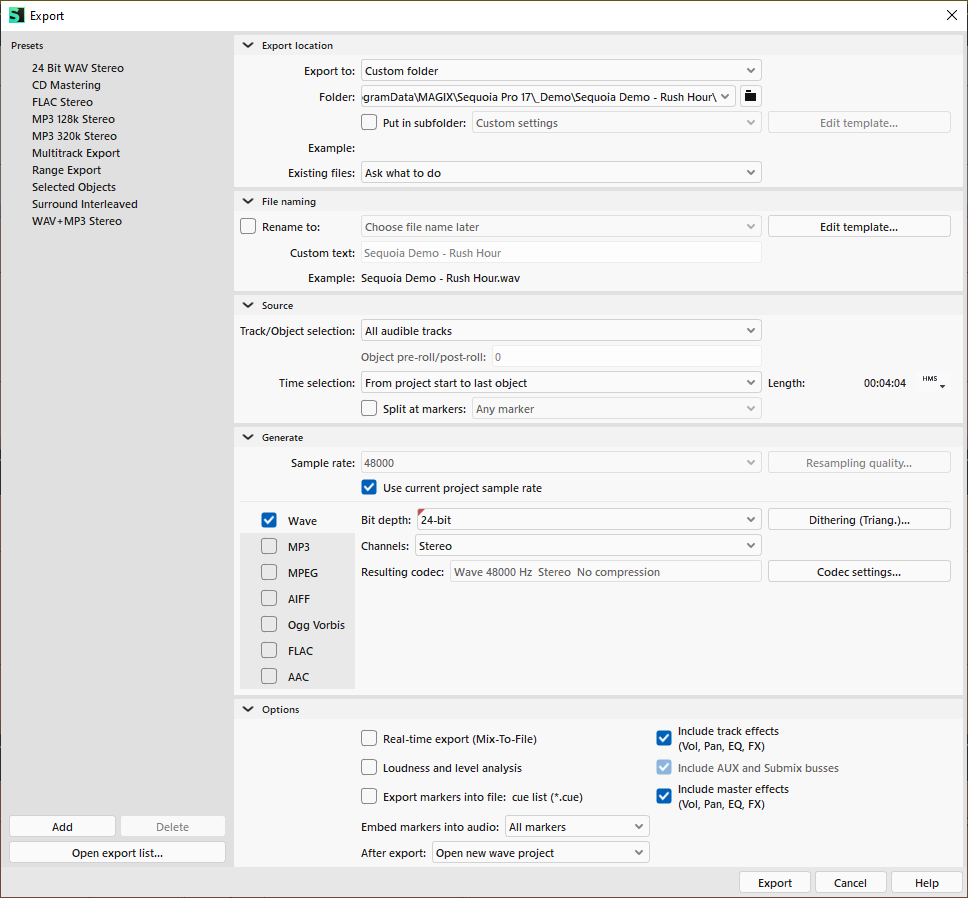
Export to
Here you specify where the exported files will be saved.
In the menu Export to: you can select the project folder (preset) or various default folders (Music, Desktop, Documents). You can use the folder button  to select other folders in the file system (Custom folder). Click on the arrow button to the right of the text field to select a folder from the most recently used export folders. When choosing Choose folder later you specify the folder just when you run the export function.
At Put in subfolder you can optionally specify an additional subfolder.
Existing files: Here you specify how to handle it if files with the same name already exist at the selected location, e.g. if you run an export again with the same settings. If you select the option Choose new name you will be asked for a new file name in these cases, if you select Overwrite existing files will be overwritten without warning. Skip skips the file. Ask what to do leaves this choice to you in individual cases.
File naming
Here you specify how the exported files will be named. The project name is used by default. If several files are created during export, e.g. by splitting at markers or when exporting individual tracks or objects, the file name is generated according to the following rules:
-
Single track export: <track number> <track name>
-
Export of individual objects: <object name> + <track number>, for identical object names in a track additionally + <consecutive number>.
If Chose file name later (see below), the name entered + consecutive number is used for tracks and objects.
-
Split at markers: <MarkerNumber>_<MarkerName>.
The project name is not used for the files, but used for the name of an optional playlist (see Options).
Activate Rename to for further naming options. In the menu, you will find various combinations of date, project name and a custom text, which you can enter in the field below the menu. Use the option Select file name later to enter the name in an input field for each export process.
With Edit template... you can create your own templates. Click the buttons with the variables to compose the naming scheme. You can also insert any other characters such as spaces or underscores. Characters that Windows interprets as path components, such as \ or :, are not allowed. The <CustomText> variable refers to the text you can enter at Custom text. Click on Save as... to give the template a name and add it to the Rename to menu.
For all of these options, you can see which file name results from the current project with the selected settings at Example.
Source
In this menu, you can choose whether to combine the output of all tracks or only selected tracks into one file, create separate files for each track, or export individual objects.
Track/Object selection
This menu is used to specify the outputs whose output is to be written to the files.
-
Master: This is the default option. All tracks that are routed directly or indirectly via submix buses to the mixer's master output are used. If surround masters are available, these masters are also offered as export sources in the menu, see Surround Export. There is also the option Surround + Stereo Master to export the first surround master and the stereo master together.
-
All audible tracks: All tracks that are not muted are mixed together. The regular device output routing of the tracks is ignored, and all tracks are mixed together and routed through the master, even if they are routed to physical outputs other than the master. For example, if you only use Sequoia as a recording device, assigning each track its own input and output and performing the mixdown outside the program, you can use this option to quickly create a mixdown within the program.
This corresponds to the option All outputs (ignore device routing) of previous program versions
-
Selected tracks only: Same as the previous option, but only the selected tracks are used. Of these, only the audible tracks (i.e., those that are not muted) are used.
If a selected track is a submix bus, all tracks routed to this bus will also be exported. This happens recursively, i.e. if these tracks are buses themselves, their sources will also be exported. This allows you to quickly mix individual groups together.
-
All audible tracks individually (Multi-track export): The individual tracks are always rendered through the entire effects chain, including sub-mix busses and master effects. When sending to AUX busses, the track portion of the AUX bus is also added. In other words, as if the individual tracks were set to solo one after the other, see Global solo mode Solo Safe. This behavior can be changed at Options so that the track effects, master effects and the portion from the buses can be deactivated separately.
-
All selected tracks individually (Multi-track export): This limits the single track export to selected tracks. Only the audible tracks (i.e., those that are not muted) from the selected tracks are used.
-
All audible tracks individually (Interleaved): There is also an export of the individual tracks, but instead of individual files per track, a multi-channel file in interleaved format is created, which contains a corresponding number of channels.
-
All selected tracks individually (Interleaved): This limits the single track export to an interleaved file to selected tracks.
-
Use Device routing (Interleaved): All tracks that are not muted are exported to the individual hardware output devices according to their routing. A corresponding channel is created in the interleaved wave file for each device output channel. Under Channels in the Generate section, you can also choose to create individual mono or stereo files instead.
-
Export all selected objects individually: All selected objects will be bounced individually, including the object effects, into a new file. This enables a large number of single objects to be exported quickly to separate files (e.g. for creating sample libraries).
When exporting objects, there is an additional setting Object pre-/post-roll, which allows you to include additional samples before and after the object boundaries in the file for safety.
-
Glue selected objects together: All selected objects, including object effects, are exported to one new file per track. All objects between the first and the last selected object of a track are glued together.
-
Glue selected objects until silence: All selected objects, including object effects, are exported to new files. The objects in each track are glued together until the next silence.
Time Selection
In this menu you select the time period of the project for export:
-
Selected range only: Only the range selected in the project will be exported.
Note: If no range is selected, the complete project will be exported.
-
Selected range markers: If several range markers have been selected in the range marker track or in the range manager, these ranges are exported separately.
-
From the beginning of the project to the last object: (default) The time selection goes from the beginning of the project to the end of the last object plus the reverb time.
-
Complete project: The entire project is used, i.e. including the silence behind the last object until the end of the project.
-
Complete CD: Time selection goes from the first CD track index to the CD end index.
Note: If there is no CD end index, the complete project will be exported.
Split at Markers
This option is not available for multi-track and object export.
Enable the option if you want to export to multiple files:
-
Each CD track into one file: Individual files are created, ranging from one CD track index to the next.
-
Each CD track to pause marker into a file: Individual files are created, ranging from one CD track index to the next pause index. The sections between the pause index and the next CD track index are not exported.
Select these options if you want the track information from the CD track indexes to be entered into the metadata (ID3 tags) of the exported files.
-
All markers: Individual files are created, each ranging from one marker (all marker types) to the next.
Generate
Here you specify the format to export to and what to do with the created audio files
Format
|
|
Select the file formats for export here. You can export to several of the available formats at once by enabling the corresponding option. You can select a single format with double-click. Click the format name to set the options for that format. Sample rate and Bit depth can be selected for all formats in the corresponding menus. The options that are not available for a particular format will be grayed out. You can use the option Use current project sample rate to create presets that are independent of the specific sample rate of the project. |

Dithering: You can define your own dithering settings for each export, independently of the global settings. You can bypass dithering altogether (No dithering), apply the default dithering Triang., or dither according to the system options. The button shows in brackets (e.g. Triang. or POW-r 1) the currently set dithering algorithm. Dithering Options opens the System-Dithering Settings.
Resampling quality: With this button you open the program settings for the resampling quality during export.
With Codec Settings... you open the settings specific to the respective file format:
Wave (*.wav files) is the standard format for storing audio files on Windows computers and the recording format used by Sequoia. It allows bit depths up to 32bit (float) and any number of audio channels. Use this format for all files that should be further processed and should be in maximum quality.
Codec: Leave the setting at uncompressed, unless you want to use special compressing wave codecs, which you can select from this list. These codecs are from the early days of computer-based audio processing and are now only used in very rare special cases such as mobile telephony. When selecting these codecs, you can choose from several preset channels/sample rates/bite depth defaults that override the settings for these parameters in the Export dialog.
MPEG II Layer 3, abbreviated as MP3 (*.mp3 file) is a widely used file format for audio files that uses lossy compression.
Encoder quality: You can choose between a faster encoding and one with high quality. If time is not very tight, you can keep High Quality.
Bitrate: The bitrate of the compression can be set from 16 kBit/s to 320 kBit/s. At the highest setting of 320kBit/s, there are no longer any audible differences to uncompressed audio. However, if you plan to process the files later, we recommend using uncompressed formats, since applying effects may cause artifacts resulting from the previous compression.
Variable bitrate: The bitrate is dynamically adjusted to the audio material, a lower bitrate is used in quieter places, a higher bitrate in more complex places. Therefore you can no longer specify a fixed bitrate, instead there is a setting for quality. A constant bitrate provides streaming capability and maximum compatibility; a variable bitrate provides better audio quality at the same file sizes. Not all playback programs can process VBR correctly, some will result in problems during title length display or when seeking.
Info text editor: MP3 files can contain metadata (title, artist, genre...). When exporting with Split at markers, the metadata from the CD track indexes is transferred to the files. This button opens the CD-Text/MP3-ID Editor for editing the metadata.
MPEG (*.mpg, *.mp2, *.mus, *.wav) files, more precisely MPEG-1 Audio Layer 2 is a lossy compressed audio file format. It is a precursor to the popular MPEG 1 Audio Layer 3 format, now known as MP3 for short. While MP3 is essentially used for Internet streaming and portable audio playback, MP2 is still used for digital broadcasting (DAB, DVB) and occasionally for DVDs.
Bitrate: The bitrate of the compression can be set from 64kBit/s to 384 kBit/s.
Stereo options: In addition to stereo and mono, there is also Joint Stereo, where common components of the channels are stored only once, allowing better compression at the expense of channel separation.
File format: Here you can select the container format used for the compressed data.
AIFF (*.aif files), Audio Interchange File Format, is the standard audio file format on the Mac platform. It has nearly the same properties (lossless, bit depths up to 32bit float) as Wave. Use this format for data exchange with MAC audio software users.
No special codecs are selectable, so the Codec settings button is not available.
Ogg Vorbis (*.ogg files) is a royalty-free open source audio codec with very good sound characteristics in comparatively small files. It works, similar to MP3, with lossy compression. Not all hardware players can handle this format.
Bitrate: The bitrate of the compression can be set from 46 kBit/s to 500 kBit/s (for mono up to 240 kBit/s).
Variable bitrate: Constant bitrate provides streaming capability and maximum compatibility, variable bitrate provides better audio quality at the same file sizes. The selected bitrate is then only a guideline, the bitrate changes dynamically depending on the audio material.
Info text editor: OGG files can contain metadata (title, artist, genre...). When exporting with Split at markers, the metadata from the CD track indexes is transferred to the files. This button opens the CD-Text/MP3-ID Editor for editing the metadata.
FLAC (*.flac files) is the abbreviation for "Free Lossless Audio Codec". This is a royalty-free open source audio codec that lets you compress your audio to about 50% of the original size. Unlike other compression methods like MP3 or OGG, the full sound quality is kept intact with FLAC. Lossless compression algorithms similar to the zip or rar archives used for file transfers are used.
FLAC is the only compressed audio format that allows a bit depth of 24bit. It is therefore best suited for space-saving archiving of raw material from 24bit recordings.
The compression rate can be set between 0 and 8. This does not affect the quality of the generated files (the compression is lossless), but only the speed of the export: the higher the compression is, the longer it takes.
Info text editor: FLAC files can contain metadata (title, artist, genre...). When exporting with Split at markers, the metadata from the CD track indexes is transferred to the files. This button opens the CD-Text/MP3-ID Editor for editing the metadata.
AAC (*.mp4 files), Advanced Audio Coding is a lossy compressed audio file format primarily used in video and audio streaming and portable audio players.
Type: You can choose between different so-called profiles here. In most cases, for maximum compatibility with hardware players and streaming providers, you should keep the AAC LC (Low Complexity) profile. Only at very low bit rates and for special requirements is the use of HE-AAC/HE-AAC v2 (also referred to as AAC+ or AAC+ v2) worthwhile.
Bitrate mode: When selecting Constant Bitrate you can select a fixed bitrate between 64 and 480kBit/s at Bitrate, furthermore you can select different guide values for variable bitrates, furthermore you can find settings for different broadcast standards like DAB+.
Quality: Choose between different quality levels here, higher quality also increases the time required for encoding.
Note: For AAC export, the sample rate depends on the bit rate. For example, if you load a 44.1 kHz wave file into a 44.1 kHz VIP and then export it as AAC at 128kbit/s, you get a 44.1 kHz sample rate file. If, on the other hand, you export the same file at 256 kbit/s, you get a 48 kHz file.
Info text editor: AAC files can contain metadata (title, artist, genre...). When exporting with Split at markers, the metadata from the CD track indexes is transferred to the files. This button opens the CD-Text/MP3-ID Editor for editing the metadata.
Windows Media (*.wma files) is a Microsoft audio/video format optimized for streaming purposes. In the dialog, different, rather historical profiles can be selected for streaming in low bitrates. To create additional profiles you need the Windows Media Encoder 9 from Microsoft.
Info text editor: WMA files can contain metadata (title, artist, genre...). When exporting with Split at markers, the metadata from the CD track indexes is transferred to the files. This button opens the CD-Text/MP3-ID Editor for editing the metadata.
The result of these settings is displayed at Resulting Codec.
Channels
Here you define how the stereo channels are treated during export. For some file formats only stereo is possible, then this menu is grayed out.
-
Stereo: Both channels are output to a stereo file.
-
Left & Right: The stereo channels are output separately in two files, filename_L and filename_R.
The load option Load L&R files as stereo allows such file pairs to be automatically treated as stereo files when loaded by loading them into one stereo object.
-
Left channel only: The left channel is output to a mono file.
-
Right channel only: The right channel is output to a mono file.
-
Mono mix: The left and right channels are mixed together according to the formula (L+R)/2 and output to a mono file. The panning law of -6dB ensures that mono signals panned to the center are exported at the correct level. Select this setting if the project contains mono tracks panned to any position.
-
Mono: The left and right channels are mixed together according to the formula L+R. Select this setting if the project contains mono track pairs (panned alternately all the way to the left and right).
-
Automatic: Stereo tracks are exported stereo, mono tracks are exported mono.
Options
Realtime export: This option allows you to perform the export in real time.
Include master effects: If this option is activated, all effects applied to the master bus are included in the export. These include volume adjustments, equalizers, compression, reverb, and other mastering effects. Deactivate this option if you want to export without master effects.
As the entire effects chain including the master effects is also taken into account when exporting individual tracks, it is recommended that you deactivate this option if you want to export individual tracks (stems) for a remix or further editing.
Include track effects: If this option is activated, all effects applied to the individual tracks are included in the export, including:
-
Volume
-
Stereo position (pan)
-
Equalizer (EQ)
-
Additional effects (FX) such as reverb, delay or compression
Deactivate this option if you only need the raw audio material, for example for further mixing or mastering in other software.
Include AUX and submix buses: Deactivate this option to not include the influence of tracks that are routed to submix busses or that send to AUX busses when exporting them.
This corresponds to the behavior of older versions of Sequoia.
If you export individual objects or glue them together (see above at Track/object selection), the track effects are automatically deactivated. If you also select the options Create new objects and Replace object(s) as action after Export (see below), the master effects and the AUX and submix bus effects are also deactivated so that the effects are not used twice.
Loudness and level analysis: This option allows you to display the
Export marker file: If there are CD track indexes in the project, you can use this option to create a cue file (*.cue) that contains the track information. If the option Split at markers is activated at Source, a playlist file (*.m3u) is created instead.
Embed markers in audio file: All markers in the project are written to the audio files as audio markers. (only when exporting to Wave format)
Action after export: In this menu you can define what should happen to the created audio files after the export.
-
Create new audio file: The audio file or files will only be created.
-
Open new wave project: The audio file or files will be created and opened as wave projects in new windows.
-
Create new objects in VIP: The audio file or audio files are created and inserted as new objects in new tracks in the project.
-
Replace object(s) in VIP: The objects involved in the export are removed and the created files are inserted as new objects on the involved tracks.
-
Create new VIP: A new project is created and the new audio material is inserted.
Presets
The complete settings of the export dialog can be saved to presets.
|
|
|
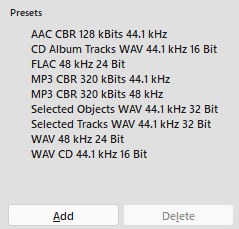
Each preset is included in the menu File > Export with preset, so you can perform an export with the settings of a preset without opening the export dialog.
With menu File > Export with previous settings you repeat an export with the last selected settings.
Use Open export list... to open the export list, in which you can perform multiple exports with several presets in one go.