Room Simulator
The Room Simulator is a reverb effect that simulates the reverberation of any room using its impulse response ("reverb tail"). A room impulse response is the reverberation of a very short, impulsive sound, such as a bang. You can additionally manipulate the impulse response with the various parameters in the dialog. This way you edit the reverb properties (reverberation time, damping...) similar to algorithmic, digital reverb effects. In addition, however, you have the option of fundamentally determining the reverb character by selecting the impulse response.
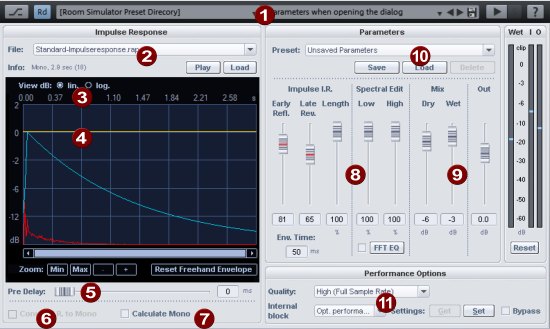
A graphic representation of the impulse response and the envelope allows an overview of the impulse response manipulation using the Room Simulator parameters dialog.
|
|
Banks and presets: In the header of the dialog you can choose from a series of banks and corresponding presets. The default installation of Sequoia only installs a small selection of presets and impulse responses for the room simulator. You can get the rest of the presets and impulse responses by installing additional content via menu Help >Download instruments and sounds.... The presets contain both the parameter settings of the dialog and the reference to a specific impulse response. The impulse response can be any sample, supplied impulse responses have the file extension *.IMR. |
|
|
Impulse Response:
|
|
|
View dB lin./log.: The graphic display with the impulse response has linear amplitude scaling. This settings corresponds to the common display of samples. The representation in logarithmic amplitude scaling corresponds to the human loudness perception. |
|
|
Freehand envelope: The amplitude curve of the impulse response can be edited by drawing the yellow freehand envelope into the graphic with the mouse. You can use this to attenuate or cancel individual early reflections of the impulse response. With the zoom controls (Min, Max, +, -) you can zoom into the time course of the impulse response to find problematic reflections and edit them exactly. By clicking on the Reset Freehand Envelope button you can reset the yellow envelope curve. |
|
|
Pre-Delay: The Pre-Delay value delays the entire impulse response by a period of 1ms to 100 ms. |
|
|
Convert I. R. to Mono: If you select the Convert I.A. to Mono option, stereo impulse responses will be converted to mono. The convolution is calculated in stereo |
|
|
Calculate mono: If active, the entire reverb is calculated in mono only, which reduces the required computing power. The input signal and the impulse response, if stereo, are converted to mono before convolution. |
|
|
Envelope I.R./Equalizer: Use these controls to influence the duration and sound of the reverb by editing the impulse response. Envelope I.A.: The envelope of the impulse response (light blue curve in the graphic) allows to fade in and out the impulse response. The edits made by the envelope are shown in the graph of the impulse response (red curve).
Equalizer:
|
|
|
Mix/Out: With these sliders you adjust the mixing ratio of the Dry and Wet signals as well as with Out the overall level. Wet/I/O: The level meters show the generated reverb signal (Wet) as well as the input and output signal level. Reset resets the markings of the highest levels of the level indicators. |
|
|
Parameter Presets: Here you can select, save, load and delete presets, which are composed of the parameters for the envelopes, frequency response and mix. The presets can thus be combined with different impulse responses. |
|
|
Performance/Options: Room simulation by convolution is relatively computationally expensive. With the settings at Performance Options you can set different qualities for the effect with different levels of computing effort.
Bypass: This allows you to temporarily disable the effect in order to compare the unprocessed signal with the processed signal. |


Tips and tricks
-
By applying effects to the impulse response you can influence the reverb character in many ways beyond the possibilities offered by the room simulator:
-
If you apply menu Effects > Sample manipulation > Reverse to an impulse response, you get a reverse reverb.
-
The application of time-stretching to the impulse response allows the room size to be changed without altering the resonant behavior of the room.
-
-
Apply an pulse-like decaying envelope to any shorter samples and use the result as an impulse response - this creates the most exotic reverb effects.
-
Interesting reverb sounds are also created when you use samples of percussion instruments as impulse responses.
-
Via Menu Object > Impulse response extraction… you open an assistant that supports you in creating your own impulse responses for use in the room simulator.