Track Options Dialog
The dialog Track Options shows all settings of the selected track. Most of the settings here can now be adjusted more quickly in the Track head, Track editor or Mixer, it is in this respect a legacy dialog of older Sequoia versions with a simpler interface. But it also contains a few controls that make it easier to set certain track properties for several tracks together.
To display the Track Settings dialog, right-click Track Name or Track Number in the Track Head or Track Editor, or select Menu Track > Track Options… (keyboard shortcut: Alt + I).
|
|
|
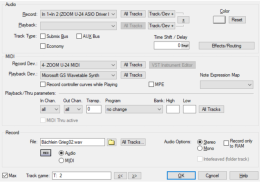
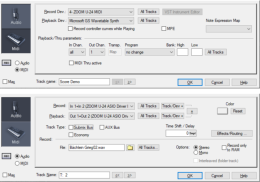
The Max option in the lower left corner of the dialog can be used to switch between two different views, where the settings for audio and MIDI are displayed either on two different views Audio and MIDI or together in one view.
In the field Track name at the bottom the track name can be displayed and changed, with the <</>> buttons you change the displayed track.
Audio
Here you make settings for recording and playing back audio on the tracks.
-
Record/Playback: Recording and playback device for the track. Submix busses can also be selected for playback.
-
All tracks: The recording or playback device selected for this track is used for all tracks.
-
Track/Dev +: Use this button to assign successive input or output channels to successive tracks (channel pairs for stereo tracks). Clicking this button switches to the next track and simultaneously sets the next device for this track, e.g. from an output pair 1+2 to 3+4.
The + - button next to the two Track/Dev + simultaneously switches to the next recording and playback device.
If there are no further devices, the assignment for the next tracks is started again from the first device.
-
Color: Setting the track color and the color of objects placed on it.
-
Track type: This indicates if the track is an AUX or Submix bus. A single track can also be both.
-
Timeshift/Delay: Use this field to set a time offset for an entire track. Positive values cause the playback of this track to be delayed by the entered amount. Negative values result in earlier playback of the track. All other tracks and the play cursor will be delayed in relation to the entered value. To the right of the input field you can select the unit of the time delay.
-
Effects/Routing: This button opens the Effects routing dialog for the corresponding track.
MIDI
Here you make settings for recording and playing back MIDI on the tracks.
-
Record Dev./Playback Dev.: MIDI input and output device selection. The list of playback devices also includes all VST instruments.
-
All tracks: The recording or playback device selected for this track is used for all tracks.
-
VST Instrument Editor: Opens the graphical interface of an included VST instrument.
-
MPE: Sets MIDI recording to MPE mode
-
Note Expression Map: Here you can select a VST3 Note Expression Map.
Record controller curves while playing: If this option is active, incoming MIDI CC events (controllers) are written to automation curves for these controller values during playback. This is a legacy option that was once used for MIDI remote control of digital mixer hardware. Attention, the function is independent of whether recording is active for a track.
Play/Thru parameter: For detailed information about these parameters see Track Editor > MIDI!
MIDI Thru active: Corresponds to activating monitoring (speaker symbol) in audio tracks, i.e. incoming MIDI data is forwarded to the output.
Recording
The section "Record" contains settings for recording
Rec corresponds to the recording readiness for the track
File: File name of the audio file to record to on this track. Since these names are only used internally, as long as you do your production entirely within Sequoia, you can leave these names at the defaults. If you want to use the recorded raw material elsewhere or pass it on, you have the option of naming these files according to specific naming schemes for better identification. To do this, click All Tracks and choose an option from the menu:
- Filename_track number: Enter any filename in the field File and select this option to use this name on all other tracks, appending the respective track number, e.g. funky_01.wav, funky_02.wav..
- Project name_track number: (default) Uses the project name on all tracks, supplemented by the track number, e.g. demo_01.wav, demo_02.wav..
- Track name: Uses the track name of each track as file name, e.g. Drums.wav, Bass.wav...
- Track number_Track name: Uses the track number and the track name of each track as file names for the audio recording, for example, 01_Drums.wav, 02_Bass.wav, etc.
- Project name_Track name: Transfers the project name to all tracks and adds the corresponding track name to them, for example demo_Drums.wav, demo_Bass.wav, etc.
- Track number_take name and other options with take name: These options correspond to the optional Recording setting Save each take in a new file, but allow a bit more flexibility in naming the files.
The last two options are also in the menu, but they are not used to define the file name, but vice versa to define the track names based on the file or object names:
- Set track name to first object name: Tracks are named after the name of the first object in the track.
- Set track name to first object file name: Tracks are named after the audio file name of the first object in the track.
With these commands you can name the tracks according to the file names after importing several files one below the other, e.g. stems from a remix kit.
Audio options
-
Stereo/Mono determines whether the recording on the track should be in Stereo or in Mono. This also determines whether you can select individual inputs or input pairs on the recording device.
In the track's input routing (right-click on Rec in the track head) you can also specify stereo processing for tracks recorded in mono (Mono In / Stereo FX).
-
The option Record only to RAM allows recording to be done directly in the system RAM.
-
Interleaved (folder track) is only available for folder tracks and activates a interleaved recording for them.