Tempo Track
With the tempo track you can display the course of the tempo as a curve in a separate track. The Tempo Track is a graphic display of the project's tempo map as an automation curve. Each automation point of the curve corresponds to a tempo marker. Changes to tempo markers are automatically transferred to the Tempo Track and vice versa.
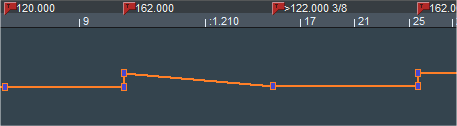
BPM markers, a tempo ramp (>) and a time signature change (3/8) and the tempo track below.
The Tempo Track head provides quick access to the most important commands for placing and editing tempo markers.
Note: You still have the option of displaying the "tempo" automation curve as one of many automation curves in any other track, instead of displaying it in a separate Tempo Track. However, you will then be missing the special controls in the track head of the tempo track. When you create a separate tempo track, the tempo automation curve of the other track is removed.
Creating Tempo Tracks
To create a Tempo Track, select Track > Insert new Tracks > New Tempo Track.
Tempo automation behaves somewhat differently than the other track automations: For example, in the case of a leaping tempo change, the two automation points (old and new tempo) are coupled together, and the automation drawing mode creates new automation points only by clicking, not clicking and dragging.
Note: In the tempo track the beat grid is constantly active (regardless of the system option Program > General > Use snap for automation curve points). The grid can be temporarily deactivated with the Alt key.
Editing the Tempo Track
The tempo track can only be edited in BPM mode, in snap mode it serves solely as a display.
Insert Tempo Changes
Double-click in the Universal mode  (single click in Curve mode
  ) on the desired position in the tempo curve. With the new curve point, a new tempo marker also appears in the marker bar.
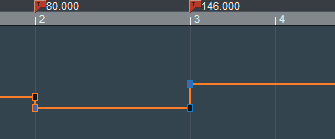
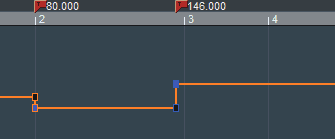
Drag the newly created curve point up or down to change the tempo. You can see that there are actually two automation points created at the same time position, one is connected to the previous point and can only be moved horizontally to adjust the time position of the tempo change. The other can only be moved vertically and is used to set the tempo.
If the tempo change is very small, it may happen that the points are on top of each other and you can only reach the point for the time position with the mouse. For the tempo change, you can therefore also drag the curve behind the point for the tempo.
If you hold down the Shift key while moving a point, only the vertical position (tempo) can be moved, whereby the tempo can then be set more precisely.
Right click on a curve point opens the Tempo and Signature dialog, which allows you to change the properties of a tempo marker and the values numerically.
Insert Tempo Gradient
To insert a tempo gradient:
-
Holding down the Shift key while double-clicking (Universal mode) or single-clicking (in Curve mode/Automation Draw mode) to create a curve point will create a tempo gradient to the previous BPM marker. Only one point is created, which can be moved in both directions (position and tempo).
-
If you hold down the Alt key while clicking and moving a curve point, you convert tempo leaps to both adjacent tempo markers into tempo gradients. The two points are combined into one point that can be moved freely.
-
Hold down the Ctrl and Shift keys and click a curve point to toggle between tempo gradient from the previous tempo marker and a tempo leap.
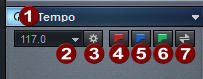
Tempo Track Head
|
|
Tempo automation on/off: You can disable tempo automation entirely with this button. This corresponds to the option Ignore all tempo markers, use project tempo in the Tempo Map dialog. |
|
|
Current tempo: The dropdown menu under the arrow corresponds to the one in the transport console and contains a selection of preset tempos, as well as the tap tempo feature. |
|
|
Open Tempo Map dialog |
|
|
Insert new tempo marker |
|
|
Insert new time signature change |
|
|
Insert new grid position marker |
|
|
Switch between Grid mode/BPM mode. |


