Video
Although Sequoia is not intended for video editing, you can also load video files into Sequoia to create, edit, or surround mix a movie soundtrack. These are then played along with the project and displayed in a separate video window.
Loading Video Files
This can be done by drag&drop from Windows Explorer or File Manager or via menu File > Import > Load video file…. Supported file formats are MPEG2 (mpg, mpeg, m2v, mp2, vob...), MPEG4 (mp4, mov), AVI, DV, MXV (Boris FX own full frame format) as well as image files in JPG or BMP format.
For the video file, a video object is created in a separate video track above the first audio track. The video object shows its content as thumbnails.

Optionally, the original video sound can also be imported and placed on its own audio track below. This converts the audio data into wave files.
Video objects can be moved and cut just like the other objects. However, it is not possible to fade in or out the objects or to use crossfades.
Note: Since Sequoia
Video objects do not have an object editor, double-clicking on the video object opens the video window instead. The video object's context menu displays the video's resolution and frame rate at the very top. This frame rate should match the frame rate of the project. Only then the grid mode and the display of the project time with frames (SMPTE) in the grid bar, time display and video preview window will work correctly.
Video window
The video window is used to display the video. Open it by double-clicking the video object or from the menu View. It can be displayed floating or docked like the other windows.
Right-click in the video window to get some display options:
-
With Original aspect ratio the window uses the original aspect ratio of the video, with 4:3 and 16:9 you can force a different aspect ratio.
-
Select Full Screen for a full screen display.
-
Use Double, Original, Half, or Quarter video size to adjust the video window to the appropriate size of the video. The function is available only when the video window is not docked.
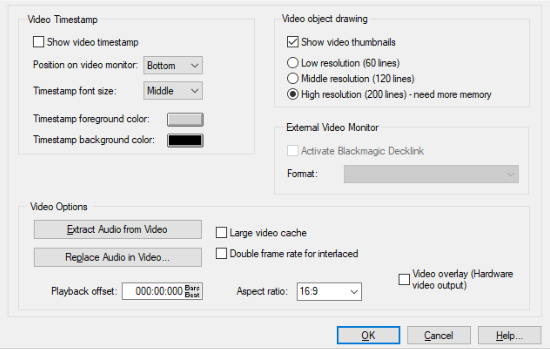
Video Settings
Using the context menu of the video window and video object or menu File > Properties of the project you can open the video settings, for further video playback options.
-
Show video timestamp: This option shows the timestamp display in the video window. You can display it in three sizes either at the top, in the center or at the bottom of the project window.
-
Video object drawing: The option Show video thumbnails displays thumbnails in the video track in different resolutions. In drawing mode 2 of the View options (Tab key), only the first and last frames are displayed.
-
External Video Monitor: Enable Blackmagic Decklink allows video output to an external monitor via appropriate video hardware.
-
Get Audio from Video: This button allows you to extract audio from a video file and insert wave data into the current project.
-
Replace Audio in Video: This button executes the Export video sound function, which lets you replace an existing audio track in an video file with the project's audio.
-
Playback offset: Set a positive or negative playback offset in this field.
-
Large video cache: The video caching cache is increased, which increases the memory footprint, but also makes the program more responsive.
-
Double frame rate for interlaced: Here you can double the frame rate when playing back interlaced video to display the videos flicker-free.
-
Aspect ratio: Select an aspect ratio of either 4:3 or 16:9.
-
Current Video Frames Window: An additional video window is opened to display the start and end frame of a selected range or object for range and object selections.
-
Video overlay (hardware video output): "Video overlay" indicates that the graphics card calculates the video display and the video picture is positioned on top of the actual Windows screen (overlay). This speeds up the video output and should only be deactivated in case of problems.
Exporting Video Sound
Select Menu File > Export video > Export Video Sound… to replace to create a new video file from a video and the sound of the project.
Select the original video file at video source. At audio length, the length of the audio track in the video and the length of the project are specified. If these lengths differ, a warning is issued. On export, the longer component is then truncated.
Under Audio Format the format of the original video sound is displayed. The export of the project is done in this format.
Target file: Click the folder icon to set the new file name.
Pressing OK exports the master output of the project and inserts it into a new video file.