minProject Display
You can configure the display of the project and the objects in it in great detail. To do this, use the section Designs > Project view in the Program preferences. You can reach the dialog via menu View > VIP display mode > View options… or keyboard shortcut Shift + Tab.
In the drop-down menu at the top, you can switch between four different complete sets of options, the drawing modes. You can quickly switch between drawing mode 1 and 2 with the Tab key without having to open the dialog.
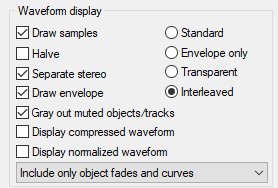
 Waveform display
-
Draw samples: Here you can turn the wave form display on and off. When deactivated, volume or pan curves are more clearly visible.
Note: In drawing mode 2, the waveform display is disabled by default.
-
Halve: The display of the samples is switched to half waveforms.
-
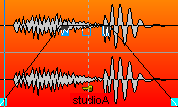
Separate stereo: For stereo files, the channels are displayed one above the other.
-
Draw envelope: The envelopes of the objects are drawn.
-
Gray-out muted objects/tracks: Muted objects and tracks will be shown gray.
-
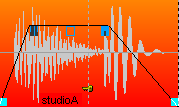
Display compressed waveform: In compressed waveform display, the assignment of levels to the height of the waveform is not proportional, but compressed in such a way that differences at low levels are displayed larger than at high levels. This makes it easier to see the transition between low level signals and the noise floor.

Image of the waveform without and with compressed display at the same zoom level
-
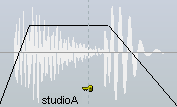
Display normalized waveform: If you have activated this function, the waveform of each track is zoomed vertically so that the sample with the highest value exactly fills the track height. Manual vertical zooming of the waveform using the keyboard shortcuts Ctrl + up/down arrow or the buttons for Zoom Wave In and Zoom Wave Out are disabled.
 This option can be switched via this button on the lower toolbar.
Attention: In this display mode, the volumes of objects can no longer be compared visually, as they always look the same regardless of the object volume setting. Use this view mode when you want to cut objects with very different levels and do not want to constantly change the zoom level of the waveform.
-
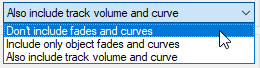
In this menu, you select how the waveform display is scaled by the object fade-in/out and by the volume curves (track/object). In the preset mode Include only object fades and curves, the waveform is only scaled by the object fades and, if applicable, by object volume curves. With Also include track volume and curve the track volume or its automation curves are also included. This corresponds to the previous option Scale with fades/curves. This scaling makes, for example, the decay of the sound during a fade-out visible as well as volume changes by a volume curve. Even with crossfades, this mode provides a good visual evaluation of the resulting audio signal.

On the right side of this section there are options to control the display of crossfades:
-
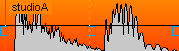
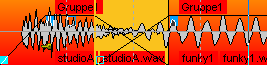
Standard: The wave form of the second object is drawn over the wave form of the first one:
-
Envelope only: This drawing mode displays only the envelope of the waveform, so that with crossfades the volume course of both objects becomes very well visible.
-
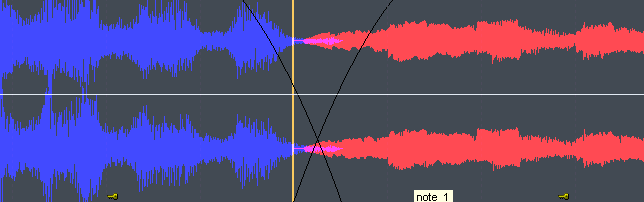
Transparent: In this drawing mode, the waveforms of the crossfade are superimposed in color. For this, the waveforms appear against a dark background. It is best to combine this mode with the alternating red/blue option for the waveform color (see below) so that the the crossfaded regions are optimally visible.
-
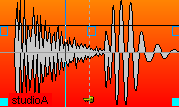
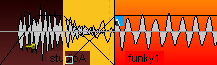
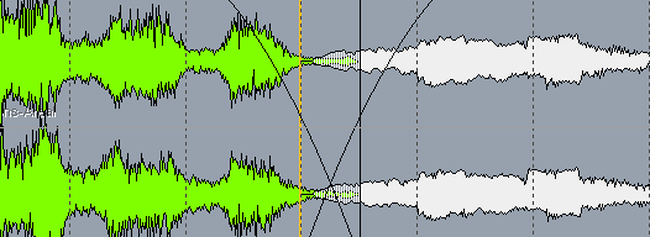
Interleaved: In this mode, within a crossfade, a sample of the left object and a sample of the right object are always drawn alternately. Especially if the two neighboring objects have different colors, the fade area can be well visually estimated.
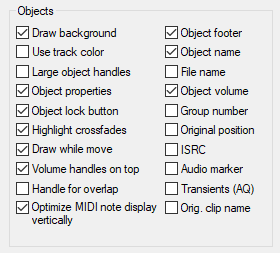
Objects
-
Draw background: Activates the background colors of the objects. Every object can be assigned its own color (see Object Color/Name or in the Object Editor under Color).
-
Use track color: The track color is used as the background color of the objects.
-
Large object handles: The object handles are displayed larger.
-
Object properties: Display object settings such as EQ, dynamics, pan, effects, or plug-ins as abbreviations on the object.
-
Object lock symbol: Display lock symbol for Locking objects.
-
Highlight Crossfades: The crossfades between objects are highlighted.
-
Draw while moving: The user interface is updated while moving. This option can be deactivated for computers with low processing capabilities.
-
Handle for overlap: This handle allows you to set the overlap of crossfades without having to open the crossfade editor or object editor.
-
Volume handles on top: If active, the volume handle of an object is always displayed at the top regardless of the object volume setting, otherwise it is moved when the volume is adjusted.
-
Vertically optimize MIDI note display: In MIDI objects, notes are arranged vertically so that the lowest and highest notes present in the object are placed at the top and bottom of the object to make best use of the available space.
-
Object volume: Numerical display of the object volume in dB.
-
Object footer: The texts displayed on the object are shown in a special area below the waveform
-
Object name: The object names are displayed.
-
File name: The file names are displayed.
-
Group number: Objects can be grouped in VIPs. The groups are numbered. When viewing these group numbers, you get a quick overview of which objects belong to a group.
-
Original position: Display of the original recording position related to the beginning of the project in the set format. By comparing the value in the object with the position on the timeline or the timecode in the video, it is easier to resolve deviations in the synchronization.
-
ISRC: This option displays the ISRCs in the objects. If the ISRC for an object's file is not specified in the Broadcast Wave File (BWF) entry, the ISRC of a CD Track Index at the object is displayed, if available. For this the object must be on the first track.
-
Audio markers: This option allows you to display the markers from the audio files in the associated objects. See Audio Markers.
-
Transients (AQ): Display transients in objects that you have previously created by the Audio Quantization.
-
Orig. clip name: At objects created by loading a clip, the clip name is displayed.
Project
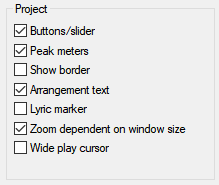
Various VIP components (buttons/sliders, peak meters, border and arrangement text) can be activated/deactivated here.
-
Buttons/slider displays the track head with all mixer controls, i.e. the channel faders, solo buttons, etc. If you always have the Track Editor open, you won't have to use these functionally identical controls here. You can also leave the track head switched on and only hide the peak meter for the track head.
-
Show Border: The tracks are given a border to better separate them from each other.
-
Arrangement text: The arrangement text is used to indicate the division of the track into the two editing areas in Universal mouse mode.
-
Lyric Marker: Display of the lyrics marker
-
Zoom dependent on window size: The vertical zoom (track height) adjusts as the window size changes so that the number of tracks displayed remains the same.
-
Wide play cursor: By default, the play cursor is displayed 3 pixels wide for better visibility. If you disable the option, it will be only 1 pixel wide.
Waveform colors
-
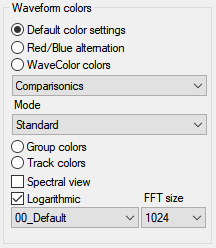
Default color settings: The waveform contains the color that is preset in the color settings or defined in the Object Editor or Object > Object Color/Name menu.
For more information about object colors, see Renaming and Coloring Objects
-
Red/Blue alternation: This display mode always colors the waveform of neighboring objects alternately red and blue. This way, crossfades can be optimally viewed in the "Transparent" and "Interleaved" drawing modes.
-
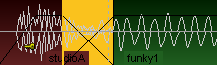
WaveColor colors: With WaveColor, two additional properties of the audio material are visualized in the waveform display using color. The pitch is represented by the hue: Low tones are red, mid tones are green, high tones are blue. The sound characteristics of the audio material are represented by the color saturation: The more tonal and harmonic the signal, the more saturated the color, the more noise there is, the less saturated the color will be.
Various settings can be found in the drop-down menu below: The default setting applies intense rainbow colors to the audio signal. The Comparisonics preset provides coloring similar to the Comparisonics color display of older versions of Sequoia. Black & White - Pitch and Black & White - Noise Factor displays only the pitch or noise component in grayscale.
Based on WaveColor colors, a special audio search method is also available in the menu Object > WaveColor Audio Search, which can be used to find regions with the same or similar audio material in wave files.
-
Group colors: Object groups receive a randomly created individual group color. This allows a quick overview of the objects belonging to the different groups.
-
Track colors: When a track has been assigned a color, all objects on that track will automatically receive that color. Accordingly, the waveform color also changes when you move an object to another track. On tracks without color assignment, objects have the default color.
-
Spectral view: The audio material is displayed in the spectral view by a spectrogram that shows the frequency components over time. The level of the frequencies is visualized by the color or the brightness in the display.
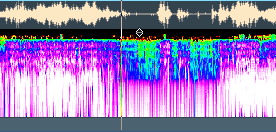
In the menus under the option you can select the color palette and the FFT size. The smaller you choose this size, the more accurate the display, at the expense of performance. Therefore, for a sluggish display, increase the FFT size. The Logarithmic option uses a different mapping of levels to the palette's brightness values, allowing for improved rendering with certain audio material.