Loudness Meters

From the View menu, choose Loudness Meters to display the Loudness Meters window.

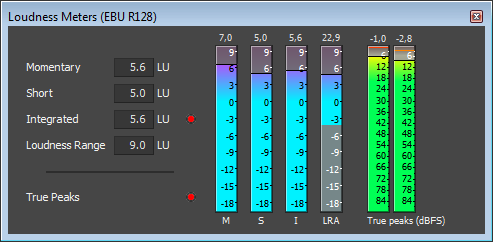
The Loudness Meters tool provides data about an audio file's momentary loudness, short-term loudness, integrated (overall) loudness, and loudness range. You can use these values when mastering for broadcast to ensure compliance with loudness standards (such as the CALM Act).

The meters display real-time values for each of the following measurements:

  • The M meter represents the momentary loudness — in loudness units (LU) — across all audio channels based on 400-millisecond integration windows. The Momentary box displays a numeric representation of the momentary loudness.

  • The S meter represents the short-term loudness — in loudness units — across all audio channels based on 3-second integration windows. The Short box displays a numeric representation of the short-term loudness.

  • The I meter represents the integrated loudness — in loudness units — across all audio channels over the duration of the program. The Integrated box displays a numeric representation of the integrated loudness and includes an over-target indicator.

  • The LRA meter represents the loudness range — in loudness units — of the momentary and short-term levels. The Loudness Range measurement provides a standardized method of determining the dynamic range of the signal.

  • The True peaks meter represents the peak levels in dB FS. True peaks are calculated using a higher sample rate than peaks in the Channel Meters window for increased accuracy.

    The True Peaks indicator shows you whether the target loudness has been exceeded. The indicator is reset when you restart playback, or you can right-click the Loudness Meters window and choose Reset Clip from the shortcut menu.

The statistics on the left side of the window display the last-calculated values and are reset when you restart playback. You can reset the values by right-clicking the Loudness Meters window and choosing Reset Metering Engine from the shortcut menu.

TIP

Tips:

  • Loudness is recalculated whenever you start, stop, seek, or change playback direction. If you want to force a recalculation, right-click the window and choose Reset Metering Engine from the shortcut menu.

  • Select the Enable surround processing for files with 6 channelscheck box on the Status tab of the Preferences dialog if you want to treat audio with six channels as surround audio when measuring loudness (a gain of ~1.5 dB is applied to the left and right surround channels). When the check box is cleared, all channels contribute equally to the loudness measurement.

Choose a metering modeClosed

To change the mode of the meters, choose Loudness Meters from the Options menu, and then choose EBU R 128 Mode or ATSC A 85 Mode from the submenu (you can also right-click the meter to set its options).

  • When using EBU R 128 Mode, the target value of the Integrated meter is -23 LUFS, and the maximum True peak value is -1.0 dB FS. Use this mode when you're mastering to European Broadcasting Union (EBU) standards.

  • When using ATSC A 85 Mode, the target value of the Integrated meter is -24 LUFS, and the maximum True peak value is -2.0 dB FS. Use this mode when you're mastering to North American Advanced Television Systems Committee (ATSC) standards.

The over-target indicators will be triggered if the target values for Integrated and True peak meters are exceeded.

Choose a loudness scaleClosed

To change the scale of the meter, choose Loudness Meters from the Options menu, choose Loudness Scale, and then choose EBU +9 or EBU +18 from the submenu (you can also right-click the meter to set its options).

  • When using EBU +9, the meters are displayed with a range of -18 to +9 LU.

  • When using EBU +18, the meters are displayed with a range of -36 to +18 LU.

Choosing a wide range allows you to see low-level signals at the expense of precision display at high levels.

Select Absolute (-23 LUFS) if you want to display loudness values as Loudness Units Full Scale (LUFS). When Absolute (-23 LUFS) is not selected, all values are expressed as Loudness Units (LU) relative to the selected mode (EBU R 128 Mode or ATSC A 85 Mode).

Configure peak metersClosed

To toggle the True Peaks meters in the Loudness Meters window, choose Loudness Meters from the Options menu, and then choose Show True Peak Meter from the submenu (you can also right-click the meter to set its options).

TIP Please note that true peaks are calculated using a higher sample rate than peaks in the Channel Meters for increased accuracy.

Peak levels may be miscalculated if audio signals are asymmetrical or if a DC offset is present. To enable filtering, choose Loudness Meters from the Options menu, and then choose True Peak Blocking Filter from the submenu (you can also right-click the meter to set its options). When True Peak Blocking Filter is selected, peaks are calculated as the maximum of the filtered and unfiltered signals.

The True Peaks meters display levels in dB FS. To change the resolution of the meters, do either of the following:

  • From the Options menu, choose Loudness Meters, choose True Peak Range from the submenu, and then choose a display range.

  • Right-click the Loudness meter, choose True Peak Range from the submenu, and then choose a display range.

Choosing a wide range allows you to see low-level signals at the expense of precision display at high levels.

Generate a loudness logClosed

A loudness log is a report of the loudness of an audio file and it allows you to provide documentation that your files adhere to loudness standards.

Generating a loudness log when saving a file

  1. Use the Save As dialog to save your file.

  2. Select the Generate Loudness Log check box if you want Sound Forge Pro to analyze the loudness of your file and create a log file that summarizes its loudness values. The loudness log is created using the same folder and base name as your sound file with _loud.txt appended to the name. The log will record the file name, format, loudness metering mode, and loudness values throughout the file.

Loudness logging is performed after the plug-in chain, but before any codec is applied to your rendered file. Because audio compression may affect audio levels, choose Tools > Generate Loudness Log to create a log after saving to a compressed format.

Select the Enable surround processing for files with 6 channelscheck box on the Status tab of the Preferences dialog if you want to treat audio with six channels as surround audio when measuring loudness (a gain of ~1.5 dB is applied to the left and right surround channels). When the check box is cleared, all channels contribute equally to the loudness measurement.

Generating a loudness log for a data window

  1. Select the data you want to analyze.

    If no data is selected, the entire file is analyzed.

  2. Choose Tools > Generate Loudness Log.

    The loudness log is created using the same folder and base name as your sound file with _loud.txt appended to the name. The log will record the file name, format, loudness metering mode, and loudness values throughout the selection or file. If the Open editor when new loudness log is generated check box is selected on the Status tab in the Preferences dialog, the log will be automatically opened in your default text editor.

Select the Enable surround processing for files with 6 channelscheck box on the Status tab of the Preferences dialog if you want to treat audio with six channels as surround audio when measuring loudness (a gain of ~1.5 dB is applied to the left and right surround channels). When the check box is cleared, all channels contribute equally to the loudness measurement.