How Do I Record from an External Source?
This topic provides general guidelines to help you record sound from
an external source using Sound Forge Pro software. Your specific hardware
may vary. Please refer to your hardware documentation for more information.
TIP
If you're recording from a turntable, use a phono preamplifier
between your turntable's output and your sound card's line input. Most
turntables' outputs are phono-level (rather than line-level) outputs.
Phono-level outputs are quieter than line-level outputs and have special
equalization applied. A phono preamplifier will convert the phono-level
signal to a line-level signal that you can record.
Basic setup
In this setup, an audio source
is connected to an input on your sound card, and your powered speakers
are connected to a Line
Out output. You could connect a computer microphone to your sound
card's Mic
In input, or you can connect line-level outputs from a tape deck
or other source to a Line
In input.
Basic setup with mixer/preamplifier
In this setup, your speakers
and audio source are connected to a mixer or preamplifier. The mixer/preamplifier
is then connected to Line
In and Line
Out connections on your sound card.
TIP
If you're recording from a turntable, use a phono preamplifier
between your turntable's output and your sound card's line input. Most
turntables' outputs are phono-level (rather than line-level) outputs.
Phono-level outputs are quieter then line-level outputs and have special
equalization applied. A phono preamplifier will convert the phono-level
signal to a line-level signal that you can record.
Digital input/output with MIDI synchronization
In this setup, an audio source
with digital input/output is connected to a sound card with digital input
and outputs. Dashed lines represent a sync connection from your audio
source to a MIDI timecode converter to a MIDI card.

The Record tab in the Audio
Preferences page allows you to choose the audio inputs from which
you want to record. Before recording, you'll need to verify that your
sound card's recording inputs are active.
The
maximum number of channels recorded depends on the data window where you're
recording. For example, if you enabled six inputs on the Record tab in
Audio Preferences,
you need to record into a six-channel data window to record all six inputs.
If you record to a stereo data window, only two inputs will be recorded.
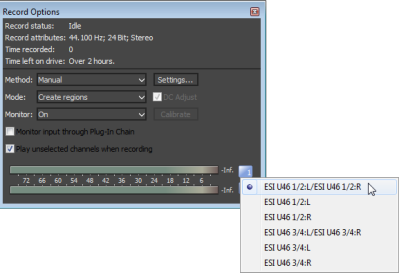
To choose your recording input, use the Audio
tab in the Preferences dialog or click a channel number in the Record
Options window and choose a new input port from the menu.
-
Ensure all cables are connected
and that your audio source is generating a signal.
-
Adjust your recording levels:
-
If your audio device provides a
console application to adjust levels, open the application and adjust
its gain controls while monitoring the peak meters on the Meters tab in
the recording dialog. Adjust the gain controls in the console application
so Sound Forge Pro receives a strong signal with no clipping.
For more information about using your sound card and its console application,
please refer to the manufacturer's documentation.
-
If you're using your Windows sound
card, perform the following steps to open the recording controls:
- Double-click the speaker
icon
 in your system tray to open the Volume Control
window.
in your system tray to open the Volume Control
window.
- From the Options menu,
choose Properties.
- Click the Recording
radio button and click OK.
- Select (or unmute) the
device from which you want to record.
- Adjust the Volume
faders for the selected device and for the Master Record level while monitoring
the recording meters in the Sound Forge Pro Record dialog.
For example, if you want to record from an audio CD in your CD-ROM drive,
the CD Mute
check box should not be selected, and the CD and Master Record Volume
faders must be adjusted so Sound Forge Pro receives a strong signal with no
clipping.
Sound Forge Pro software can automatically adjust for any
produced by your audio hardware during the recording process.
-
Set up your hardware. For
more information see Recording Setup.
-
From the View menu, choose
Record Options
to open the Record Options window.
-
Click the Arm
button  on the main toolbar.
-
Ensure your recording input
is quiet.
-
Select the DC
adjust check box.
-
Click the Calibrate
button.
If you change sound cards or are recording from different
digital sources or at different sample rates, you should recalibrate the
DC offset before recording.
