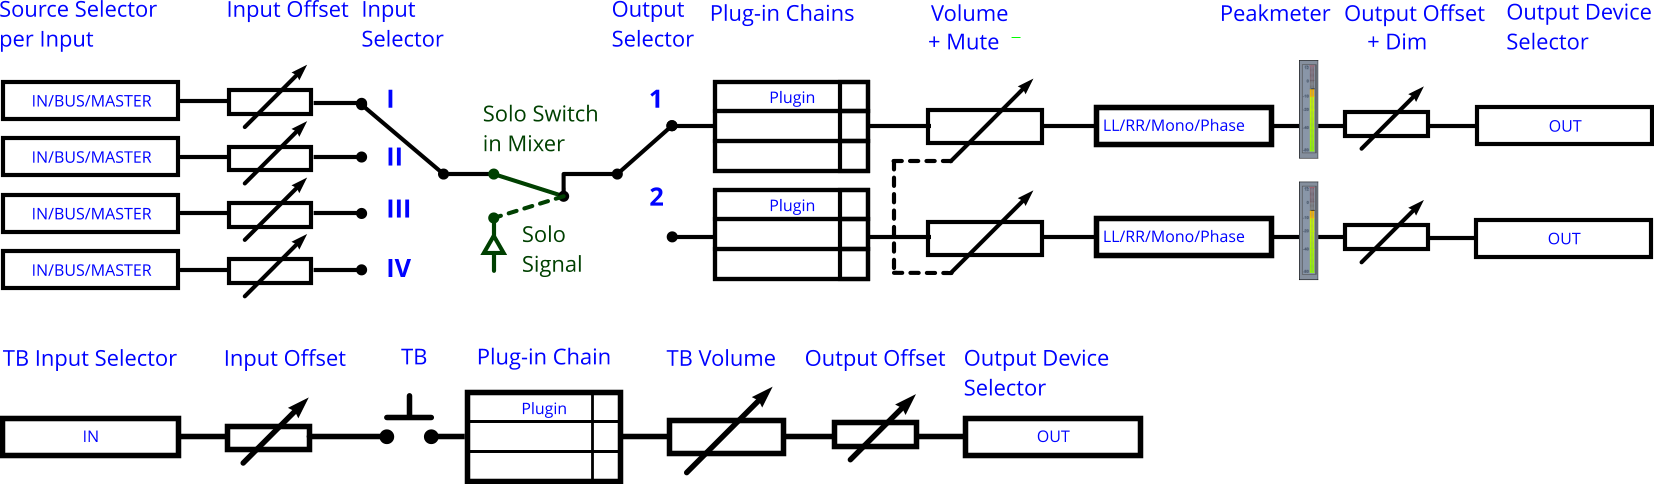
Monitoring Section

The Monitoring section provides a separate workflow for monitoring inputs, busses or masters. It is possible to switch between
Note: The Monitoring of the tracks is a different, independent function. This means monitoring the input signals of tracks before and during a recording. The monitoring section is generally used to control the audio output of the program.
The settings in the Monitoring Section apply across all projects, i.e. they are independent of the loaded project.
To display the Monitoring Section, go to the menu View > Monitoring Section or use the keyboard shortcut Ctrl + Shift + S.
Monitoring via separate monitor buses is only available when using the hybrid engine.
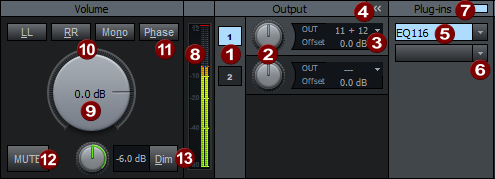
Input
|
|
|
Select Source: Default source is the Master, but you can also select any input pair or (stereo) bus as input source. When using a separate monitor bus, you can use Solo on Monitoring section to limit soloing to monitor output. Sources selected here that are not available in the current project are shown in red. |
|
|
Input Offset: Here you can adjust the level of the input signal independent of the selected output. |


If the master or a bus has been selected as the input, and their outputs are routed to the same output device as a monitoring section output, the signal will not be played back via both paths.
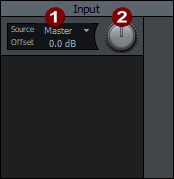
Volume/Output/Plugins
|
|
Output selection: A separate output device can be set for each output. Settings in the ranges Volume (except the large knob for the global volume) and Plug-ins apply separately to the respective output. To display the settings in these areas for the respective output, activate the corresponding field below Output. Use the buttons |
|
|
Output level offset: The controls can be used to trim the monitor output level per output by setting an offset to the global monitor level. |
|
|
Device selection: Click the arrow |
|
|
The plug-ins panel can be hidden with this button. |
|
|
Plug-in slots: The plug-in slots work like those in the mixer, track or object editor. A left click on an empty slot opens the Plug-in Browser, a left click on a loaded plug-in deactivates the plug-in, a right click opens the plug-in window. You can even load more than two plug-ins, but only the first two are displayed in the slots. The others can be reached via the FX routing dialog. |
|
|
Use the arrow to open the plug-in menu. |
|
|
A left click on this button deactivates the entire plug-in chain, a right click opens the FX routing dialog. |
|
|
The Peak meter shows the level behind the large volume control, but before the output offset. |
|
|
Volume control: Here you set the global monitoring volume. The value corresponds to the setting Monitor in the mixer at the bottom right. |
|
|
LL, RR, Mono: Use these buttons to adjust the mono stereo signal distribution. With LL the left input signal is reproduced on both output channels, with RR the right signal. Mono sums right and left to a mono signal, which is then also reproduced on both output channels. |
|
|
Phase: Inverts the phase of the right input signal to compensate for possible phase shifts. |
|
|
Mute: Mute switch. |
|
|
Dim: A click on the button reduces the volume by the amount set on the knob. |

 to select the device for the output. The device for output 1 corresponds to the device that can be set under


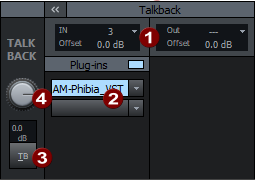
Talkback
With the talkback function, you can set up an additional communication path between the recording booth and mixing console.
|
|
|
Input/Output: Here you define the input and output device for the talkback. |
|
|
Plug-ins: There are also plug-in slots for the talkback. |
|
|
|
Activate talkback |
|
|
|
Talkback Volume |
Keyboard shortcuts for the monitoring window
To be able to execute the most important monitoring functions quickly without mouse clicks, there are some keyboard shortcuts especially for the monitoring section. These only apply when the monitoring window is open and focused. So you must have clicked in the window at least once after opening it.
For talkback, you can define a global keyboard shortcut in the Program Preferences in the section Keyboard/Menu/Mouse under Special Keys that also works independently of the focus of the monitoring window.
|
H |
Invert phase |
||
|
1, 2 |
Select Output 1 or 2 |
B |
Open Plug-in browser (Monitor) |
|
Alt + M, 0 |
Mute |
Shift + B |
Open Plug-in browser (Talkback) |
|
D |
Dim |
P |
Plug-ins on/off (Monitor) |
|
L |
LL (Input L to Output LR) |
Shift + P |
Plug-ins on/off (Talkback) |
|
R |
RR (Input R to Output LR) |
T |
Talkback (momentary) |
|
N |
Mono (Input L+R to Output LR) |
Shift + T |
Talkback on/off |
Monitoring section signal flow