Recording Options
With right-click on the recording button of the transport console or with menu Playback > Recording options... (keyboard shortcut:Shift + R) you open the dialog Recording options.
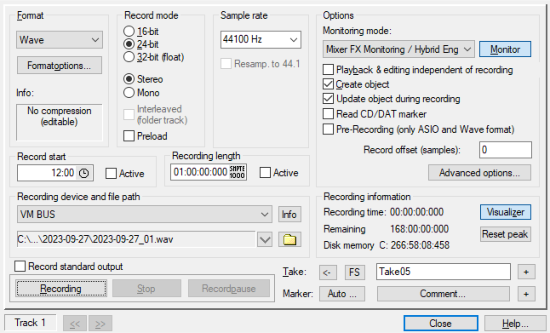
All recording settings can be changed here. The dialog can be closed and also reopened during a recording. The dialog also allows you to start, pause and stop recording and set markers during recording.
Files and Inputs
On the right side of the dialog you specify the format and paths of the files to be recorded to and the recording devices used.
-
Format: Here you can set the respective recording file format (Wave, MP3, MPG, AIFF, Ogg Vorbis and FLAC). In the info box below you'll find information about each of the formats available. This way you can see if the format can be edited directly in Sequoia and which data compression is used.
-
Record Mode: Select the desired bit resolution for your recording and choose between stereo
If your recording device supports true 32bit float recording, clipping can no longer occur when recording in 32bit (float), as levels above 0dB are also saved correctly in float format.
If Preload is active, when you start recording with the record button, all playback buffers are loaded first and a confirmation dialog is displayed. After confirming with OK the recording is started without delay.
-
Sample rate: This option allows you to select the sample rate of the recording. By default, the project sample rate is used. However, you can also record at a different sample rate, in which case a object resampling will be applied to the recorded objects after recording.
Resamp. to 44.1: If you have set the recording sample rate to a value other than 44100 Hz and activate this option, Sequoia will resample to 44.1 kHz during recording.
This is an deprecated option. Modern audio hardware allows you to set all common sample rates via its driver settings and we recommend working with a uniform sample rate for driver, project and recording.
-
Recording start: Set the recording start time in this field. The recording is then controlled automatically by the internal system clock to a specific time. With Recording length you determine the duration of the recording. This gives you the option to perform scheduled recordings even in your absence. If no length has been selected, recording continues until the hard disk is full and then stops automatically.
-
Recording device: Display and selection of the recording device for the track. With Info you open the driver settings of the recording device.
-
File path: Specify the path to the files where the data should be recorded. The folder button opens a query for selecting the path and file name. In the menu below the down arrow there are naming schemes to derive the file name from various track properties (track name, track number...). For more information, see Dialog Track Options.
Use the <</>> buttons at the very bottom to switch between tracks. However, stereo/mono recording, recording device, and file name are the only options in this dialog, which may differ from track to track. So you can't record wave file on one track and MP3 files on another.
-
Record standard output: Enable this option to record the standard output of the operating system, for example the playback of DVD sound, the browser or games. An actual digital recording is implemented, which means that the exact digital data delivered to the sound card driver by the playback software (e.g. player in browser) is stored.
To prevent this option from accidentally remaining active, it must be reactivated for each such recording operation.
Note: Some audio devices integrated in the mainboard (onboard sound) also offer the entire audio output as a recording device, often under the name "Stereomix" or "What You Hear". This also works, but the result of such a recording is not a real digital recording, because the analog output signal is fed back to the analog input inside the audio device, so a double conversion - from digital to analog and back - takes place.
Tip: Since everything that is played back in the operating system is actually recorded, you should disable system sounds, website notifications, instant messengers and the like.
Options
In the Options section of the dialog you will find the most important options for recording. Further options can be found in the Program Preferences > System Options > Recording, which you can also open directly via this dialog with the button Advanced Options….
-
Monitoring mode: For detailed information on monitoring, see Program Preferences > System options > Monitoring setup.
-
Monitor: With this button you activate the monitoring. All tracks with activated recording show the incoming signal on the peak meter.
-
Playback and editing independent of recording: This option switches from standard recording mode to Playback and editing independent of recording mode.
-
Create object: All recordings create objects on the corresponding tracks. You could disable this default behavior here.
-
Update object during recording: During the recording, the graphical representation of the objects updates. The option is available only for recording to wave files. You could disable this default behavior here.
-
CD/DAT markers read: DAT devices and some professional CD players output marker information via the SPDIF output (CD track or DAT marker). If this option is active, these markers are transferred to the project, provided that the audio device supports this.
-
Pre-recording (ASIO and Wave format only): Use this function to add audio material that you have played before starting the recording to the beginning of the current recording.
For more information on pre-recording, see Program Preferences> System Options > Recording.
-
Recording offset (samples): If recordings exhibit a constant, undesired shift in relation to the existing audio material in the project, set an offset here which can be used for positioning all recordings. The option +ASIO latency can be used to deactivate the compensation of ASIO input and output latency, which is always included by default, for certain recording and monitoring situations, for example when recording the master to a track and additionally recording the input.
Recording Information: In this section you can find information about the last recording you made, such as Recording Time (length of recording), Remaining Time (remaining recording time), and Disk Space (remaining space on the hard disk).
Visualizer: Opens or closes the visualization window.
Reset Pk.: Reset the visualization's peak hold display.
Recording control
You can also start and stop recording in the Recording Options dialog. The button Recording (keyboard shortcut: A) starts the recording. Stop (keyboard shortcut: S) ends the recording.
You can pause the current recording with the button Recording pause. Click again on Pause recording to resume recording at the same position. Unlike stopping and restarting the recording, this does not create a new take. When stopping the recording from the paused state, the play cursor remains at the current position, the next recording then starts at this position.
Take: Each recording take is given a name and a sequential number. In the name field you can change the preset name that will be used for the next recording.
If you press the button "FS (False Start) during the recording, the acquired object will be split at the current position - but the recording will continue. The name of the separated part of the take is completed with "FS".
For more information on takes, see Take Manager
Auto: During recording, you can use this button to set markers at the current recording position, e.g. to mark an incorrect passage for later correction.