Impulse Response Extraction
Sequoia provides an assistant for extracting impulse responses from natural rooms or effect devices for use in the room simulator.
Method
The chirp method is used to generate the impulse responses, which works as follows:
-
A chirp is generated. A chirp is a sinusoidal signal that is varied over a wide frequency range.
-
This chirp is then played through loudspeakers in the room to be detected, and the room's "response" is recorded with microphones. Effects units can also be "sampled" in the same way, by playing the chirp through the effects unit and recording it.
-
The impulse response is then calculated from the original and the processed or recorded chirp.
Steps 1 and 3 are carried out in the dialog Impulse response extraction, which you open via menu Object > Impulse response extraction....
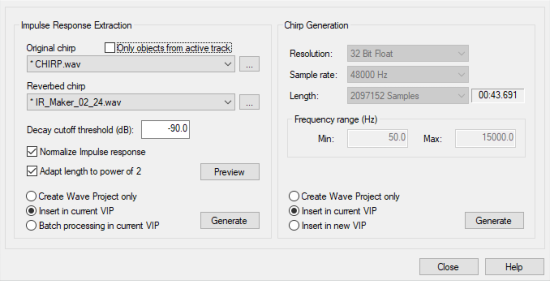
Chirp Generation
On the right-hand side of the dialog you will find the parameters for chirp generation.
-
Resolution: Select between 16-bit and 32-bit float resolutions here. We recommend a 32-bit float resolution.
-
Sample rate: Select the sample rate here. Note that the sample rates of the played chirp, the reverberated chirp, and the virtual project must match.
Note on sample rate: If you want to work with 96 kHz or 192 kHz, keep in mind that when capturing natural impulse responses, the loudspeaker must be capable of reproducing very high frequencies in order to actually capture the extremely low ultrasonic components of the impulse response. The microphones used also define limits here, so that in practice it is usually sufficient to work with 44.1 kHz or 48 kHz.
-
Length: Select the length of the chirp in samples, staged in powers of two.
The longer the chirp length, the better the results, since the influence of constant noises like hissing, traffic noise, or non-linear distortions in the result is reduced. On the other hand, the CPU load increases when processing the impulse response.
Tip: The chirp should be at least as long as the duration of the reverberation.
-
Frequency range (Hz): Specify the start and end frequency of the chirp here. The frequency range depends on the frequency response of the loudspeaker. You should therefore avoid frequencies that are too low or too high for the speaker to reproduce.
The following options determine how the generated chirp will be used:
-
Create wave project only: The chirp is written to a wave project only.
-
Insert into current VIP: The wave project is inserted into the current virtual project.
-
Insert into new VIP: The wave project is inserted into a new virtual project. There you can immediately play the chirp and simultaneously re-record the reverberated room in the same virtual project.
Click on Generate to generate the chirp. After generating the chirp, the dialog can be closed again.
Reverberation of the Generated Chirp
Natural Rooms
To capture the impulse response, the chirp signal is reproduced monophonically in the room using a loudspeaker or loudspeaker combination. The loudspeaker(s) should be placed in the room where the acoustic sound sources such as instruments or singers are located - in an opera house, for example, on the stage or in the orchestra pit.
Individual loudspeakers have a different directional behavior than natural sound sources, they emit less sound energy to the rear. Therefore, it is better to use speaker combinations to radiate the chirp. A proven loudspeaker combination is to have one loudspeaker directed to the front - towards the audience - and a second loudspeaker directed to the back.
Note: For the best possible impulse response, always record the reverberation until it has completely decayed. Also avoid any impulsive noise during decay.
Digital Reverb Devices
When processing the chirp signal with a reverb unit, you should always set the un-reverberated, dry portion ("Dry") to zero, so that the original chirp is not mixed in.
Note: With the impulse response method you can only simulate linear and time-invariant systems. Effects such as chorus or flanger change the transfer function dependent on time, i.e. they behave according to the time variation, meaning they cannot be simulated. The same applies to effects that feature parameters that are modulated by LFOs. Distortion or compressors have a non-linear behavior and can also not be reproduced. The reverb programs of multi-effects units often use other effects besides the actual reverb, for example chorus effects to cover resonances. Also in these cases, an exact reproduction of the reverb is not possible. The strength of the impulse response method, on the other hand, is the reproduction of natural spaces in high quality.
Use the External FX Plug-in for convenient integration of the effects unit!
Simultaneous Playback and Recording of the Chirp in Sequoia
-
Load the chirp into a track of a project.
-
Activate recording in another track and route corresponding input and output devices on these tracks.
-
Disable monitoring (e.g. right-click on MON in the Transport Console and select No Audio Monitoring (Peakmeter Only) ), as other monitoring settings may cause acoustic feedback.
-
If not already done, open the window Visualization in the mode Peakmeter, select the recording track and in the menu of the visualization window Track Visualization (current track).
-
Start a test recording that features the complete chirp and adjust the peak control. The recording of the reverberated chirp should be controlled well enough that overmodulation does not occur.
-
After the optimal levels have been set, record the reverberated chirp.
-
Play the reverberated chirp and check the recording in the visualization window in the spectrogram view for nonlinear distortion, spurious pulses, or aliasing.
Calculation of the Impulse Response from Original and Reverberated Chirp
Now reopen the dialog Impulse response extraction in the menu Object. The dialog elements for calculating the impulse response are featured on the left hand side of the dialog.
-
Original Chirp: Select the audio file or object that contains the original unprocessed chirp here. Via the ... button you reach a file selection dialog.
If the audio file of the original chirp is not available, you can select the [Manual] option and set the parameters used to generate the chirp on the right side of the dialog. Note that if the set parameters differ from those of the original chirp used, usable results will no longer be obtained.
-
Reverberated Chirp: Here you select the audio file or object that contains the reverberated chirp. In the list field all objects present in the project are listed, with Only objects from active track only objects of the selected track are listed. The letter "T" (for track) and the track numbers are placed in front of the object names in the list.
-
Decay cutoff threshold: Here you can specify the threshold of the signal value in dB, below which the impulse response will be cut off.
-
Adjust length to power of two: This option fades the impulse response so that the length in samples is slightly less than a power of two. This is used to optimize the performance when using the impulse response in the room simulator.
-
Create wave project only: The impulse response is saved as an audio file only.
-
Insert in current VIP: An object with the impulse response in the current project is additionally created.
-
Batch processing in current VIP: This allows to calculate several impulse responses one after the other. The precondition for this is that the same original chirp was always used. Arrange the reverberated chirps under the object of the original chirp one track at a time. The impulse responses are calculated from all objects one after the other. The impulse responses are inserted behind the objects with the reverberated chirps, respectively.
Individual objects can be excluded from batch processing via the M button of the tracks.
-
Preview: Calculates and plays the impulse response.
-
Generate: Calculates and saves the impulse response.
Chirp Residuals in the Impulse Response
It may happen that the calculated impulse responses contain residues of the chirp signal used. Typical causes for this are explained below and remedies are described.
Aliasing
When using older digital reverb devices that work with lower internal sampling rates, aliasing may occur. In the spectrogram representation of the recorded chirp, the chirp mirrored in the frequency domain can be easily recognized.
To remedy this, experiment with different sample rates and see if the aliasing component is reduced when you use digital inputs and outputs instead of analog.
Otherwise, only use of a very long chirp will help. The interfering signal then extends in the impulse response over a narrow frequency range (e.g. 12000 Hz - 12100 Hz) and can be removed there with the FFT filter.
Faulty Impulses during Recording, Reverberation or Signal Transmission
Impulses or impulse-like acoustic sounds also produce chirp residue in the calculated impulse response. The process reacts very sensitively to these noises. Even pulses with a level of less than -50 dB have a disturbing effect.
Causes of faulty pulses:
- Clicks when playing the chirp or recording the reverberated chirp, e.g. when the chirp is not played from the beginning.
- Discontinuity due to premature termination of the recording, e.g. due to an incompletely recorded reverb tail after the end of the chirp.
- Impulsive sounds during recording of natural spaces such as falling objects, footsteps, chairs moving, etc.
- Faulty cables, connectors or similar.
To remedy this, avoid impulsive noises during playback and recording. To determine the cause of the interfering pulses, listen carefully to the reverberated chirp. If the disturbing pulses sound like the recorded room or effect device, the faulty pulses have occurred during playback. If the noise sounds "dry", the faulty impulses occurred during recording. In the spectrogram display of the visualization, these impulses may be recognized as vertical lines.
Different Characteristics of the DA-Converter for the Playback of the Chirp and the AD-Converter for the Recording of the Reverberated Chirp
If you're working with different sound cards/devices, a chirp-like noise may occur shortly prior to the start of the impulse response. The pop noise at the beginning of the impulse response sounds "chirped" in this case.
To remedy this, always use the same device for recording and playback.
Tips and Tricks
Digital Reverb Devices
- Use the digital in and outputs, provided these are present.
- If only analog in and outputs are available, then these should be used with a 24-bit converter.
- Underdriving worsens the signal noise interval.
- Digital distortion should definitely be avoided.
- The parameter for the mixing the reverberated signal ("dry" component) should be set to zero.
- Draw the chirp completely up until the reverb decays.
- Don't allow any switching on and off clicking sounds to enter the recording of the reverberated chirp.
- The chirp length does not normally need to be longer than one minute. This does not apply if chirp residues appear in the result. Details can be found in the corresponding section above. In practice, a length of 47 sec has proven effective in rooms.
- A bandwidth of 50-15000 Hz is normally sufficient.
- For chirp playback and recording of the reverberated chirp, you should use converters with identical properties (not different devices).
Multi-channel Impulse Responses
When recording multichannel impulse responses for surround room simulation, true multichannel recording is not absolutely necessary. The impulse responses for the different positions can also be recorded one after the other.
To synchronize the recordings, record the individual positions in stereo, using a reference microphone for the second stereo channel that always remains in the same position.
The stereo recordings of the impulse responses can now be synchronized perfectly in the virtual project with the reference signal on the second channel. Then you can obtain the surround impulse responses by exporting all the stereo recordings together, muting the channel of the reference microphone in each track
Natural Rooms
- Slight analog overloads of the speakers or amplifiers used to reproduce the chirp are not problematic, at least when longer chirps are used.
- Avoid digital distortion in the AD/DA converter.
- The louder the chirps are played, the better the signal-to-noise ratio will be in the measurement.
- The longer the chirps are, the better constant noises such as traffic or hissing will be removed from the resulting impulse response. You can also use longer chirps (> 1min) to extract impulse responses with very good signal-to-noise ratio at lower playback volume.
- Be sure to avoid impulsive noise during recording.
- The linear distortions from microphones, amplifiers, speakers transfer to the impulse response. For this reason, use components that are as high-quality as possible. The speaker is normally the weakest link in the chain.
Long chirps
Computing impulse responses from longer chirps is very computationally expensive and requires a lot of memory. For example, for chirps with a length of 6 minutes at 44.1 kHz, approx. 700 MB RAM is required. Make sure that enough RAM is present in this case.
The progress bar behaves non-linearly during the calculation, it progresses slower and slower as the number of operations increases towards the end of the calculation.
If you are planning a larger number of calculations, it is recommended to use batch processing in the virtual project.