Moving Objects
Moving with the Mouse
Simple moving of objects with the mouse is possible in the mouse modes Universal mode  , Object mode
  and Object curve mode
  : Click with the left mouse button on the object (in Universal mode: the lower half of the object) and drag it the desired place. You can also move an object to another track.
When moving objects to other tracks, the time position is preserved if you press the Shift key while moving.
If you want to move an object beyond the visible section, first drag the object in the appropriate direction and move the mouse pointer onto the scroll bars at the window borders. The arrangement scrolls in the corresponding direction and you can move the object to the now visible tracks or time sections.
To avoid accidentally moving objects already when selecting them, activate the option 2nd click required to move object in the Program preferences under Keyboard/Menu/Mouse > Mouse. Then objects have to be clicked again extra to move them, the first click only selects the object.
For multiple selections or groups, all involved objects are moved together when one involved object is moved. But be careful: If one of the objects is locked, no object can be moved!
When moving objects, the object modes also apply. This means that, for example, in mode, Link one track to the right all subsequent objects are moved as well.
Moving to a Specified Position
The following options can be used to move an object to a specified position:
-
Menu Object > Move Objects > Move Object…: This allows you to enter start position for a selected object numerically. With the unit field on the far right of the dialog you can select the unit of measurement used. For a multiple selection or group of objects, the foremost and topmost object of the selection is moved to the position and the other objects are moved by the same amount.
-
In the Object editor you can also enter the desired position in the Fades view at Object start.
-
In the Object manager you can set the object position in the column Position.
-
Menu Object > Move objects > Object start/object end to play cursor position: The selected objects are moved to the play cursor position. For a multiple selection/group, the start of the foremost object is taken as the reference point, regardless of the track; for "Object end to play cursor position", the end of the rearmost object is used.
-
Object hotspot to play cursor position moves an object so that its hotspot is placed at the play cursor.
Keyboard shortcut: Ctrl + Alt + P
If multiple objects are selected, the hotspot of the foremost object is considered the reference point, even if other objects have hotspots that are further ahead. If the foremost object does not have a hotspot, its object start applies, even if other objects have hotspots.
-
Menu Object > Move objects > Object start to end of previous object/Object end to start of next object: A selected object is moved to the previous/next object so that it is directly adjacent to it. In the case of a multiple selection/group, the active object is the reference point.
-
Menu Object > Move objects > Arrange objects…: This allows you to enter the pause between multiple objects numerically and set it to a uniform value.
Keyboard shortcut: Ctrl + Shift + Alt + A
Attention: the function works in such a way that the pauses before the selected objects are changed. This also affects the first selected object (exception: it is the first object on the track). So if you only want to change the distances between several objects, do not include the first object in the selection.
Moving Objects Step by Step
In the menu Object > Move Objects > Object Move Step 1/2 you will find a large number of commands that allow you to move objects, change start and end time, volume, fades and much more. This menu is not designed to be operated with the mouse, but contains a series of keyboard shortcuts that follow a logical principle:
Select one object for simple object editing. If you have selected two objects for editing, you can edit them both independently of each other as well as together.
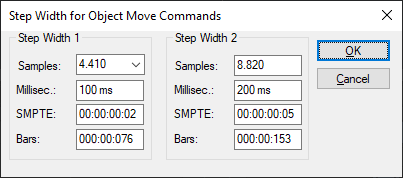
Each of the commands below is available in two step sizes. The step sizes can be set with menu Object > Move objects > Object/Fade step settings….
Keyboard shortcuts with the Ctrl key edit the left object, with the Alt key edit the right object. The commands in the following table are executed with Step size 1. To execute the commands with Step size 2, additionally hold down the Shift key. Use the number keys 0…9 to determine the function:
|
Left object to the left |
Ctrl + 1 |
|
Right object to the left |
Alt + 1* |
|
Left object to the right |
Ctrl + 2 |
|
Right object to the right |
Alt + 2* |
|
Move object(s) left |
Ctrl + Alt + 1 |
|
Move object(s) right |
Ctrl + Alt + 2 |
|
Object(s) track downwards |
Ctrl + Alt + Shift + Arrow down |
|
Object(s) track upwards |
Ctrl + Alt + Shift + Arrow up |
|
Object start to the left |
Ctrl + 3 |
|
Object start to the right |
Ctrl + 4 |
|
Object end to the left |
Alt + 3 |
|
Object end to the right |
Alt + 4 |
|
Move crossfade left |
Ctrl + Alt + 3 |
|
Move crossfade right |
Ctrl + Alt + 4 |
|
Fade-in handles to the left |
Ctrl + 5 |
|
Fade-in handles to the right |
Ctrl + 6 |
|
Fade-out handles to the left |
Alt + 5 |
|
Fade-out handles to the right |
Alt + 6 |
|
Increase left volume |
Ctrl + 8 |
|
Decrease left volume |
Ctrl + 7 |
|
Increase right volume |
Alt + 8 |
|
Decrease right volume |
Alt + 7 |
|
Increase volume |
Ctrl + Alt + 8 |
|
Decrease volume |
Ctrl + Alt + 7 |
|
Left object content to the left |
Ctrl + 9 |
|
Left object content to the right |
Ctrl + 0 |
|
Right object content to the left |
Alt + 9 |
|
Right object content to the right |
Alt + 0 |
|
Object(s) content to the left |
Ctrl + Alt + 9 |
|
Move Object(s) content right |
Ctrl + Alt + 0 |
|
Additional key for step size 2 |
Shift key |
*If only one object is selected, the commands for moving the second object (Alt key) also affect this object, but take the object mode into account, i.e. subsequent objects are moved if a corresponding object mode is set.
A simpler alternative for moving objects step by step can be found in the Object Editor. In the Fades section, in the Position area, you can click on the arrows next to the position values and thus change these positions step by step according to the step size set below.
Original Position
The original position of objects is the time position at which they were originally recorded. It is stored in the audio files and is important for assigning audio material to recording takes and thus for the function of the Take Manager.
With menu Object > Move objects > Object to original time position or keyboard shortcut Ctrl + Alt + O the object is moved to the original recording position.
With menu Object > Move objects > Set original time position the current position is set as original position.
Only objects created in Sequoia by a recording have an original position, objects created by a file import do not. So you can use this command to integrate imported files as takes into a recording session.
With Edit original time position… you edit the original position numerically.
Moving Audio Material under the Object
If you also press the right Ctrl key when moving an object, it is not the object that is moved, but the audio material under the object. However, for this to work, audio must still be available outside the object boundaries, i.e. the object must be shorter than the audio file it refers to.
Similarly, dragging the length handles on the left or right edge of the object while holding down the right Ctrl key moves the object start or end along with the audio. In other words, the object is lengthened or shortened, but starts or ends at the same point in the audio.
If you additionally hold down the Shift key to the right Ctrl key, you move the opposite object edge together with the audio material.