Editing Automation Curves
The automation curves can be edited in different ways. In addition to editing with the mouse in the project window, there are various commands for editing in the automation menu at Edit selected curve....
 Selecting a Curve for Editing
-
In the Automation Lanes, select a curve for editing by clicking directly on the curve or in the according the Automation Lane track header. If the curve is not displayed in any Automation Lane, select the corresponding parameter from the Automation menu.
-
In the track select the curve in the upper part of the automation menu. If the display option Show all curves (selectable) is active, you can select the curve by clicking on it.
Sometimes you want to explicitly have no curve selected, but still have the curves visible in the track, for example, to edit the underlying objects. To do this, select Show all curves (not selectable) and No effect (track) in the Automation menu.
-
In the automation menu, you can switch from curve to curve using the menu commands Select next curve and Select previous curve.
-
For object automations, the curve is selected in the automation menu of the object editor.
Attention: To edit object curves you have to use the automation menu in the object editor, the menus in main menu and track editor refer to track automation.
Editing the Automation Curves with the Mouse
For this purpose you can use the Universal mode, besides there are some other mouse modes especially for editing the curves.
The complete details about editing the curves in the Universal mode and in the other modes can be found in the section Mouse Modes. Here is just a brief overview and the main differences of the modes:
-
In Universal mouse mode
 , you can create and edit individual curve points by double clicking. Individual points, curve segments (the line between two curve points) and all curve points in a range selection can be moved with the mouse.
If you select the option Use snap for automation curve points in (System options > Program > General), you can move the automation points only to the time positions set in the grid.
-
With the Curve mode
 or the combined Object/Curve
  mode you specifically edit curves. Selecting multiple curve points with a selection frame is easier and curve points can be created with a single click. In return, no curve segments can be moved.
 -
With Draw automation
 mode you can freely draw curves. This allows more complex waveforms to be created more accurately. Straight lines can be created with additionally pressed Shift key. In return, you cannot move curve points in this mode.
The Draw volume mode
 as a special case of the Draw Automation mode always draws a volume curve in the track, no matter which automation curve is displayed in the track.
To facilitate the editing of small automation values of the volume curve, you can zoom this curve towards the zero line. The commands for this are located in the menu View > Vertical.
|
Command |
Description |
Keyboard shortcut |
|
Zoom In Volume Automation |
Increases the volume curve. |
Ctrl + Shift + Arrow up |
|
Zoom Out Volume Automation |
Decreases the volume curve. |
Ctrl + Shift + Arrow down |
|
Zoom default volume automation |
Restores the default zoom value, the entire automation curve is displayed. |
|
Editing the Curve Shape
Right-click on an automation curve point to open the dialog for numerical editing of the value and editing of the curve shape.
The dialog can also be opened with the command Edit next node at cursor position in the Automation menu or the keyboard shortcut Alt + A. The dialog will open at the point of the selected curve of the selected track that is closest to the current playback position.
In the input field you can enter the desired value numerically or change it with the mouse wheel. With the Shift key held down at the same time, change the value in smaller steps (factor 1/10) with the Ctrl key held down at the same time, change the value in larger steps (factor 10).
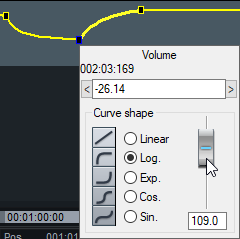
As long as the dialog is open, you can use the Tab key to jump to the next curve point. Close the entry field by pressing the Enter key.
With Curve shape you can define how the curve goes from the selected curve point to the next. The possible curve shapes correspond to the curves for objects fade in and out. The slider can be used to fine-tune the waveform.
Curve Generator
The Curve Generator creates an automation curve from simple waveforms in sync with the clock grid or depending on the object volume level in the track.
To open the curve generator, select Edit Selected Curve > Create... in the Automation menu.
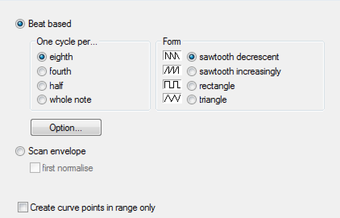
With the Beat-based option, the shape of the automation curve is based on the beat of the arrangement. At Shape you can choose between 4 different basic shapes for the automation curve: 2 sawtooth shapes, rectangle and triangle shape. With One cycle per... you can specify whether this waveform should be cycled once per eighth, quarter, half or whole note.
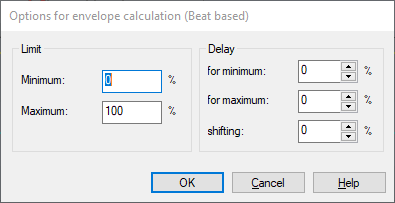
Click on Options to open an additional dialog to control the style and intensity of the influence of the beat on the automation curve.
-
Limitation determines the minimum and maximum value of the envelope.
-
Delay at minimum/maximum in %: Set here how long the maximum/minimum value is kept. This allows variations of the fundamental waveform, such as trapezoidal shapes for triangular waves or different pulse widths for square waves.
-
Shift in % shifts the entire curve in the beat grid.
Scan Envelope: Use this option to create an automation curve from the volume envelope of the track's objects.
Normalize first: This function normalizes the level of the audio object before the object is scanned to create an automation curve.
Generate curve points in selected range only: If this option is active, curve points are generated only in the selected range.
Copying and Pasting Automation Curves
The commands Copy, Paste and Paste in selected tracks in the Automation menu can be used to copy automation curves partially or completely and paste them into the same or other automation curves.
Copy copies the selected curve completely. When a range is selected, only the section of the curve in the range is copied. Curve points selected individually or by selection frame can also be copied and are considered as a copied range.
Paste inserts the copied curve points into a selected curve. This works both with the same curve in the track, a curve for the same parameter on another track and even with any other parameters.
The curve must be present and selected on the target track. So if you copy a volume curve from one track, then select another track and choose Paste, it will only work if you activate the volume curve on that track first. (Keyboard shortcut: Alt + K)
If the curve was copied completely (without range selection), it will completely replace the automation on the target curve. A copied curve range is pasted from the position of the play cursor.
With Paste in selected tracks you can transfer a copied curve to several other tracks simultaneously. The curve is always transferred to the same parameter in the target tracks. A corresponding automation curve must be present in the target track, otherwise no curve points will be inserted.
Other Menu Commands for Editing Automation Curves
-
Create new point at play cursor position: A new point is created on the curve at the playback position. It also opens the editor for the value and waveform.
Keyboard shortcut: Shift + A
-
Invert: The curve will be inverted. The smallest values become the largest and vice versa, so the curve is mirrored at the 50% line.
-
Thin out: When recording automation curves, the automation points are set at very small intervals. This function reduces the number of automation points, whereby the course of the automation is still accurately displayed and reproduced afterwards.
-
Thin out automatically: If this option is active, the command Thin out is automatically executed after each recording or drawing of automation curves.
-
Curve color…: Use the command to open the color selection dialog.This allows you to assign a different color to the active curve. The 16 colors shown below at Custom Colors correspond to the palette you can select in Color Mouse mode.
-
Logarithmic: This option lets you switch volume curves to logarithmic display. Thus the metric of the curve, i.e. the assignment of the curve height to the volume levels, corresponds better to the control behavior of real mixing consoles. When changing the display, you can optionally scale the values on the curve. This allows you to correct values that were drawn in the respective other display mode.
-
Delete: The selected automation curve will be deleted.
-
Delete all curves: All curves of all selected tracks
Converting Object to Track Automation and vice versa
With Convert track to object automation you transfer the volume or panorama automation in the track to selected objects, with Convert object to track automation vice versa the object automations to the track.
If automations already exist in affected objects or tracks, you will be asked whether you want to overwrite the existing automation curves or overlay them with the new curve. Overwrite replaces the curve, when overlaying the values of the curves are added. The initial curves in the track or object are set to 0, so that nothing changes in the resulting volume or panorama curve.
Moving Automation Curves with Objects
If you want to move objects on the timeline and move the automations to the new position as well, activate the Object mode Link curves to objects on the upper toolbar.
When moving objects, all curve points from the object start to the next object are now moved. When you move an object to the left, existing curve points before the object are deleted, they are also not restored when you move the object back. In the same way, when you move the curve to the right, the following curve points are deleted when you reach the next object.
If you want to keep these automations, do not move the object to the new position, but select it and copy it. Then place the play cursor at the desired target position and paste the object there.
If you have automated an effect on a track and move an object from that track to another track, the automations will be reassigned correctly there if the effect is also present on that track. If the effect is missing from the target track, such automations are cached in a hidden automation curve so that the automation curve can be reassigned once you move the object back to a track where the effect is present. Such curves are marked with ??? in the automation menu.
You can also create the effect on the target track afterwards. To reassign the automation, copy the "orphaned" curve, select the effect parameter in the Automation menu, and paste the curve.