Mouse Modes
Different mouse modes can be selected for working in the project window of Samplitude. Depending on the mode, the function of mouse-clicks in the project changes. For most tasks the default Universal Mode is sufficient but there are other mouse modes specifically for editing objects, ranges and automation curves.
|
|
The menu |

 next to the icon with the current mouse mode can be used to select the different mouse modes.
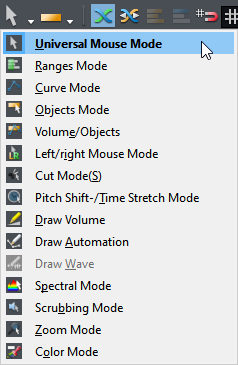
The various mouse modes can also be chosen through menu Edit > Mouse Mode. To open this selection menu anywhere in the project window, you can:
- Click and hold the right mouse button and then click the left mouse button or
- Press Shift + click right mouse button or
- Press Shift + Context menu key (next to the right Ctrl key).
 Universal Mode
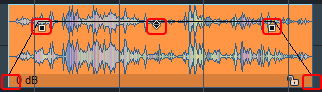
 This is the preset mouse mode for Samplitude. Depending on the click position within a track, left-clicking performs different functions. By clicking in the upper half you can mark areas and set the playback marker. In the lower half, objects can be selected and moved. Right-clicking opens a context menu.
Upper half of the track - ranges
-
Click: Set Play Cursor
-
Shift + click: Select a range between play cursor and click position
-
Shift + click outside of an existing range: Extend range to click position
-
Click and drag within existing range: Move range borders
-
Click and drag without existing range or outside of existing range: Select a range
-
Shift + click + drag within existing range: Move range
If you want to keep an existing range, move the play cursor by clicking above the track on the grid, not by clicking in the track.
Lower half of track - objects
-
Click on object: Select individual objects
-
Ctrl + click on object: Add single objects to selection
-
Shift + click on object: Add all objects between last selected object and clicked object to selection
-
Click between objects and drag to the right: Span a selection frame ("object lasso"), all objects touched by it are selected
-
Shift + click between objects and drag to the right: Span a selection frame, all objects touched by it are added to the existing selection.
-
Click between objects and drag to the left: Span a selection frame, all automation points touched by it are selected
-
Double click on object: Open the Object Editor.
-
Double-click between objects: Select all objects of the track.
-
Clicking on an object + dragging: Move an object, object selection or group of objects to the desired position.
-
Shift + click on an object + drag: Move objects with lock of horizontal (time) position, to move to another track.
-
Ctrl + click on an object + drag: Duplicate an object, object selection or group of objects and drag to the desired position.
Ctrl and Shift can be combined.
Object handles
|
|
Various object parameters can be set on the five object handles, which become visible on selected objects. When moving the mouse pointer over a handle, the mouse pointer changes shape to indicate the handle's function. |
-
Click on middle handle + drag up/down): Adjust the object volume. The exact value in dB is displayed in the tooltips. This also works with multiple selected objects and object groups.
-
Click Side handles (top) + drag right/left: Set the duration of object fade-in and fade-out. The duration can be adjusted more finely by additionally holding down Shift key. With additionally held Alt + key the fades of a multiple selection can be edited together.
-
Click Side handles (top) + drag up/down: Adjust the curve shape of the fade-in/fade-out.
-
Click on lower handles + drag to the right/left: Set the start and end position of the object. The position can be adjusted more finely by additionally holding down the Shift key.
For objects that are crossfaded with other objects (for example, the auto-crossfade that occurs when you split an object), you can also move the crossfade itself with the mouse. The handle for the start position of the rear object is located a little to the right of the crossfade.
Automation curves
For detailed information on automation curves, see the section Automation.
-
Double-click on automation curve: Create and delete (double-click again) curve points. Selected points can also be deleted by pressing the Del key.
-
Click on curve point: Selection of individual curve points.
-
Ctrl + Click on curve point: Add individual curve points to the selection.
-
Shift + click on curve point: Add all curve points between last selected curve point and clicked curve point to selection.
-
Clicking between objects and dragging to the left: Spans a selection frame ("curve lasso") for curve points, all curve points touched by it are selected.
-
Shift + click between objects and drag to the left: Spans a selection frame, all curve points touched by it are added to the existing selection.
-
Click on Curve Point + Drag: Move the selected curve points.
-
Shift + click on curve point + drag: Move the selected curve points only in the vertical direction, that is, the time positions are preserved.
Holding the Alt key in addition to this will move the curve points only horizontally. (So you'll be changing their positions and not their values).
-
Click on curve section + drag: Move the curve section. The curve points at the two ends of the section are selected and moved together.
-
Click on curve segment in range selection + drag: If there is a range selection, you can move the entire curve vertically with all existing points within the range limits by dragging on a curve segment. This creates two new curve points on the range edges.
-
Right-click on a curve point: Numerical editing of the value and definition of the curve shape For more information, see Editing automation curves
Range Mode
 The mouse functions of the Universal mode for the upper half of the track apply to the entire track in this mode. Thus, in this mode, only ranges and the playback marker can be manipulated. The Range mode therefore is a "safe mode" because objects or curve points cannot be moved accidentally.
Object Mode
 The mouse functions of the Universal mode for the lower half of the track apply to the entire track in this mode. In this mode, you can only edit objects and their start and end position, fade-in and fade-out phase, and object volume. The range selection is retained.
Curve Mode
 This mode is exclusively for editing automation curves.
-
Click on the curve: Creates a new point; a double-click or the Delete key deletes it.
-
Click next to the curve + drag: Selection frame for selecting multiple automation points.
-
Click on point: Selects point.
-
Ctrl + click on point: Adds point to selection.
-
Shift + click on a point: Selects all points between last selected point and clicked point.
-
Click on selected point + drag: Move all selected points.
-
Ctrl + click + drag a selected point: Move only the clicked point if multiple points are selected.
-
Right-click on a curve point: Numerical editing of the value and definition of the curve shape For more information, see Editing automation curves
-
Right-click: Context menu
Object/Curve Mode
 This mode is a combination of Object mode and Curve mode. In this mode, you can move objects and edit curves.
To move the play cursor or select ranges in this three modes (Object mode, Curve mode, Object/Curve mode), click or click and drag on the grid bar above the first track. To select ranges in the track, for example to delete or copy ranges, double-click the selected range in the grid bar.
Left/Right Mode
 This mode combines range and object editing, i.e. the functions of the Universal mouse mode on the upper and lower track halves in such a way that you use the left mouse button to access the functions for ranges, and the right mouse button to access those for objects.
In return, there is no context menu in the project window in this mode.
Cut Mode
 In this mode you can quickly split objects. Click on the object with the left mouse button to split it at the corresponding position. When the snap is active, it also affects the mouse pointer according to the snap settings.
In Program Settings > Keyboard/Menu/Mouse > Special Keys you can set a key to temporarily activate the cut mode.
Pitchshift/Timestretch Mode
 In this mode, you can change pitch and playback speed of objects, edit Tempo Markers
-
Click on middle object handle + drag: The pitch of the object can be changed in the range +/- 6 semitones. The pitchshifting algorithm used can be selected in the object editor.
-
Click on lower right object handle + drag: Change the length of the object by timestretching. The same time section (original length of the section in the audio file) can be lengthened or shortened by time-stretching, so the object will play faster or slower. The time-stretching algorithm used can be selected in the object editor.
-
Clicking into an object (upper half) sets a Warp Marker into the object.
-
Click + drag a Warp Marker: Move the Warp marker (upper half) or move the anchor point of the Warp Marker (lower half).
-
Shift + click on grid bar: Create tempo markers. By dragging vertically, you can set the tempo right away.
-
Shift + click on tempo maker + drag vertically: Set BPM of tempo marker.
-
Alt + click on grid bar: Create grid position markers.
-
Right-click: Context menu
Draw Volume Mode/Draw Automation Mode

 In these two modes you can draw automation curves with the left mouse button.
-
Click: Create a curve point on an existing curve.
-
Click + drag: Freehand drawing function for automation curves.
-
Shift + Click + Drag: Create a straight line starting from the previous curve point.
-
Right-click on a curve point: Numerical editing of the value and definition of the curve shape For more information, see Editing automation curves
-
Right-click: Context menu
For the most part, the modes have the same function: They work identically when drawing in Automation lanes. But when the automation curves are displayed in the track, the Draw automation mode edits the active curve and, if Show all curves (selectable) is active, the clicked curve. However, in Draw volume mode, the volume curve is always edited, regardless of which curve is displayed.
Draw Wave Mode
 If you are destructively editing audio files, you can draw directly in the waveform of a file in this mouse mode. The display of the waveform changes to a suitable zoom level. This is particularly suitable for manually removing very short interference pulses.
Spectral Mode
 With the Spectral mode you can remove noise from an object directly in the project window.
To be able to work particularly effectively with the spectral mode, set the option Spectral display for the project display.
The audio material is represented in the spectral display by a spectrogram that shows the frequency components over time. The volume of frequencies is visualized via a color code or via its brightness.
Audible distortion that is louder than the desired signal are usually limited to a certain frequency spectrum. They are highlighted with colors in the spectrogram. A continuous sound is displayed by a pattern consisting of horizontal lines, which correspond to the sound components (overtones) of the sound. An impulse-like noise becomes recognizable as a vertical spike.
Select the noise by clicking in the spectrum and dragging a rectangle around it. With the handles you can still adjust the selection rectangle afterwards.
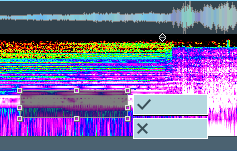
To avoid an audible gap, extracted components of the original frequency spectrum are interpolated from the audio material surrounding the noise. Confirm the correction by clicking the button with the checkmark.
You can also edit the left and right channels of the signal separately by activating the option Stereo in 2 waveforms in the Project display options (keyboard shortcut: Shift + Tab) > Object and then dragging the selection rectangle accordingly only over the upper or lower part of the spectrogram.
Scrubbing Mode (Pre-Listening)
 This mouse mode enables you to monitor and control the playback speed. In this case, the project can be played back in a forward or reverse scrubbing direction.
-
Left click: Pre-listen with play speed control.
-
Right-click: Context menu
Zoom Mode
 Use the right mouse button to zoom out of the project, and the left mouse button to zoom in.
-
Left click: Zoom in
-
Right click: Zoom out
-
Click + drag : Zoom in selected area (horizontal)
-
Shift + click + drag: Zoom in selected area (vertical)
There's an option in Program Settings > Keyboard/Menu/Mouse > Mouseby which you can zoom horizontally and vertically via selection frame even without the Shift key.
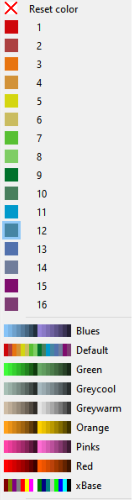
Color Mode
 Color mode enables you to color objects or entire tracks. After selecting the color mode, open the mouse modes menu again, in the lower part of the menu you can now select a color. Further down in the menu there are other color palettes to choose from. Click on a color palette to replace the colors in the menu with those of the selected color palette.
|
|
If you do not like the default color selection, you can change individual colors. At the very bottom of the menu, choose Select your own color... and open the Colors dialog. There you can change any of the 16 available colors. With Create new color palette... you can save the colors together in a new palette, which can then also be selected in the menu. |
Temporarily Switching to Other Mouse Modes
By pressing and holding certain keys, you can temporarily switch to another mouse mode. This way you can combine several modes without much clicking.
In the Program settings in the section Keyboard/menu/mouse, under Special keys, you can specify other keys for switching or set additional temporary key functions for switching mouse modes.
. (Dot): Temporary change to Object mode. As long as you keep the button pressed, you can select objects and edit them with the handles. This button is useful in the Draw Automation mode, in the Range mode and in the Cut mode, in which you cannot otherwise access the objects that quickly.
- (hyphen): Temporary change to curve mode. As long as you keep the key pressed, you can edit automation curves in curve mode. For example, you can work in Universal mode and use the slightly different editing options of Curve mode at the touch of a button.
You can also specify a second key for switching to Draw automation mode and then be even more flexible.
Insert/Number Pad 0: This key is assigned twice, so it works independently of the status of the NumLock key. It allows you to temporarily activate scrub mode and thus move around in the arrangement by clicking.
Z key: Temporary change to Zoom mode. Then you can zoom in by left-clicking and zoom out by right-clicking.
Not defined by default, but available are also a toggle switch for scrub mode (i.e. scrub mode remains active until the key is pressed again) as well as keys for the Draw automation mode and the Cut mode.