Object Effects
The FX view contains all the settings for the object effects.

In addition to the effects in the tracks and in the master channel of the mixer, you can also apply effects in audio objects. This allows you to selectively apply effects that you only need at a certain point in the arrangement, and you don't have to set up an extra track for an AUX send effect or automate a track effect for it.
The effects " stick to" the objects, therefore all settings are preserved when moving or copying the objects. Even if you split an object, the new object inherits all the effects of the original object.
It is also possible to use the object effects via the Effects menu or via the context menu on the object.
Level and pan of the object as well as the volume controls in the track are calculated by default after the object effects.
The dialog is divided into different sections (Gain, AUX, Plug-ins, EQ, Pan, Vol, Automation). Some of the sections have a menu  . From this menu you can:
-
copy the settings of the section and paste them into the same section of another object,
-
reset the settings of the section and
-
apply the settings of the section to all selected objects.
For transferring all settings to the other selected objects, see Apply to all
Gain and AUX Sends
Gain: Here you can set the gain for the object.
If you normalize an object with a very low level, the volume fader in the object is at its maximum value after that and the object volume can no longer be changed so easily with the fader. In such cases, it is a good idea to enter the numerical value from the object volume at Gain (simply by copying and pasting) and set the object volume to 0.
AUX sends: AUX sends 1-4 are displayed in the object editor. Use the respective slider to set the send level.
Object AUX sends are fixed to Post, i.e. after volume and pan, you cannot change this position.
Any object can send to all available AUX busses. Right-click the small rectangular button in the header to open the extended AUX Send dialog where you can edit all AUX Send paths. Click this button on the left to bypass all AUX sends (bypass function).
Plug-ins and EQ
Use the Plug-in section to apply effect plug-ins to objects.
Clicking on the empty insert slot opens the plug-in browser, where you can load a plug-in to the slot. Click on an occupied slot to activate/deactivate the plug-in. Right-clicking on the slot opens the plug-in's interface. In the menu at the insert slot you reach further functions, e.g. you can open the plug-in browser again to exchange or remove the plug-in.
The Plug-ins button at the top turns all effects in the respective effect chain on and off. A visual indicator (*) for plug-ins shows that they were previously active and will be reactivated the next time the Plug-ins button is clicked. The order of the plug-ins can be changed by dragging and dropping a filled slot to another position.
The FX button opens a simplified Effect routing dialog for changing the plug-in order. Use the menu next to the "FX" button to save or load object effect settings to a file.
The button Offline FX opens a menu that contains roughly the same entries as the menu Effects in the main menu, with the difference that here the effects are applied offline to the object's audio file. It is also possible to edit either the left or right channels individually.
At EQ you can directly adjust four frequency bands of the EQ116 Parametric Equalizer using the rotary controls. By clicking the small rectangular button in the header you switch the equalizer on/off. Right-click on the knobs or the button to open the interface of the EQ116, where you can edit all frequency bands.
Pan
Here you can edit the panorama position as well as the stereo width.
If surround busses or masters are present in the project, additional panels appear that let you apply track-based or object-based surround panning.
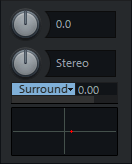
Right-click in the surround panorama box below to open the Surround editor.
Vol
Vol.: The volume can be controlled using this fader. Double-clicking on the fader sets it back to 0 dB.
Norm.: normalizes the maximum level of the object to 0dB.
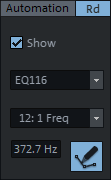
Automation
| Here you can configure settings for object automation. Select the parameter to be automated in the menus. Use the Show option to make the parameter's automation curve visible in the objects. Activate the Draw automation mode button and draw the object automation curve into the object. More information on object automation can be found in the section Automation |