The Batch Converter
If you routinely perform similar processing on multiple files, a batch job can combine multiple, time-consuming steps into a single process.
You create as well as perform batch jobs in the Batch Converter dialog window.
Creating or Editing a Batch Job
-
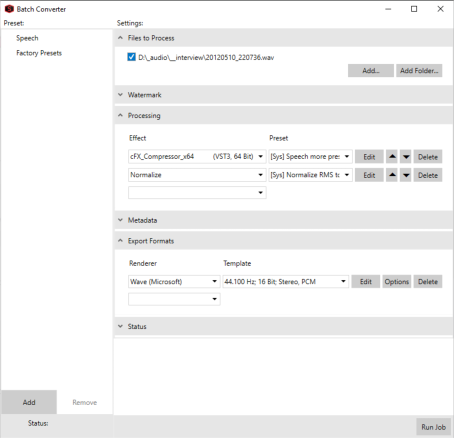
From the Tools menu, choose Batch Converter. The Batch Converter window is displayed.
-
Select the Processing settings you want to apply.
-
Choose a plug-in from the Effect drop-down list to add it to the end of the list.
-
Choose a preset from the Preset drop-down list.
-
Click Edit to open the the plug-in dialog to further adjust the effect. For more information about an individual effect's settings, click the Help button in the plug-in window.
-
Repeat these as needed to create your effects list.
-
If you need to change an effect's position in the list, select it and click the Move Up or Move Down button
 .
.
-
-
Metadata: Type values for any metadata (file information) you want to save in the output files.
-
If the Overwrite check box is not selected and the destination file already includes information for a metadata item, the existing information is preserved (keywords, however, will be appended).
-
If the Overwrite check box is selected and the destination file already includes information for a metadata item, the existing information is overwritten with the information from the Metadata entry (existing information will be erased if the box is blank).
NOTE If a metadata type is not supported by the output format, it will be ignored.
-
-
Watermark: Here you can select a watermarking file that is mixed with the output file.
-
Export Formats: Choose a file type from the Renderer drop-down list if you want to convert your files to a new format.
Choose a setting from the Template drop-down list to choose the parameters that will be used for rendering your file, or click Edit to create a custom template. »For more information, see Custom File Templates.
You can export the files to multiple output formats at once. After adding an output format, another drop-down menu appears to add another output format. Delete output renderers with the Delete button.
TIP For any output format, choose Default Template to preserve the source file's format (sample rate, bit-depth, and number of channels) in the output file.
Click Options to adjust file location and naming:
-
Export Location: Select a radio button to indicate where you want to save the files
Item
Description
Same as source
Select this radio button if you want to save the converted files using the same name as the original files.
Save files to
Select this radio button and type a path in the edit box (or click Browse to select a folder with an explorer window) if you want to save the files in a specific folder.
You can select the Preserve source subfolders check box if you want to use the same folder structure in your source and target files.
For example, if you have
C:\audio\folder_a\1.wav
C:\audio\folder_b\2.wav
C:\audio\3.wav
and export to D:\export, then it should look like this:
D:\export\folder_a\1.wav
D:\export\folder_b\2.wav
D:\export\3.wav
Note that the "\audio" part of the file path is not taken over, because all files have it in common.
-
File Naming: Select a radio button to choose the naming scheme you want to use for exported files.
Item
Description
Same as source
Select this radio button if you want to save a file using the same name as the original file.
Append to name
Select this radio button and type text in the box if you want to add a suffix to the file names of saved files.
The text you enter will be added to the original file name during conversion For example, if your source file is C:\Audio\DoorSlam.wav, the file could be saved as C:\Audio\DoorSlam-processed.wav during conversion.
-
-
When everything is set, click Add in the lower left corner of the dialog to add your preset to the preset menu. The New Preset dialog window opens.
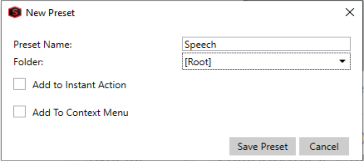
Give your preset a descriptive name and optionally choose a folder (see below) where the preset should be stored.
-
The Preset is now available in the list on the left side of the dialog.
To delete a preset, right click it and choose Delete Preset.
NOTE You cannot edit an existing preset. To change a preset, load it by clicking on it, delete it, make your changes and save it again
Folders: The preset list can contain folders where you can save presets together, for instance for a specific purpose.
NOTE One folder Factory Presets is already there, containing the factory presets supplied with the program.
-
To create a folder, right click on the list and choose Create New Folder....
-
To remove a folder, right click it and choose Remove Folder.
-
Process files using the Batch Converter
-
From the Tools menu, choose Batch Converter. The Batch Converter window is displayed.
-
The available Batch Converter Presets are listed on the left side of the Batch Converter dialog. To load a preset, just click on it, the Settings on the left side are immediately updated with the contents of the preset.
-
Add the files you want to process in the Files to Process section on top of the settings. All data windows that were open in the Sound Forge Pro workspace when you started the Batch Converter are automatically included in the list. You can un-check specific files to exclude them from processing.
Click the Add button, browse to a file, and click the Open button to add individual files. (Multiple selection of files with Ctrl or Shift + Click are supported).
Click the Add Folder button to add all files within a folder.
NOTE Only the contents of the folder you select are added; subfolders are not included.
-
Click the Run Job button to start processing. After you click the button, you can monitor the progress of your batch job in the Status section.
Adding Batch Jobs to the Instant Action window or Windows Explorer context menu
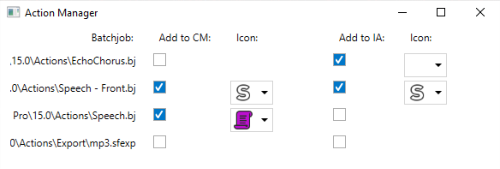
You can add any Batch preset as a button in the Instant Action window or as a Windows Explorer context menu entry.
Add to Instant Action: Check this option, when you want to have the batch job as an Instant Action available. You can the choose an icon from the drop-down menu that is shown in the Instant Action window for this job.
Add to Context Menu: Check this option to add the job to the context menu of any audio file in the Windows Explorer. As with Instant actions, you can add an icon that is used in the context menu. The custom context menu entries are available in the Sound Forge Pro 2026 Custom Actions context menu.
|
|
This button from the User Entries section of the Instant Actions window opens the Action Manager, where you can set for each batch job whether it is available in the Instant Actions window and/or in the context menu. |

Last modified on March 23, 2026
Was this page helpful?
What did you particularly like about this page?
What did you dislike about this page?
Thank you for your feedback.