You can set up recording to begin automatically from the selected input device using a timer,by detecting
when audio exceeds a set threshold, or when MIDI timecode is detected.
When you're using threshold-triggered recording, you can choose to record
continuously: set a buffer size, and the recorded audio will fill the
buffer, discarding the oldest data as new data is recorded. If you want
to save data from the buffer, you can save it to disk.
When
recording automatically, you can use the Record
button to manually begin recording. Automatic recording
settings will then be used to determine when recording ends.
The maximum number of channels recorded depends on the data window
where you're recording. For example, if you enabled six inputs on the
Record tab in Audio
Preferences, you need to record into a six-channel data window to
record all six inputs. If you record to a stereo data window, only two
inputs will be recorded. To choose your recording input, use the Audio
tab in the Preferences dialog or click a channel number in the Record
Options window and choose a new input port from the menu.
From the View menu, choose
Record Options.
The Record Options window is displayed.
Use the Record Options window
to set the audio levels at which recording will start and stop:
From the Method
drop-down list, choose Automatic:
Threshold.
Choose a setting from the Mode drop-down list
to choose whether to create regions or record to a new window when recording
is suspended and resumed. For more information, please see Recording
Options.
Click the
Settings button. The Threshold Settings
tab in the Record Settings dialog is displayed.
Drag the Threshold
fader to set the audio level at which recording will begin.
Drag the Release
slider to set the amount of time the audio level should be below the Threshold setting before
recording will stop.
Select the Automatically
rearm after record check box if you want to continue monitoring
audio levels and recording until you click the Stop
button .
Click OK to close the Record Settings
dialog.
Click the Arm button
in the data window where you want to record. The Record
status value in the Record Options window indicates that recording
is armed, and the meters in the Record Options window monitor the level
from your recording input. Recording will begin when the audio signal meets the threshold level
and will stop after the level falls below the threshold for the specified
release time. recording begins at the cursor position,
and the Time Display window and the data
window's selection status bar will show the current record position. If the destination window contains a selection that is shorter than
the timer duration, recording will stop at the end of the selection. If
the destination window contains a selection that is longer than the timer
duration, recording will stop at the end of the timer duration.
During recording, playback commands, the Preferences dialog,
and commands that affect the recording data window are unavailable.
From the Options menu, choose MIDI In/Out, and then
choose Trigger from MIDI
Timecode from the submenu.
From the View menu,
choose Record Options.
The Record Options window is displayed.
Use the Record Options window
to set the MIDI timecode interval you want to record:
From the Method
drop-down list, choose Automatic:
MIDI Timecode.
Choose
a setting from the Mode
drop-down list to choose whether to create regions or record to a new
window when recording is suspended and resumed. For more information,
please see Recording Options.
Click the
Settings button. The MIDI Timecode
Settings tab in the Record Settings dialog is displayed.
From the Input
drop-down list, choose the trigger device. Changing the setting here will
also update the Input setting on the MIDI/Sync
tab in the Preferences dialog.
Select the Timecode
start check box and type a value in the edit box to indicate the
timecode location when recording will begin.
Select the Timecode
stop check box and type a value in the edit box to indicate the
timecode location when recording will end. If you don't indicate a stop
time, recording will continue until you click the Stop
button .
Select the Bound
record length on timecode loss check box if you want to prevent
recording beyond the specified end time. This ensures that your record
length is exact regardless of any inaccurate timecode.
Click OK to close the Record Settings
dialog.
Click the Arm button
in the data window where you want to record. The Record
status value in the Record Options window indicates the timecode
when recording will begin, and the meters in the Record Options window
monitor the level from your recording input. Recording will begin when Sound Forge Pro detects the specified Timecode start value
and will stop at the specified Timecode
stop value. Recording begins at the cursor position, and the Time Display window and the data window's
selection status bar will show the current record position. If the destination window contains a selection that is shorter than
the specified timecode range, recording will stop at the end of the selection.
If the destination window contains a selection that is longer than the
timecode duration, recording will stop at the Timecode
stop value.
During recording, playback commands, the Preferences dialog,
and commands that affect the recording data window are unavailable.
From the View menu, choose
Record Options.
The Record Options window is displayed.
Use the Record Options window
to specify when you want to record:
From the Method
drop-down list, choose Automatic:
Time.
Choose
a setting from the Mode
drop-down list to choose whether to create regions or record to a new
window when recording is suspended and resumed. For more information,
please see Recording Options.
Click the
Settings button. The Time Settings
tab in the Record Settings dialog is displayed.
Click the Add
button to create a timer setting (or click the Edit button
to edit an existing setting). The Record Timer Event dialog is displayed.
TIP
Tips:
If you want to remove a
timer setting, select it and click the Delete
button .
If you want to remove all past timer
settings, click the Remove
All Past Events from List button .
Type a name in the Name box to create
a name to identify the preset.
Choose a setting from the Recurrence drop-down
list to indicate whether you want to record one time only or repeat the
timed recording at a regular interval.
Use the Start
date, Start time, and Duration boxes to indicate when you want
to start and stop recording.
Click OK to close the Record
Timer Event dialog.
Click OK to close the Record
Options dialog.
Click the Arm button
in the data window where you want to record. The Record
status value in the Record Options window will display a countdown
to show you when recording will begin.
When the timer is activated, recording begins at the cursor position,
and the Time Display window and the data
window's selection status bar will show the current record position.
If the destination window contains a selection that is shorter than
the timer duration, recording will stop at the end of the selection. If
the destination window contains a selection that is longer than the timer
duration, recording will stop at the end of the timer duration.
During recording, playback commands, the Preferences dialog,
and commands that affect the recording data window are unavailable.
 to manually begin recording. Automatic recording
settings will then be used to determine when recording ends.
to manually begin recording. Automatic recording
settings will then be used to determine when recording ends.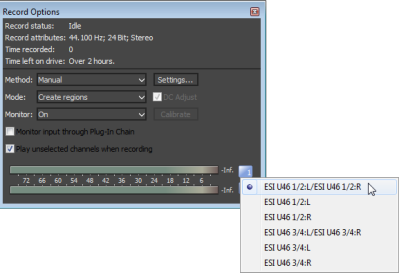

 .
. in the data window where you want to record. The
  to create a timer setting (or click the
  to edit an existing setting). The Record Timer Event dialog is displayed.
 .
. .
.