Recording Multichannel Audio
If you have an audio device that supports multiple inputs, you can use Sound Forge Pro to perform multichannel recording.
Tips:
-
Sound Forge Pro is not a multitrack editor check out our Vegas and Acid family of products for full multitrack recording and editing. You can use multichannel recording to create surround audio or capture field recordings.—
-
If you experience gapping or glitching when recording multichannel audio, try increasing your buffer size. You can increase the Record buffering setting on the Audio tab of the Preferences dialog or click the Advanced button on the Audio tab of the Preferences dialog to increase your device's buffers.
-
Connect your audio sources to your sound card's inputs. For more information, please see Recording Setup.
-
Enable your recording inputs:
-
From the Options menu, choose Preferences, and click the Audio tab.
-
Choose your recording device from the Audio device type drop-down list.
-
Click the Record tab.
-
Select the Enable check box for each input you want to enable for recording, and then select a radio button to assign the input to an audio channel.
In the following example, the signal from Analog in 1 is recorded to channel 1, Analog In 2 is recorded to channel 2.
-
Click OK to close the Preferences dialog and save your changes.
-
-
Verify that your recording mode is set to Manual.
-
From the View menu, choose Record Options. The Record Options window is displayed.
-
From the Method drop-down list, choose Manual.
-
If you want to set up pre-roll, post-roll, or a prerecord buffer, click the Settings button. For more information about other recording modes and methods, please see Recording Options.
-
-
Create a data window for your recording:
-
From the File menu, choose New.
-
Choose a sample rate from the Sample rate drop-down list.
-
Choose a setting from the Bit depth drop-down list to specify the number of bits that should be used to store each sample.
-
Choose a setting from the Channels field to specify the number of channels that will be used in the window.
-
Choose a channel configuration in the Layout drop-down menu. Depending on the number of channels, common layouts for the number of channels are offered, e.g. 5.1 Surround for 6 channels. The channels will then be named accordingly in the data window (i.e. instead of 1...6 as L(eft), R(ight), C(enter)...) and treated accordingly when multi-channel capable effect processing is used.
NOTE The first option Discrete #<number of channels> corresponds to the old configuration where the channels are simply numbered and treated the same.
-
Click OK. A new, untitled sound file is created.
TIP The maximum number of channels recorded depends on the data window where you're recording. For example, if you enabled six inputs on the Record tab in Audio Preferences, you need to record into a six-channel data window to record all six inputs. If you record to a stereo data window, only two inputs will be recorded.
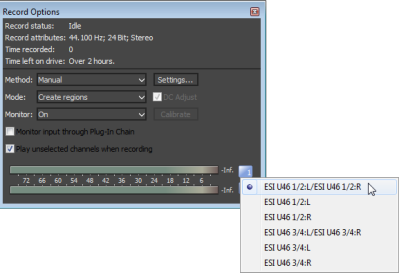
To choose your recording input, use the Audio tab in the Preferences dialog or click a channel number in the Record Options window and choose a new input port from the menu.
-
-
Select the sound data you want to replace, or click to position the cursor where you want to begin recording.
TIP If you want to check your input levels before or during recording, you can use the meters. The peak meters represent the volume of the recording input. For best results, the peak level should be somewhere in the yellow range with an occasional red segment: you want your input to be as loud as possible without clipping.
-
Click the Arm button
 if you want to begin recording as soon as possible after clicking the
Record button
if you want to begin recording as soon as possible after clicking the
Record button
 . The Arm button
is optional, but can allow for more accurate takes. When you click Arm, the wave device
is opened and all recording buffers are loaded in order to minimize the
amount of time between clicking the Record
button and when recording starts.
. The Arm button
is optional, but can allow for more accurate takes. When you click Arm, the wave device
is opened and all recording buffers are loaded in order to minimize the
amount of time between clicking the Record
button and when recording starts. -
Click the Record button
(or press Ctrl+R). Recording begins,
and the Time Display window and the data
window's selection status bar will show the current record position.During recording, playback commands, the Preferences dialog, and commands that affect the recording data window are unavailable.
-
Recording will stop automatically at the end of the selection. If you're recording without a selection, existing data is overwritten during recording, and you can click the Record
or Stop
button  to end recording.
 Clicking Pause
 suspends recording, clearing the selection and moving the cursor to the
end of the recorded data. When you pause recording, the recording device
remains armed.
suspends recording, clearing the selection and moving the cursor to the
end of the recorded data. When you pause recording, the recording device
remains armed.
Last modified on April 29, 2026
Was this page helpful?
What did you particularly like about this page?
What did you dislike about this page?
Thank you for your feedback.