Recording
For a quick start, Samplitude is already set up " from factory " so that a recording can be made immediately:
|
|
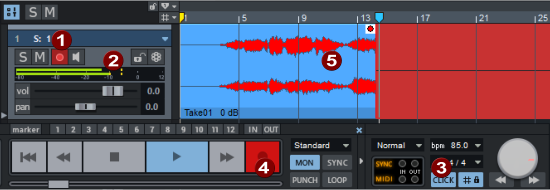
Arm the tracks to be recorded to for recording by activating the red record button. |
|
|
By default, monitoring is active, you should now already be able to hear the input signal through the track and the track peak meter should show the level of the input signal. Note: You control the input level with the mixer application of the audio hardware or directly at the audio hardware. The track volume control is used to set the playback or monitoring volume and not the input level. |
|
|
If you want to play at a certain tempo by metronome, set the tempo in the transport console and activate the button CLICK. |
|
|
Start recording with the keyboard shortcut R or click on the Record button of the transport console. |
|
|
The recording will start and you can immediately see the recorded audio on the track. Clicking Record or Stop again ends the recording. In the subsequent query, you can decide whether to keep or discard the recording. |


The play cursor is returned to its starting position. You can now use the recording or record another take at the same place.

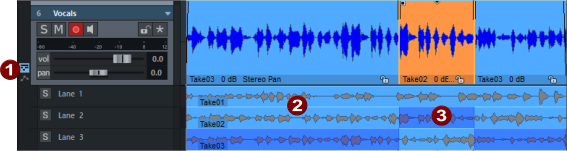
The existing object is overwritten by the recording, but the previously recorded material is still available in the project. After the recordings, there is an object in the track that references all the recording takes. You can manage the different take lanes via
|
|
Select the object on the lane and open the take lanes with the icon on the lane header. All recording takes are displayed under the object. |
|
|
Click a take to use that take for the object. |
|
|
Click and drag over a take to use a section from this take to combine the different recording takes. |
For multitrack recordings, the takes on all tracks will be exchanged accordingly if you leave the recorded objects grouped after recording as preset.
You can now use the object handles or the
To tailor the recording function to your needs, you can customize the following:
-
Input routing: There are controls in the mixer, track header and track editor for assigning recording devices to tracks. In the dialogs Track Settings
-
For monitoring, i.e. the playing of the input signal during recording, there are a number of different monitoring modes for the audio engine, which can be used to configure monitoring for the playback of tracks with effects.
-
Mono/Stereo: Recordings can be made in mono or stereo files. This means you can record stereo signals into either two mono tracks or one stereo track. You can use the routing functions in the Mixer Settings dialog to adjust several tracks or the entire project accordingly and make the necessary pan settings.
-
Files: You set the default folder for projects in Program Preferences > Program > General. The recorded audio files are saved next to the project file in the project folder in the form
project name_track number. wav. As long as you do your production entirely within Samplitude, you can leave these names on the default defaults. If you want to use the recorded raw material elsewhere or pass it on, you have the option of naming these files according to specific naming schemes for better identification. -
In the Record Options dialog you can specify a different file format for the files and set other options for recording. For even more settings for recording, see Program Preferences > System Options > Recording.
In this section