Channel Strips
Each mixer channel corresponds to one track in the project. Accordingly, you will find all the setting options in the channel that you also find in the track editor or in the track header. Each channel strip is divided into different sections, which can be opened and closed individually by clicking on the corresponding arrow symbol.
If the mixer window height is too small, only the section names will be displayed instead. They can then be opened accordingly by clicking on the name.
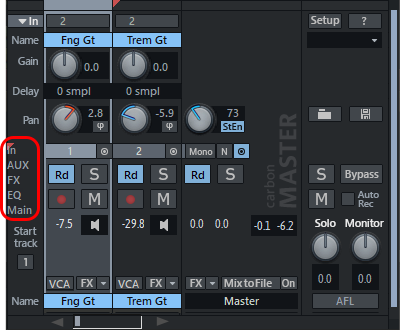
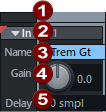
In (Input)
|
|
|
Field for selecting the track. Drag the field to rearrange tracks. |
|
|
In: Shows the input(s) for recording on the track. Clicking opens a menu with settings for recording, see Input and output assignment. |
|
|
|
Track name: Shows the name of the track. Double-click the field to edit the name. |
|
|
|
Gain: Controls input amplification for the channel. |
|
|
|
Delay: Track delay. For more information, see Track settings. Right-click to select the time display format used. |


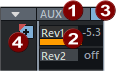
AUX Sends/Outputs/Side Chains
|
|
Via right-click menu you can reach the AUX sends dialog, furthermore the whole section can be switched to display the outputs or sidechain sends. |
|
|
The sliders can be used to set the AUX send values for different AUX buses. Drag an unnamed control to create a new AUX bus. A left click on the slider deactivates the AUX send. By right-clicking on the fader, you can switch the function of the fader between Pre/Post/ |
|
|
Bypass indicator/switch. Left click on AUX or this button disables all AUX send signals. |
|
|
The + opens a menu that lets you choose the number of displayed send controls. |
Plug-ins
|
|
|
The Plug-ins button at the top turns all effects in the channel on and off. A visual indicator (*) for plug-ins shows that they were previously active and will be activated again the next time you press the Plug-ins button. |
|
|
A mouse click on an empty insert slot opens the plug-in browser, via which you load a plug-in into the slot. Click on an occupied slot to activate/deactivate the plug-in. Right-clicking on the slot opens the plug-in's interface. VST instruments whose output signal is routed to the track are also displayed in the plug-in slot, indicated by a preceding + symbol |
|
|
|
The arrow next to the respective insert slot opens a menu with various functions: For example, you can reopen the plug-in browser to exchange the plug-in or remove the plug-in. |
|
|
|
The + opens a menu that lets you choose the number of displayed plug-in slots. |

Equalizer
|
|
|
This section allows you direct access to the parametric equalizer |
|
|
Using the menu with click on EQ you can, among other things, copy EQ settings and paste them into the EQ on other tracks. |
|
|
|
Use the knobs to adjust the gain of the 4 bands. Right-click on one of the knobs to display the EQ dialog where you can make more detailed settings. |
|
|
|
In the number fields you can edit gain and frequency of the respective band numerically. |

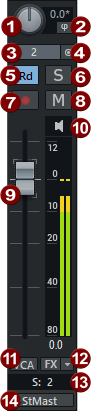
Main
Here you will find the most important controls of the track. If the track is a bus, this area is displayed in a slightly different color.
|
|
|
Panorama: This adjusts the signal placement in the stereo panorama. The settings of the knob have a different effect on mono and stereo tracks. In a mono track, depending on the control setting you can place the signal more left or right in the stereo panorama. In contrast, in stereo tracks, this lets you control the balance between the left and right channel. |
|
|
Beside the panorama dial, you'll also find a switch to reverse the phase.
|
|
|
|
Track number |
|
|
|
Link: This button |
 If the track is routed to a
  links the channel to the one to the right. All faders, panorama, input, AUX sends, as well as EQ settings and adjustments now affect both channels.
 |
|
Automation mode: Left-click to quickly switch the automation mode between Right-click to access all automation modes. For detailed information on automation, refer to the chapter "Automation". |
|
|
Solo: The Solo button mutes all channels except the soloed channels. Keyboard shortcut: Alt + S A more specific Solo button behavior can be set by right-clicking on it:
Various global solo modes can also be set in the menu, see Global Solo Modes. |
|
|
Record: This button activates the track for recording. Right-click to set the recording mode and track inputs. |
|
|
Mute: The Mute button mutes the selected channel. Keyboard shortcut: Alt + M A more specific Mute button behavior can be set by right-clicking on it:
|
|
|
Volume: Controls the level of the track. Note: The volume control has a maximum value of +12dB. You can set higher values by entering them numerically. To do this, double-click on the volume value display below the peak meter and enter the desired value. |
|
|
Monitoring: By clicking this button you activate the monitoring function. The signal fed to the input is passed on to the output. For more details on monitoring, see Monitoring Settings. |
|
|
VCA: This button opens the VCA menu for the channel. There you set the fader as VCA master or assign the fader to a VCA group, see VCA-Groups. |
|
|
FX: This button opens the effect routing dialog for the respective track, which you use, among other things, to specify the effect order in which the effects are applied. Right-click the button or click the arrow to open a context menu where you can load preset effect settings. You can also copy, paste, reset, save or load track effect settings here. |
|
|
Track name: Shows the name of the track. Double-click the field to edit the name. |
|
|
Out: Sets the output for the channel. See Input and output assignment |


