Creating a New Recording

After you've connected an audio source and verified your recording setup, you're ready to start recording audio.

When you click the Arm or Record button when no data windows are open, Sound Forge Pro creates a new window 
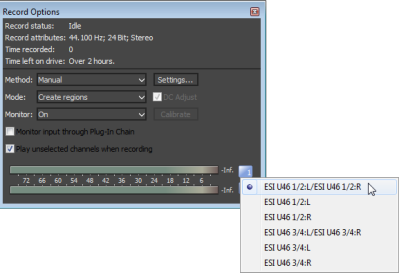
automatically using the last-used new window settings. When Create new windows is selected in the Mode drop-down list in the Record Options window, a new window appears each time you start recording.

If you want to record into an existing sound file, please see Recording into an Existing Sound File.

TIP You can use the Stereo Recording window layout to optimize the Sound Forge Pro interface for recording.

The maximum number of channels recorded depends on the data window where you're recording. For example, if you enabled six inputs on the Record tab in Audio Preferences, you need to record into a six-channel data window to record all six inputs. If you record to a stereo data window, only two inputs will be recorded.

To choose your recording input, use the Audio tab in the Preferences dialog or click a channel number in the Record Options window and choose a new input port from the menu.

Create a recordingClosed

  1. Verify that your recording method is set to Manual.

  2. From the View menu, choose Record Options. The Record Options window is displayed.

  3. From the Method drop-down list, choose Manual.

  4. If you want to set up pre-roll, post-roll, or a prerecord buffer, click the Settings button. For more information, see "Set up pre- and post-roll" or "Set a prerecord buffer" in this help topic.

  5. Use one of the following methods to create a new window:

    • Choose File > New.

    • When you click the Arm or Record button when no data windows are open, Sound Forge Pro creates a new window automatically using the last-used new window settings.

    • When Create new windows is selected in the Mode drop-down list in the Record Options window, a new window is each time you start recording.

  6. Click the Record button to start recording. During recording, the Time Display window and the data window's selection status bar will show the current record position.

    During recording, playback commands, the Preferences dialog, and commands that affect the recording data window are unavailable.

  7. Click the Record or Stop button to end recording, or click the Pause button to suspend recording and leave the recording device armed.

NOTE By default, the cursor goes back to where the recording started after it ends. You can change this by unchecking the Option Rewind cursor position after recording in the Preferences window > General tabGeneral Preferences

Set up pre- and post-roll Closed

Using pre- and post-roll can help you when recording voiceovers or overdubs:

  • When you're performing punch-and-roll recording from the cursor, pre-roll allows you to hear the material before the cursor position.

  • When you're recording into a selection, pre- and post-roll allow you to hear the material before and after the selection.

  1. From the View menu, choose Record Options. The Record Options window is displayed.

  2. From the Method drop-down list, choose Manual.

  3. Click the Settings button in the Record Options window.

  4. Select the Pre-roll check box and type a value in the edit box to set the amount of time before the cursor (or selection) that you want to play when recording.

  5. Select the Post-roll check box and type a value in the edit box to set the amount of time after the selection that you want to play when recording into a selection.

  6. Click the OK button.
    When performing punch-in recording, recording occurs underneath the pre- and post-roll. If your subject starts early, for example, you can adjust the event to uncover the recording. You can use the Event Tool to slip or trim the edges of the recorded event to expose the recorded pre- and post-roll. For more information, please see Slipping and Trimming Events.
    During recording, the Record status value in the Record Options window indicates that recording is armed, in pre-roll, recording, or in post-roll. The meters in the Record Options dialog monitor the level from your recording input.

Set a prerecord buffer Closed

A prerecording buffer helps to ensure you won't miss a perfect take when you're recording. When the prerecording buffer is enabled, sound data is written continuously to the buffer after you click the Arm button . When you start recording, the sound data in the buffer is committed to disk.

After you finish recording, the buffer is not displayed in the window, but you can use the Event Tool to slip or trim the left edge of the recorded event to expose the buffer. For more information, please see Slipping and Trimming Events.

  1. From the View menu, choose Record Options. The Record Options window is displayed.

  2. From the Method drop-down list, choose Manual.

  3. Click the Settings button in the Record Options window.

  4. Select the Prerecord buffer check box and type a value in the edit box to set the duration of the buffer.

  5. Click the OK button.

Review recorded takes Closed

Click the Play button to review your recording. Click the Stop button to end playback.